Ir para o conteúdo principal

Huawei Honor 10 Screen Replacement

O que você precisa

  1. Huawei Honor 10 Screen Replacement, Rear Glass: passo 1, imagem 1 %32
    • Before you begin, switch off your phone.

    • Apply a heated iOpener to a long edge of the phone to loosen the adhesive beneath the rear glass. Apply the iOpener for at least two minutes.

  2. Huawei Honor 10 Screen Replacement: passo 2, imagem 1 %32 Huawei Honor 10 Screen Replacement: passo 2, imagem 2 %32 Huawei Honor 10 Screen Replacement: passo 2, imagem 3 %32
    • If the phone's rear glass is cracked, the suction cup may not stick. Try lifting it with strong tape, or superglue the suction cup in place and allow it to cure so you can proceed.

    • Press a suction cup onto the back cover.

    • Lift the back cover's right edge with your suction cup, opening a slight gap between the back cover and the frame.

    • Insert the tip of an opening pick in the gap you created and slide it to the bottom right corner.

  3. Huawei Honor 10 Screen Replacement: passo 3, imagem 1 %32 Huawei Honor 10 Screen Replacement: passo 3, imagem 2 %32
    • Apply more heat if the adhesive becomes hard to cut. During the removal process, the back cover is under tension all the time and is likely to break if the adhesive isn't softened enough.

    • Insert a second opening pick at the bottom right corner of the rear glass.

    • Slide the opening pick along the bottom edge of the rear glass to cut the adhesive and leave it in the bottom left corner.

  4. Huawei Honor 10 Screen Replacement: passo 4, imagem 1 %32 Huawei Honor 10 Screen Replacement: passo 4, imagem 2 %32 Huawei Honor 10 Screen Replacement: passo 4, imagem 3 %32
    • Insert a third opening pick at the bottom left corner of the rear glass.

    • Slide the opening pick along the left edge of the rear glass to cut the adhesive.

    • Leave the opening pick at the top left corner of the rear glass.

  5. Huawei Honor 10 Screen Replacement: passo 5, imagem 1 %32 Huawei Honor 10 Screen Replacement: passo 5, imagem 2 %32
    • Insert a fourth opening pick at the top left corner of the rear glass.

    • Slide the opening along the top edge of the rear glass and cut the remaining adhesive with it.

  6. Huawei Honor 10 Screen Replacement: passo 6, imagem 1 %32 Huawei Honor 10 Screen Replacement: passo 6, imagem 2 %32
    • Carefully lift the rear glass of the Huawei Honor 10 and remove it.

  7. Huawei Honor 10 Screen Replacement, Battery disconnect: passo 7, imagem 1 %32 Huawei Honor 10 Screen Replacement, Battery disconnect: passo 7, imagem 2 %32 Huawei Honor 10 Screen Replacement, Battery disconnect: passo 7, imagem 3 %32
    • Use a pair of tweezer to carefully peel the black foil off the loudspeaker and daughterboard cover.

    • Remove the foil completely.

  8. Huawei Honor 10 Screen Replacement: passo 8, imagem 1 %32
    • Remove the three Phillips #00 screws (2.9 mm length) that secure the metal bracket on top of the battery, interconnect, and display flex cable.

  9. Huawei Honor 10 Screen Replacement: passo 9, imagem 1 %32 Huawei Honor 10 Screen Replacement: passo 9, imagem 2 %32
    • Use a pair of tweezers to remove the metal shield that covers the connectors of the interconnect cable, the battery and the display flex cable.

  10. Huawei Honor 10 Screen Replacement: passo 10, imagem 1 %32 Huawei Honor 10 Screen Replacement: passo 10, imagem 2 %32
    • Use a spudger to pry up and disconnect the battery flex cable.

  11. Huawei Honor 10 Screen Replacement, Loudspeaker Unit: passo 11, imagem 1 %32
    • Remove the seven Phillips screws securing the loudspeaker unit:

    • Three silver 2.9 mm long screws

    • Four black 3.4 mm long screws

  12. Huawei Honor 10 Screen Replacement: passo 12, imagem 1 %32 Huawei Honor 10 Screen Replacement: passo 12, imagem 2 %32 Huawei Honor 10 Screen Replacement: passo 12, imagem 3 %32
    • There's a little bit of adhesive under the loudspeaker. It's possible to remove the loudspeaker without heating the adhesive but if you're having a hard time removing it, you can use an iOpener to soften the adhesive.

    • Slide the flat end of a spudger under the right side of the loudspeaker unit.

    • Pry up the loudspeaker unit until you can get a good grip.

    • Remove the loudspeaker unit.

  13. Huawei Honor 10 Screen Replacement, Screen: passo 13, imagem 1 %32 Huawei Honor 10 Screen Replacement, Screen: passo 13, imagem 2 %32
    • Use a spudger to pry up and disconnect the display flex cable.

  14. Huawei Honor 10 Screen Replacement: passo 14, imagem 1 %32 Huawei Honor 10 Screen Replacement: passo 14, imagem 2 %32
    • Use a spudger to pry up and disconnect the home button flex cable.

  15. Huawei Honor 10 Screen Replacement: passo 15, imagem 1 %32
    • Apply a heated iOpener to the screen to loosen the adhesive beneath. Apply the iOpener for at least two minutes.

    • You might need to reheat and reapply the iOpener several times during the removal procedure to keep the adhesive warm enough to cut.

  16. Huawei Honor 10 Screen Replacement: passo 16, imagem 1 %32 Huawei Honor 10 Screen Replacement: passo 16, imagem 2 %32 Huawei Honor 10 Screen Replacement: passo 16, imagem 3 %32
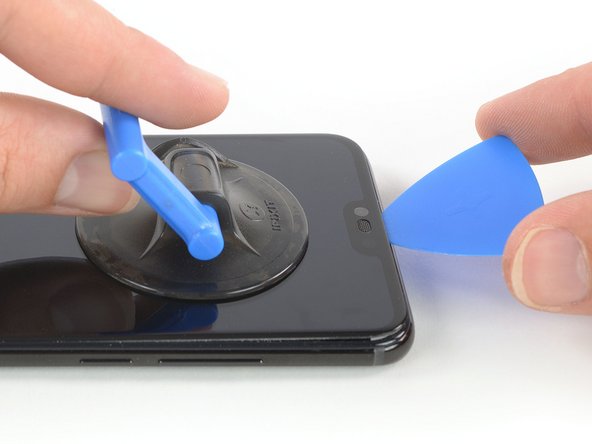
    • Once the screen is warm to the touch, apply a suction cup near the top edge of the phone right under the earpiece speaker.

    • If the phone's screen is cracked, the suction cup may not stick. Try lifting it with strong tape, or superglue the suction cup in place and allow it to cure so you can proceed.

    • Only insert the tip of the opening pick under the screen (about 1/8 of an inch) to prevent damage to components underneath, such as the front facing camera and the earpiece speaker.

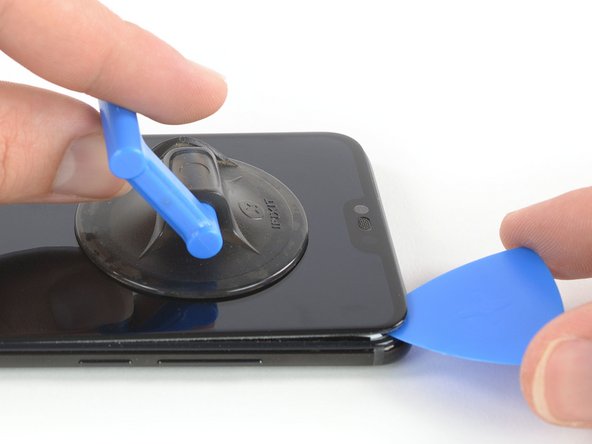
    • Pull up the suction cup, and insert the tip of an opening pick under the display where the earpiece speaker is located.

    • Slide the opening pick to the top right corner of the phone to cut the adhesive.

  17. Huawei Honor 10 Screen Replacement: passo 17, imagem 1 %32 Huawei Honor 10 Screen Replacement: passo 17, imagem 2 %32
    • While cutting, make sure the pick slides under the display panel and not just between the display and the front glass.

    • Slide the opening pick from the top right corner down the edge of the phone to cut the adhesive.

    • Leave the opening pick at the bottom right corner of the screen to keep the adhesive from resealing

  18. Huawei Honor 10 Screen Replacement: passo 18, imagem 1 %32 Huawei Honor 10 Screen Replacement: passo 18, imagem 2 %32 Huawei Honor 10 Screen Replacement: passo 18, imagem 3 %32
    • Pull up on the suction cup, and insert the tip of a second opening pick under the display where the earpiece speaker is located.

    • Slide the tip of the opening pick to the top left corner of the phone to cut the adhesive.

  19. Huawei Honor 10 Screen Replacement: passo 19, imagem 1 %32 Huawei Honor 10 Screen Replacement: passo 19, imagem 2 %32 Huawei Honor 10 Screen Replacement: passo 19, imagem 3 %32
    • Slide the opening pick from the top left corner down the edge of the phone to cut the remaining adhesive.

    • Try not to remove the display all the way yet. The home button and display flex cables are still threaded through the midframe.

  20. Huawei Honor 10 Screen Replacement: passo 20, imagem 1 %32 Huawei Honor 10 Screen Replacement: passo 20, imagem 2 %32
    • Make sure the flex cable does not stick to the frame and carefully thread it through its gap.

    • Remove the screen.

    • Remove any remaining adhesive from the midframe, and clean the glued areas with isopropyl alcohol and a lint-free cloth.

Conclusão

If possible, turn on your phone and test your repair before installing new adhesive and resealing the phone.

The best way to secure the new screen is with a sheet of custom-cut double-sided tape. Apply the tape to the back of the screen, then carefully feed the display cable through the frame. Align the screen and press it into place.

To reassemble your device, follow these instructions in reverse order.

Take your e-waste to an R2 or e-Stewards certified recycler.

Repair didn’t go as planned? Check out our Answers community for troubleshooting help.

15 outras pessoas executaram este guia.

Dominik Schnabelrauch

Membro desde: 11/23/16

202.836 Reputação

Autoria de 682 guias

Equipe

iFixit Membro de iFixit

Staff

Membros da 135

Autoria de 16.732 guias

5 comentários

Hi I decided to fix my Honor 10 lite. The pictures you show are absolutely nothing like the Honor 10 lite I have in front of me. Please could you provide some strip down pictures of what SHOULD be shown

mike hares - Responder

Good afternoon, if you sent a message to me, then I have not added these images to the current site database.

I only made a text translation into Russian.

DeStream TV -

Hi Mike,

this is not the display guide for the Honor 10 Lite but the Honor 10. The build of these phones is sadly not the same.

Dominik Schnabelrauch -

Hi, i just tried to change the screen,but when i tried it,the touchscreen doesn t work(the screen look fine).So i tried whith the old screen,and doesn’t work too(before it was working).What can it be?i damaged something?

edoardo figaia - Responder

Hi would the screws in the honor ten lite be the same. Therfore could I purchase this screwdriver

khammy96 - Responder

Adicione um comentário

Exibir estatísticas:

Últimas 24 horas: 3

Últimos 7 dias: 17

Últimos 30 dias: 52

Duração total: 17,013