Esta versão pode conter edições incorretas. Mude para o último instantâneo verificado.
O que você precisa
-
Este passo não foi traduzido. Ajude a traduzi-lo
-
Use a plastic opening tool to scrape adhesive off the back of the screen.
-
-
Este passo não foi traduzido. Ajude a traduzi-lo
-
You may be able to peel up the adhesive with tweezers.
-
-
Este passo não foi traduzido. Ajude a traduzi-lo
-
Use tweezers to peel the outer ring off of one of the adhesive strip pads.
-
Be sure to get both the double-sided adhesive and the brown backing paper.
-
-
Este passo não foi traduzido. Ajude a traduzi-lo
-
Lay the backed adhesive tape down on the Force Touch sensor, around the edge of the case where the screen rests.
-
Start in a corner with the tape as close to the corner wall as possible.
-
Press on the brown backing paper with a plastic opening tool to secure the adhesive around the entire perimeter.
-
-
-
Este passo não foi traduzido. Ajude a traduzi-lo
-
Use a plastic opening tool to reconnect the display data and digitizer cable connectors.
-
-
Este passo não foi traduzido. Ajude a traduzi-lo
-
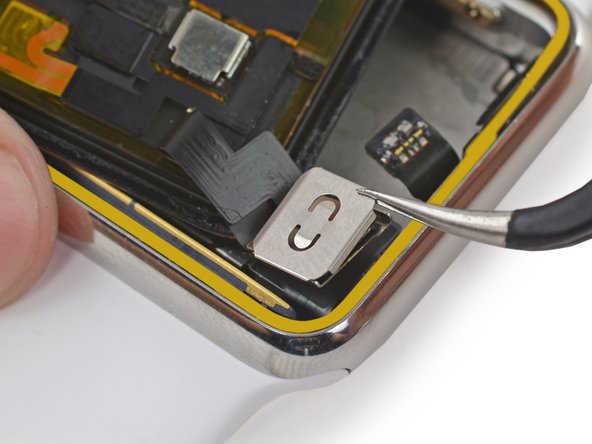
To reinstall the metal bracket, line up the single tab with the slot in the top of the lower half, and slide the bracket down.
-
Snap the upper bracket in place.
-
-
Este passo não foi traduzido. Ajude a traduzi-lo
-
Line the battery connector up with its mate on the cable inside the watch body.
-
Use tweezers to press the two connectors together.
-
-
Este passo não foi traduzido. Ajude a traduzi-lo
-
Rotate the battery down into its slot, and press it into position.
-
Press the battery down against the S1 to re-adhere it in place.
-
-
Este passo não foi traduzido. Ajude a traduzi-lo
-
Use tweezers to peel off the adhesive backing strip.
-
Peel the backing strip up halfway, then snip it with scissors so you can peel the rest off without it snagging on the display.
-
-
Este passo não foi traduzido. Ajude a traduzi-lo
-
Move the screen back to the right, folding the display data and digitizer cables neatly.
-
Center the screen over the case and press it down firmly onto the adhesive.
-


Cancelar: não concluí este guia.
38 outras pessoas executaram este guia.

Equipe

3 comentários
very good instructions…thanks for your help
https://www.youtube.com/watch?v=s5-5pGfR...
Here is a video link for this article
Excellent! Apple claimed it was not economical to repair a watch with inflated battery that had pushed out the screen. I think 18 euro for a new battery and adhesive tape, together with this manual is excellent value, a new lease of life and less waste. :-)