Introdução
The causes of paper jams include wet printing paper, paper adhesion, torn paper, folded paper, toner problems, using incorrect paper types, incorrectly loaded paper, etc.
Paper jams, an inevitable problem in the use of printers, have been considered in developing printers. For small inkjet printers, you only need to remove the paper jam by hand.
For medium and large multifunctional laser printers like the Brother Printer, the paper needs to be transferred from the feeder to the machine for printing, so the probability of a paper jam will be higher.
When a paper jam occurs, you must determine the position of the paper jam, and determine the stage of paper feeding or printing.
- Paper jams occurring in the feeding stage just need a hand and you are able to gently pull out the paper.
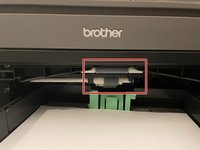
- For a paper jam in the printing stage, it is necessary to open the cover of the machine and remove the paper jam from the inside.
Repairing the paper jam of Brother Printer DCP-7060N is not a complex process. People can do it by themselves.
-
-
Press the power button on the side of the printer to turn it off.
-
-


To reassemble your device, follow these instructions in reverse order.
Cancelar: não concluí este guia.
3 outras pessoas executaram este guia.

Equipe

York University, Team S-30, Woodhouse Winter 2022 Membro de York University, Team S-30, Woodhouse Winter 2022
YORK-WOODHOUSE-W22SSG30
1 Membro
Autoria de 2 guias