Introdução
If your Switch Pro Controller’s D-Pad is being overly sensitive and causing accidental directional presses, this is the guide for you to follow!
O que você precisa
-
-
The left and right grip screws are held in place with one J00 screw each. After the screw is removed, the grip slides straight off.
-
-
-
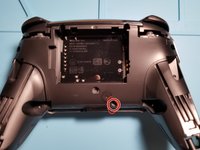
Remove the four J00 screws holding the back plate in place.
-
Once they are removed, the back plate will just lift off with little to no force.
-
-
-
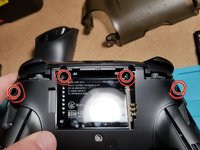
Remove an additional J00 screw.
-
Remove an additional four J00 screws. The two in the battery bay are very easy to miss!
-
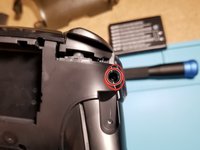
A closeup of the edge screws (also very easy to miss!).
-
-
-
-
Use a pry tool or your fingernail to gently pull the two halves of the controller apart. Beware of the ribbon cable connecting the two boards!
-
This is a ZIF connector. The black tab on the connector pops straight up, allowing you to gently pull the cable straight out of the lock. I removed the cable from the board with the control sticks.
-
-
-
Disconnect the ribbon cable that connects the plate to the controller board.
-
Afterward, remove two black J00 screws holding the plate onto the PCB.
-
-
-
Remove two more black J00 screws holding the board in place.
-
-
-
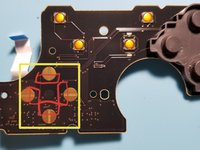
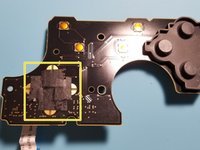
Voila! Here are the D-Pad touch sensors. I have outlined the area you want to cover in red.
-
Using tape (I recommend black electrical tape, but others have said it works with clear scotch or packing tape, just be aware it may pull up after a while and cause buttons to stick!), cover the highlighted areas. This really cuts down on accidental button presses.
-
After some testing, I applied the tape to the top and bottom touch connectors. This resulted in the smoothest operation with fewest accidental button presses. Always be sure to test (and make sure you like how it feels!) before you complete reassembly.
-


To reassemble your (expensive) controller, simply follow these instructions in reverse order.
Hopefully, this guide was simple and easy to follow - just as the actual fix is. For my controller, it's night and day as far as sensitivity is concerned!
Have a great day and happy fixing!
Cancelar: não concluí este guia.
17 outras pessoas executaram este guia.
13Comentários do guia
Thanks!! I got a bit confused on the 2nd ribbon cable because I wasn’t sure if it was a latch like the first but it worked out. Also reassembling the ribbon cables was a bit difficult and I wasn’t exactly sure how much I had to “plug” them in before closing the latch but I figured it out, thank you! Controller works wonderfully now.
Glad to hear it! Thank you for your comment!
Not to my knowledge (I don’t have any on hand to test with though). May be worth a shot!
It should be noted that the official iFixit kit is recommended for the back screw removal (especially the ones at 11 and 1 o clock by the battery compartment) or you should have a screwdriver that is skinny enough to get it straight on. I barely got it with the iFixit kit and maybe left them a little bit loose because of that. Otherwise, this guide is very good for disassembling and cleaning.