Ir para o conteúdo principal

Handspring Visor Edge Battery Replacement

O que você precisa

  1. Handspring Visor Edge Battery Replacement, Flip Cover: passo 1, imagem 1 %32 Handspring Visor Edge Battery Replacement, Flip Cover: passo 1, imagem 2 %32
    • Open the Visor Edge and place it on a table facing down.

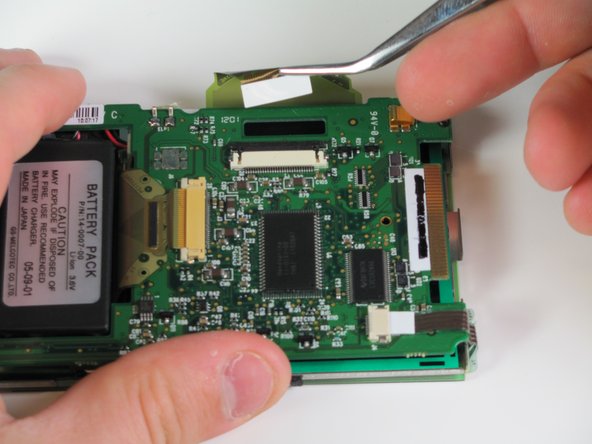
    • Gently push the tab that connects the flip cover (top half) to the PDA (bottom half) upward, lift the pieces apart to detach them.

    • Do not pull on the flip cover in an attempt to remove it from the PDA.

  2. Handspring Visor Edge Battery Replacement, Back Panel: passo 2, imagem 1 %32
    • Remove the six 4.1 mm Phillips screws from the back plate using the #00 Phillips Scewdriver.

  3. Handspring Visor Edge Battery Replacement: passo 3, imagem 1 %32
    • Remove the gray back plate from the PDA.

  4. Handspring Visor Edge Battery Replacement: passo 4, imagem 1 %32 Handspring Visor Edge Battery Replacement: passo 4, imagem 2 %32
    • Remove the four 2.6 mm Philips screws that are on the sides of the frame.

    • Remove the 3.9 mm Philips screw holding the stylus holster to the frame.

  5. Handspring Visor Edge Battery Replacement: passo 5, imagem 1 %32 Handspring Visor Edge Battery Replacement: passo 5, imagem 2 %32
    • Remove the four 2.6 mm Philips screws on the top and bottom of the frame.

  6. Handspring Visor Edge Battery Replacement: passo 6, imagem 1 %32
    • Gently remove the white frame from the back of the PDA.

  7. Handspring Visor Edge Battery Replacement, Battery: passo 7, imagem 1 %32
    • Gently pull off the front cover.

  8. Handspring Visor Edge Battery Replacement: passo 8, imagem 1 %32 Handspring Visor Edge Battery Replacement: passo 8, imagem 2 %32
    • Gently use your finger or tweezers to push the brown lock away from the side of the circuit board that is holding the ribbon cable.

    • Remove the ribbon cable with tweezers.

  9. Handspring Visor Edge Battery Replacement: passo 9, imagem 1 %32
    • Using the tweezers, pull back the ribbon cable on the top of the device.

    • Pull at the white part of the ribbon to avoid tearing.

  10. Handspring Visor Edge Battery Replacement: passo 10, imagem 1 %32
    • Using the same technique as with the other ribbons, locate and disconnect the ribbon cable above the battery pack.

  11. Handspring Visor Edge Battery Replacement: passo 11, imagem 1 %32
    • All the ribbon cables should be disconnected from the mother board.

    • Remove the four 3.6 mm Phillips #00 screws located at each corner of the device.

  12. Handspring Visor Edge Battery Replacement: passo 12, imagem 1 %32 Handspring Visor Edge Battery Replacement: passo 12, imagem 2 %32
    • Carefully separate the circuit board and the screen. (Be careful of soldered wires when separating)

    • Be careful not to break the soldered wires that connects the circuit board to the battery pack.

    • Disconnect the wire that connects the battery pack to the motherboard using tweezers.

  13. Handspring Visor Edge Battery Replacement: passo 13, imagem 1 %32 Handspring Visor Edge Battery Replacement: passo 13, imagem 2 %32
    • Wedge the spudger under the battery to pry it apart from the adhesive.

Conclusão

To reassemble your device, follow these instructions in reverse order.

Christian Valoria

Membro desde: 01/23/11

201 Reputação

Autoria de 2 guias

Equipe

Cal Poly, Team 11-28, Maness Winter 2011 Membro de Cal Poly, Team 11-28, Maness Winter 2011

CPSU-MANESS-W11S11G28

Membros da 4

Autoria de 7 guias

0 comentários

Adicione um comentário

Exibir estatísticas:

Últimas 24 horas: 0

Últimos 7 dias: 7

Últimos 30 dias: 26

Duração total: 3,141