Ir para o conteúdo principal

HTC Vive OLED Screen Replacement

Guia arquivado
Este guia é mantido exclusivamente para fins históricos. Use a versão atualizada do guia para executar o reparo.

O que você precisa

  1. HTC Vive OLED Screen Replacement, Release the upper head strap: passo 1, imagem 1 %32 HTC Vive OLED Screen Replacement, Release the upper head strap: passo 1, imagem 2 %32
    • Be sure to power down and disconnect your Vive before beginning.

    • Pull the hook-and-loop (Velcro) closure at the top of the head strap apart to release the top of the head strap.

  2. HTC Vive OLED Screen Replacement, Remove the upper head strap: passo 2, imagem 1 %32 HTC Vive OLED Screen Replacement, Remove the upper head strap: passo 2, imagem 2 %32
    • Slide the top part of the head strap through its metal loop on the headset to remove it.

  3. HTC Vive OLED Screen Replacement, Remove the right side of the head strap: passo 3, imagem 1 %32 HTC Vive OLED Screen Replacement, Remove the right side of the head strap: passo 3, imagem 2 %32 HTC Vive OLED Screen Replacement, Remove the right side of the head strap: passo 3, imagem 3 %32
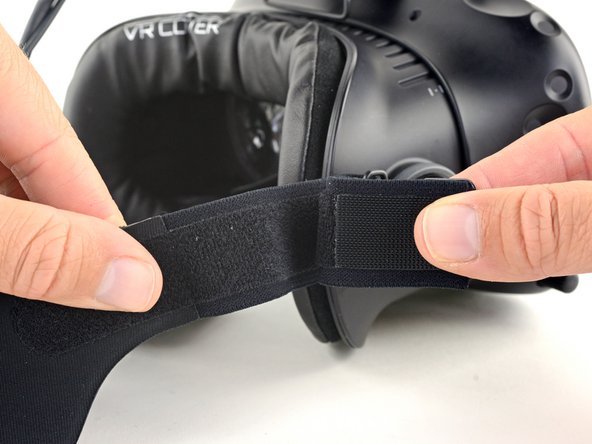
    • Pull the hook-and-loop closure at the right side of the head strap apart to release the right side of the head strap.

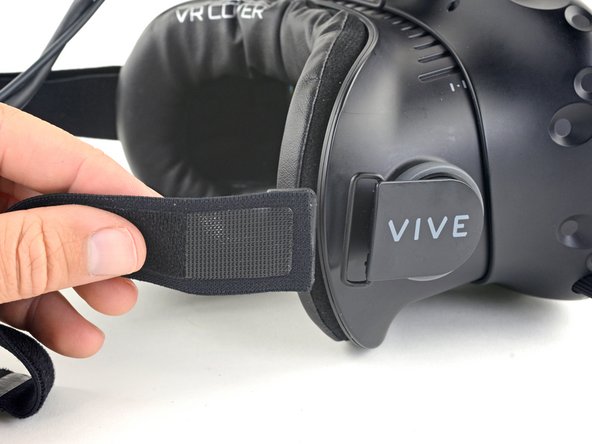
    • Slide the right side of the head strap through its metal loop to remove it.

  4. HTC Vive OLED Screen Replacement, Remove the left side of the head strap: passo 4, imagem 1 %32 HTC Vive OLED Screen Replacement, Remove the left side of the head strap: passo 4, imagem 2 %32 HTC Vive OLED Screen Replacement, Remove the left side of the head strap: passo 4, imagem 3 %32
    • Pull the hook-and-loop closure at the left side of the head strap apart to release the left side of the head strap.

    • Slide the left side of the head strap through its metal loop to remove it.

  5. HTC Vive OLED Screen Replacement, Remove the head strap: passo 5, imagem 1 %32 HTC Vive OLED Screen Replacement, Remove the head strap: passo 5, imagem 2 %32 HTC Vive OLED Screen Replacement, Remove the head strap: passo 5, imagem 3 %32
    • Slide the head strap along the cable, away from the Vive.

    • When the head strap comes to the end of the cable, gently slide it over the plugs and remove it.

  6. HTC Vive OLED Screen Replacement, Unscrew the head strap mounts: passo 6, imagem 1 %32 HTC Vive OLED Screen Replacement, Unscrew the head strap mounts: passo 6, imagem 2 %32
    • Be sure to power down and disconnect your Vive before beginning.

    • Use a T5 Torx driver to remove the two 12 mm-long screws securing the head strap mounts on either side of the headset.

    • For some devices, a T6 Torx driver may work better.

    • The mounts may fall off when the screws are removed, so be careful not to lose any parts.

    Helaas blijkt de T5 Torx schroevendraaier aan de schroeven van de bevestigingsbeugels geen grip te krijgen. Wat dan gedaan?

    Immanuel Van Meirhaeghe - Responder

    It was a T6 that fit perfectly in mine, T5 didn't cut it. Maybe it's a revision thing? Mine was an early model from 2016.
    Edit: Edited guide to say T6.

    Tim T - Responder

  7. HTC Vive OLED Screen Replacement, Remove the head strap mounts: passo 7, imagem 1 %32 HTC Vive OLED Screen Replacement, Remove the head strap mounts: passo 7, imagem 2 %32 HTC Vive OLED Screen Replacement, Remove the head strap mounts: passo 7, imagem 3 %32
    • Remove both head strap mounts.

  8. HTC Vive OLED Screen Replacement, Remove the facerest: passo 8, imagem 1 %32 HTC Vive OLED Screen Replacement, Remove the facerest: passo 8, imagem 2 %32
    • Slide the facerest straight away from the headset to remove it.

  9. HTC Vive OLED Screen Replacement, Unscrew the outer shell: passo 9, imagem 1 %32 HTC Vive OLED Screen Replacement, Unscrew the outer shell: passo 9, imagem 2 %32 HTC Vive OLED Screen Replacement, Unscrew the outer shell: passo 9, imagem 3 %32
    • Use tweezers to remove the small stickers over the four screws securing the outer shell.

    • Use a T5 Torx driver to remove the four 3.4 mm-long screws securing the outer shell.

    PSA: There are four screws you need to remove that are covered with small black stickers (two on top, two on bottom)

    Oscar Kosar-Kosarewicz - Responder

    Holy cow. Thank you for adding this comment Oscar. I was just about to break it.

    PC McGee -

    These screws are T6.

    Eric Tong - Responder

  10. HTC Vive OLED Screen Replacement, Remove the outer shell: passo 10, imagem 1 %32 HTC Vive OLED Screen Replacement, Remove the outer shell: passo 10, imagem 2 %32
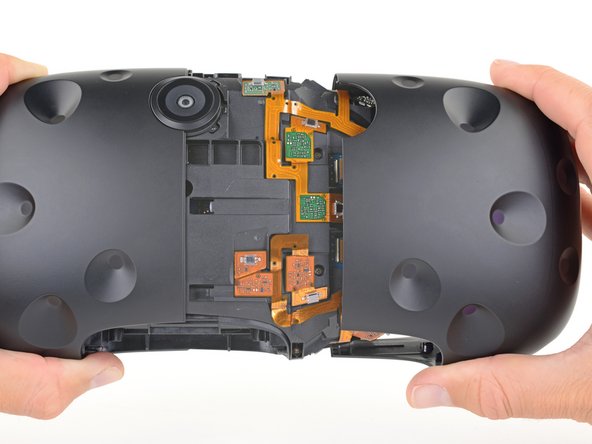
    • Use the flat end of a spudger to pry up the top edge of the right half of the outer shell, behind the component cover and near the seam in the center, until it is unclipped from the headset.

  11. HTC Vive OLED Screen Replacement: passo 11, imagem 1 %32 HTC Vive OLED Screen Replacement: passo 11, imagem 2 %32
    • Grasp the right half the outer shell and pull it to the right and toward the front of the headset until you feel the clips on the front of the cover release.

    • If the shell is difficult to remove, try prying along the seam with the flat end of a spudger to release the clips.

  12. HTC Vive OLED Screen Replacement: passo 12, imagem 1 %32 HTC Vive OLED Screen Replacement: passo 12, imagem 2 %32
    • Slide the right side of the outer shell to the right and off of the headset.

  13. HTC Vive OLED Screen Replacement: passo 13, imagem 1 %32 HTC Vive OLED Screen Replacement: passo 13, imagem 2 %32
    • Repeat the last three steps for the left side of the outer shell and remove it.

  14. HTC Vive OLED Screen Replacement, Disconnect the sensor array cables: passo 14, imagem 1 %32 HTC Vive OLED Screen Replacement, Disconnect the sensor array cables: passo 14, imagem 2 %32 HTC Vive OLED Screen Replacement, Disconnect the sensor array cables: passo 14, imagem 3 %32
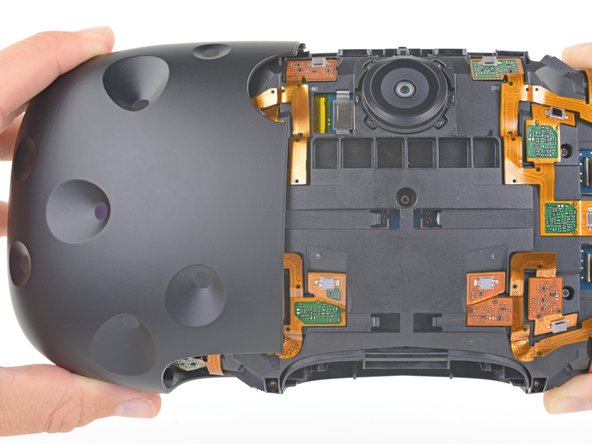
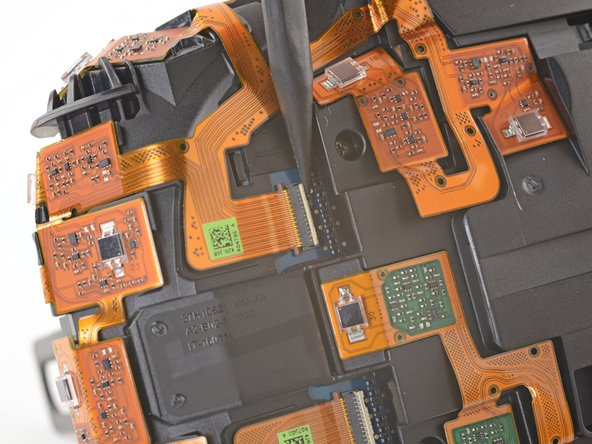
    • Use tweezers to remove the clear tape over all four of the sensor array cable connectors.

    During this step, there should be a picture of the flip side showing 4 more Philips screws hidden deep inside the headset. Removing those additional 4 screws is critical to getting the headset opened and continuing to the next step.

    Jeff - Responder

  15. HTC Vive OLED Screen Replacement: passo 15, imagem 1 %32 HTC Vive OLED Screen Replacement: passo 15, imagem 2 %32 HTC Vive OLED Screen Replacement: passo 15, imagem 3 %32
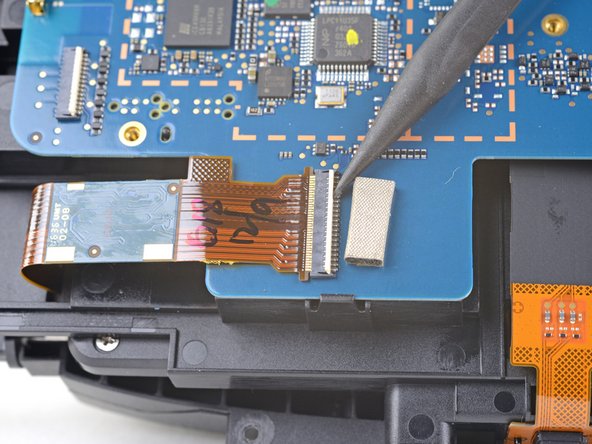
    • Use the pointed end of a spudger to flip up the small locking flap on one of the sensor array ZIF connectors.

    • Slide the cable straight out of its socket on the motherboard.

    This guide is grossly incomplete. Do NOT try to pull up the sensor array after taking these five screws off. There are 8 more screws that have to be removed, as well as 2 tabs that need to be pushed before the sensor array comes off.

    -Two screws on the bottom (by the camera) to each side. There are four screws here, but only the outermost two need to be taken off. See the two sensors on the bottom? The screws under the outside corner of each sensor are the ones you remove.

    -Two screws on the top, to the right and left of the cable opening.

    -Four screws on the back, to the left and right of the lenses. Turn the Vive around, the screws are deep inside four holes.

    -Finally, two tabs on the bottom by the camera. If you look closely you will see them!

    Dan OST - Responder

  16. HTC Vive OLED Screen Replacement: passo 16, imagem 1 %32 HTC Vive OLED Screen Replacement: passo 16, imagem 2 %32 HTC Vive OLED Screen Replacement: passo 16, imagem 3 %32
    • Repeat the previous step for the remaining three sensor array cables to disconnect the remaining cables.

    Sure, but how do you get a replacement array?

    TheGreatYogurt - Responder

    It starts with “lift the sensor array" but how am I supposed to do that? Its not just lifting off after unscrewing & disconnecting. What am I missing here?

    Daniel Connelly - Responder

  17. HTC Vive OLED Screen Replacement: passo 17, imagem 1 %32 HTC Vive OLED Screen Replacement: passo 17, imagem 2 %32
    • Use tweezers or a spudger to pry up the camera cable cover and remove it.

  18. HTC Vive OLED Screen Replacement: passo 18, imagem 1 %32 HTC Vive OLED Screen Replacement: passo 18, imagem 2 %32
    • Use the flat end of a spudger to pry the camera cable connector straight up from its socket on the motherboard.

  19. HTC Vive OLED Screen Replacement, Unscrew the sensor array: passo 19, imagem 1 %32
    • Use a PH000 driver to remove the five 3.9 mm screws securing the sensor array.

  20. HTC Vive OLED Screen Replacement: passo 20, imagem 1 %32
    • Use a PH000 driver to remove the four 3.9 mm screws securing the sensor array.

    On my 2016 headset, I had to remove two additional Phillips screws at the top (appear in picture) and two more at the bottom (which are not present in the headset pictured here, must be a different revision) before the sensor array comes off.

    Tim T - Responder

  21. HTC Vive OLED Screen Replacement: passo 21, imagem 1 %32 HTC Vive OLED Screen Replacement: passo 21, imagem 2 %32
    Ferramenta utilizada nesse passo:
    Phillips #000 Screwdriver
    $5.49
    Comprar
    • Use a PH000 driver to remove the four 3.9 mm screws securing the sensor array.

    • You'll need a narrow, long-shaft driver to reach these screws.

  22. HTC Vive OLED Screen Replacement, Remove the sensor array: passo 22, imagem 1 %32 HTC Vive OLED Screen Replacement, Remove the sensor array: passo 22, imagem 2 %32
    • Lift the sensor array away from the headset to remove it.

  23. HTC Vive OLED Screen Replacement, Disconnect the motherboard: passo 23, imagem 1 %32 HTC Vive OLED Screen Replacement, Disconnect the motherboard: passo 23, imagem 2 %32 HTC Vive OLED Screen Replacement, Disconnect the motherboard: passo 23, imagem 3 %32
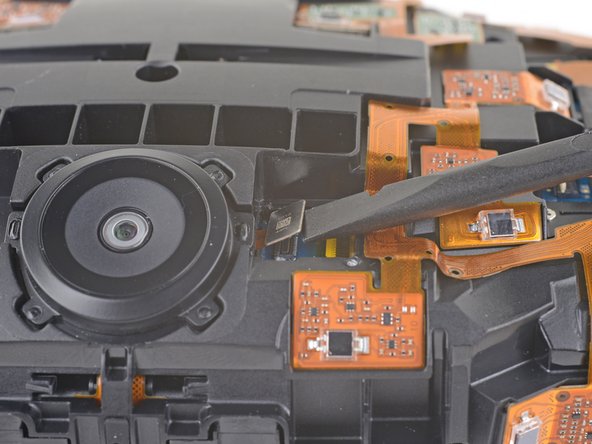
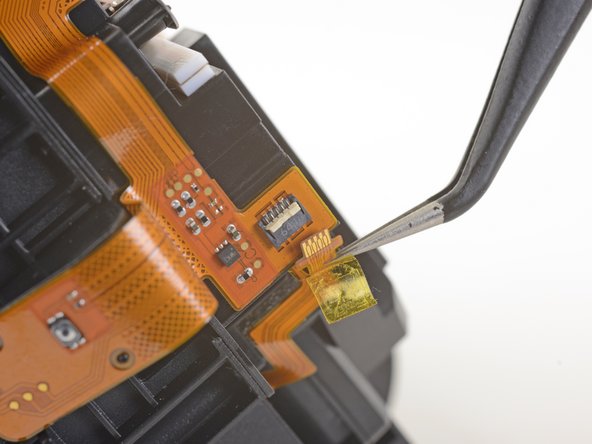
    • Remove the tape covering the interconnect cable socket.

    • Use the point of a spudger to flip up the small locking flap on the cable socket.

    • Slide the interconnect cable straight out of its socket on the motherboard.

  24. HTC Vive OLED Screen Replacement: passo 24, imagem 1 %32 HTC Vive OLED Screen Replacement: passo 24, imagem 2 %32 HTC Vive OLED Screen Replacement: passo 24, imagem 3 %32
    • Remove the tape covering the left OLED cable socket.

    • Use the point of a spudger to flip up the small locking flap on the cable socket.

    • Slide the left OLED cable straight out of its socket on the motherboard.

  25. HTC Vive OLED Screen Replacement: passo 25, imagem 1 %32 HTC Vive OLED Screen Replacement: passo 25, imagem 2 %32 HTC Vive OLED Screen Replacement: passo 25, imagem 3 %32
    • Remove the tape covering the right OLED cable socket.

    • Use the point of a spudger to flip up the small locking flap on the cable socket.

    • Slide the right OLED cable straight out of its socket on the motherboard.

  26. HTC Vive OLED Screen Replacement: passo 26, imagem 1 %32 HTC Vive OLED Screen Replacement: passo 26, imagem 2 %32
    • Use a pair tweezers to slightly twist the interconnect cable and press it down until the tabs on either side of the cable clear the hole in the motherboard.

    • During reassembly, make sure to thread the interconnect cable through its slot in the motherboard.

  27. HTC Vive OLED Screen Replacement, Remove the motherboard: passo 27, imagem 1 %32 HTC Vive OLED Screen Replacement, Remove the motherboard: passo 27, imagem 2 %32 HTC Vive OLED Screen Replacement, Remove the motherboard: passo 27, imagem 3 %32
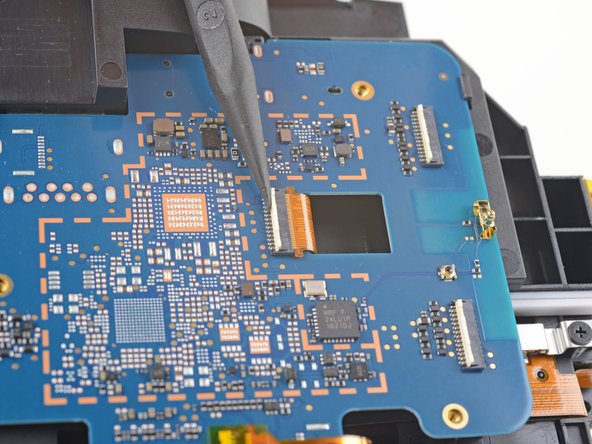
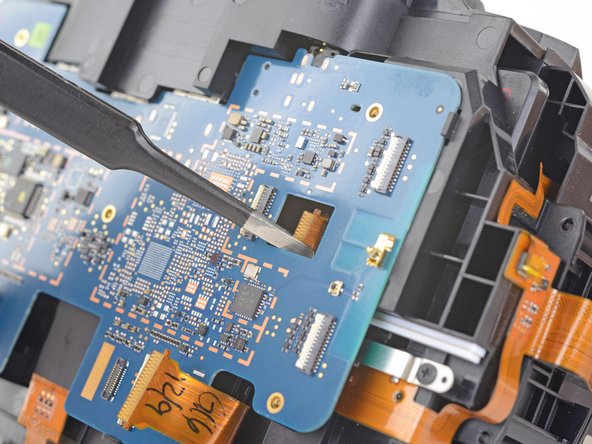
    • Press the non-port-end of the motherboard toward the top of headset while hinging it away from the midframe to free it from the clips securing that end.

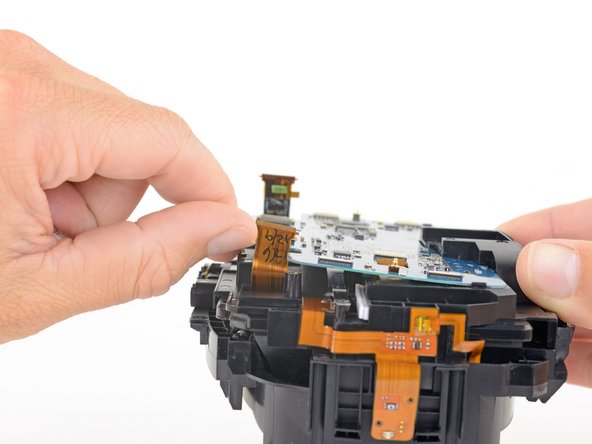
    • Slide the motherboard toward the bottom of the headset, over the clips, to remove it.

    • Take care not to snag any cables during removal.

  28. HTC Vive OLED Screen Replacement, Disconnect the facerest midframe: passo 28, imagem 1 %32 HTC Vive OLED Screen Replacement, Disconnect the facerest midframe: passo 28, imagem 2 %32 HTC Vive OLED Screen Replacement, Disconnect the facerest midframe: passo 28, imagem 3 %32
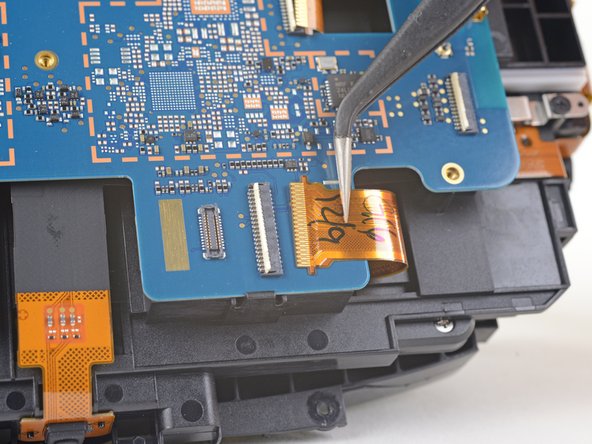
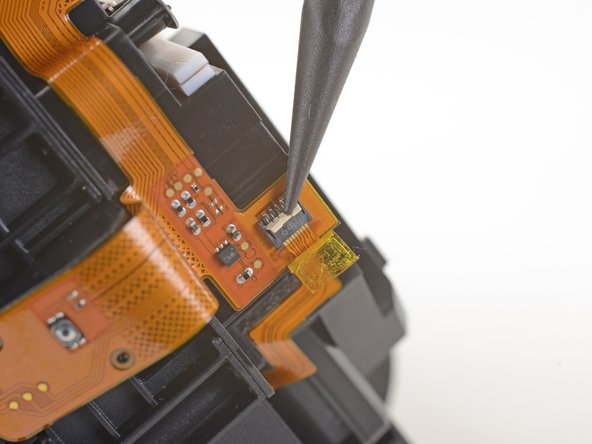
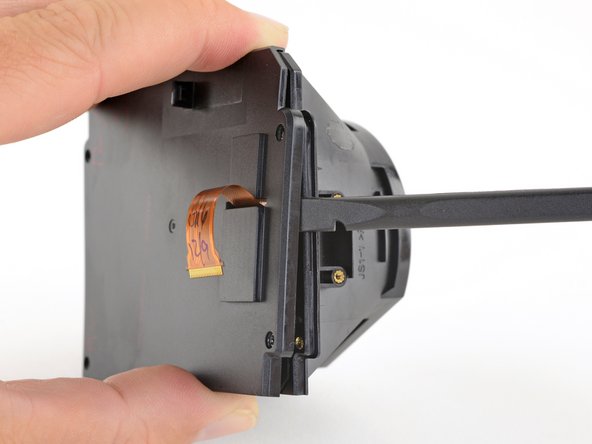
    • Use a pair of tweezers to peel back the plastic covering the eyepiece midframe cable socket.

    • Use the pointed end of a spudger to flip up the plastic locking flap on the socket.

    • Slide the cable straight out of its socket to remove it.

  29. HTC Vive OLED Screen Replacement: passo 29, imagem 1 %32 HTC Vive OLED Screen Replacement: passo 29, imagem 2 %32
    • Gently peel the eyepiece midframe cable off of the facerest midframe.

  30. HTC Vive OLED Screen Replacement, Unscrew the facerest midframe: passo 30, imagem 1 %32
    • Use a PH000 driver to remove the four 3.9 mm screws securing the facerest midframe.

  31. HTC Vive OLED Screen Replacement, Remove the facerest midframe: passo 31, imagem 1 %32 HTC Vive OLED Screen Replacement, Remove the facerest midframe: passo 31, imagem 2 %32
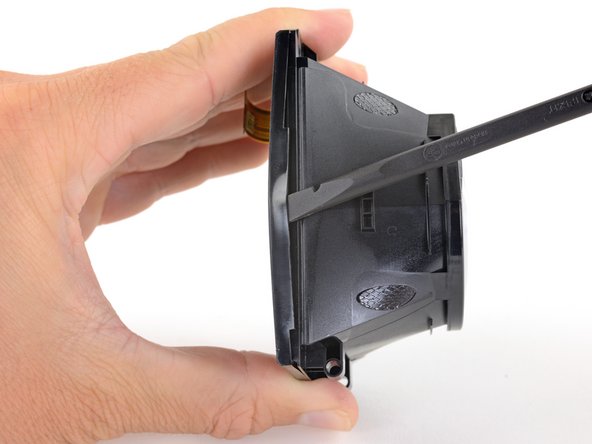
    • Lift the facerest midframe off of the eyepiece midframe.

    • Take care not to snag any cables during removal.

  32. HTC Vive OLED Screen Replacement, Remove the eyepiece gasket: passo 32, imagem 1 %32 HTC Vive OLED Screen Replacement, Remove the eyepiece gasket: passo 32, imagem 2 %32 HTC Vive OLED Screen Replacement, Remove the eyepiece gasket: passo 32, imagem 3 %32
    • Gently lift the eyepiece gasket off of the lens and OLED frames to remove it.

  33. HTC Vive OLED Screen Replacement, Remove the support rod: passo 33, imagem 1 %32 HTC Vive OLED Screen Replacement, Remove the support rod: passo 33, imagem 2 %32 HTC Vive OLED Screen Replacement, Remove the support rod: passo 33, imagem 3 %32
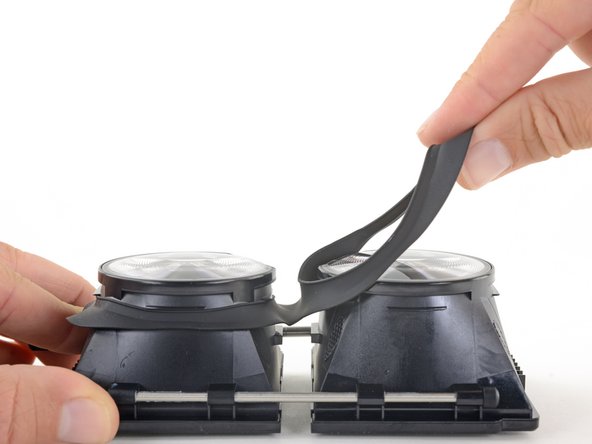
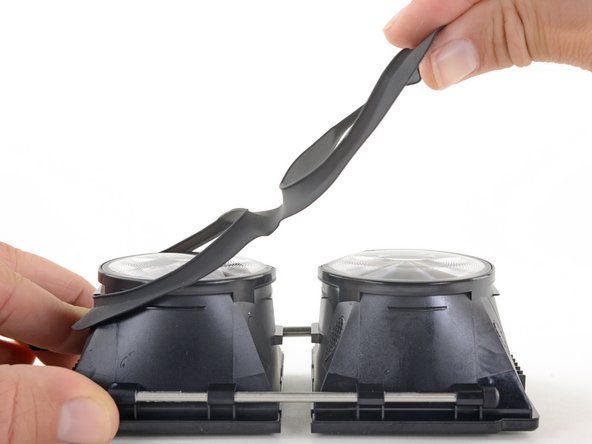
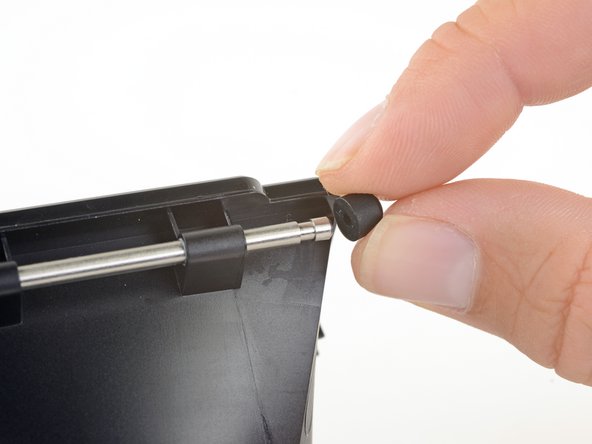
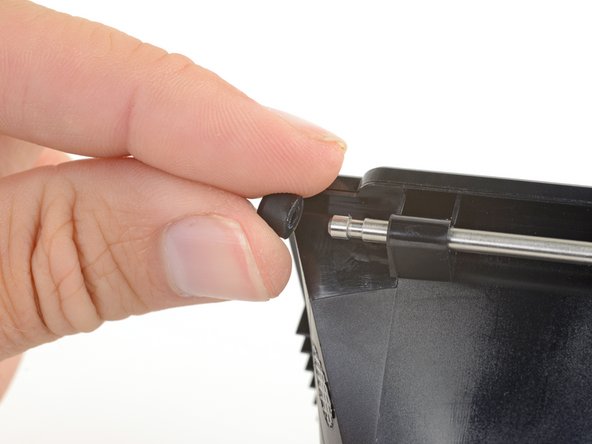
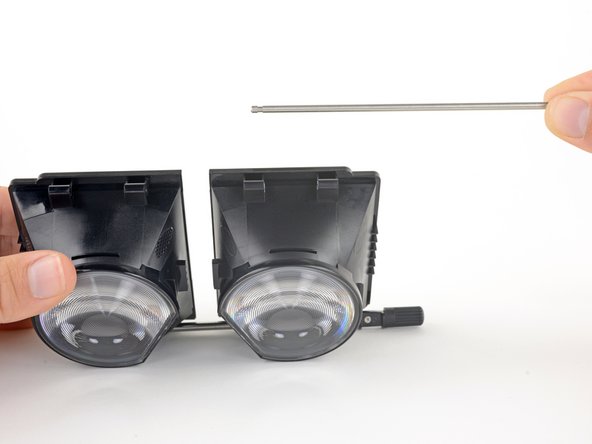
    • Pull the rubber bumpers off of either end of the support rod.

  34. HTC Vive OLED Screen Replacement: passo 34, imagem 1 %32 HTC Vive OLED Screen Replacement: passo 34, imagem 2 %32 HTC Vive OLED Screen Replacement: passo 34, imagem 3 %32
    • Slide the support rod out of its brackets on the lens and OLED frames.

  35. HTC Vive OLED Screen Replacement, Remove the focus rod: passo 35, imagem 1 %32
    • Use a PH000 driver to remove the eight 3.1 mm screws securing the focus rod brackets.

  36. HTC Vive OLED Screen Replacement: passo 36, imagem 1 %32
    • Remove the focus rod and its brackets.

  37. HTC Vive OLED Screen Replacement, Unscrew the OLED covers: passo 37, imagem 1 %32
    • Use a PH000 driver to remove the eight 2.4 mm screws securing the OLED covers.

  38. HTC Vive OLED Screen Replacement, Remove the OLED covers: passo 38, imagem 1 %32 HTC Vive OLED Screen Replacement, Remove the OLED covers: passo 38, imagem 2 %32
    • Use the flat end of a spudger push up one edge of the OLED cover and start unclipping that edge.

  39. HTC Vive OLED Screen Replacement: passo 39, imagem 1 %32 HTC Vive OLED Screen Replacement: passo 39, imagem 2 %32
    • Slide the spudger under the clip along that edge to free the rest of the edge.

  40. HTC Vive OLED Screen Replacement: passo 40, imagem 1 %32 HTC Vive OLED Screen Replacement: passo 40, imagem 2 %32 HTC Vive OLED Screen Replacement: passo 40, imagem 3 %32
    • Slide the spudger around the remaining edges of the OLED cover to unclip those edges.

  41. HTC Vive OLED Screen Replacement: passo 41, imagem 1 %32 HTC Vive OLED Screen Replacement: passo 41, imagem 2 %32
    • Remove the OLED cover.

    • Repeat the last three steps to remove the other OLED cover.

    • During reassembly, remember to thread the OLED cables through their slots in the OLED cover.

  42. HTC Vive OLED Screen Replacement, Remove the OLED displays: passo 42, imagem 1 %32
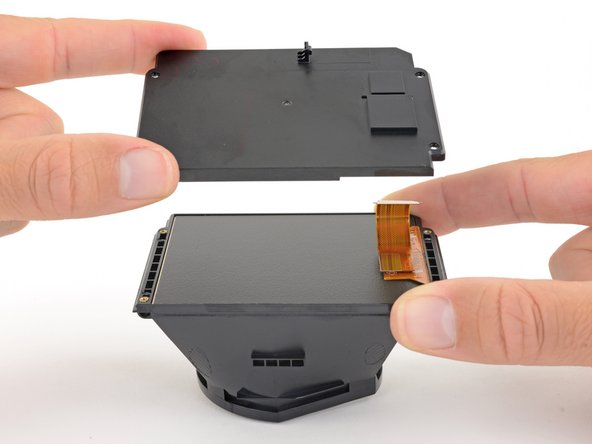
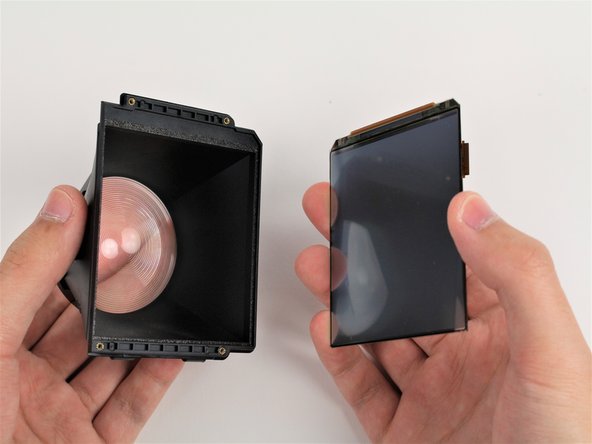
    • Very carefully lift the OLED display by its edges out of its frame.

    • If you are reusing the OLED displays, be very careful to avoid touching the front of the displays or bending or cracking the displays.

    • Repeat this process for the other OLED display.

  43. HTC Vive OLED Screen Replacement, Remove the lenses: passo 43, imagem 1 %32
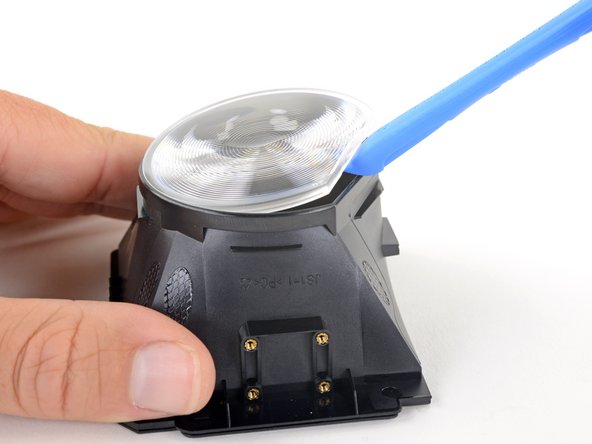
    • Apply an iOpener to the lens to soften the adhesive securing it to the frame.
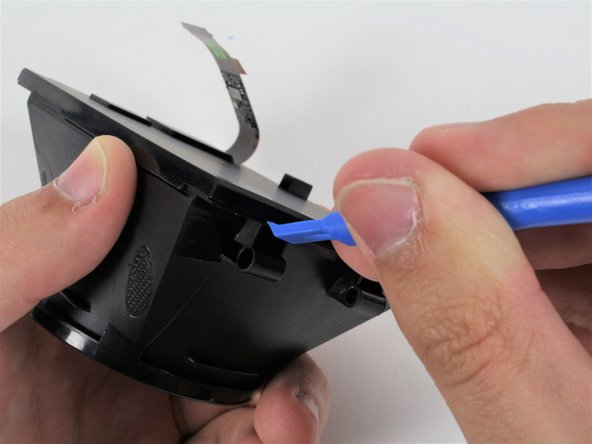
  44. HTC Vive OLED Screen Replacement: passo 44, imagem 1 %32 HTC Vive OLED Screen Replacement: passo 44, imagem 2 %32
    • Use an opening tool to pry up the flat edge of the lens.

    • If it's difficult to pry up, apply the iOpener for another 30 seconds to further soften the adhesive.

  45. HTC Vive OLED Screen Replacement, Remove the lens: passo 45, imagem 1 %32
    • Remove the lens.

    • Repeat the last two steps to remove the other lens.

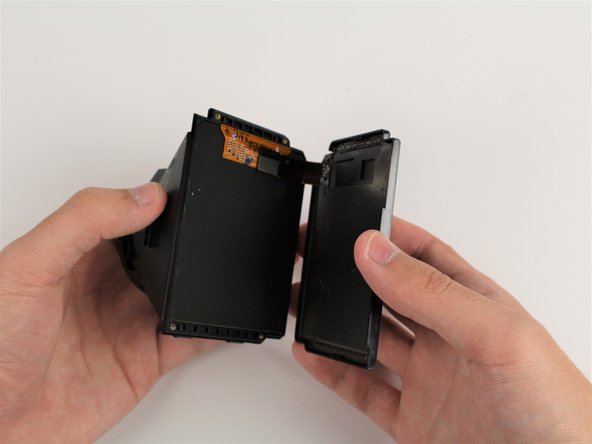
    • Only the lens and OLED frames remain.

    • During reassembly, make sure the convex side of the lens is facing away from the frame.

  46. HTC Vive OLED Screen Replacement, OLED Screen: passo 46, imagem 1 %32
    • The screws are very close to the screen. Applying too much pressure to the screws can stress or crack the screen. Be careful when unscrewing and screwing around the screen.

    • Remove the four 2mm #00 Philips head screws holding the screen in place from the eyepiece assembly.

  47. HTC Vive OLED Screen Replacement: passo 47, imagem 1 %32 HTC Vive OLED Screen Replacement: passo 47, imagem 2 %32 HTC Vive OLED Screen Replacement: passo 47, imagem 3 %32
    • Use a plastic opening tool to gently pry around the seam between the eyepiece housing and the screen.

    • Gently pull the screen cover away from the eyepiece housing, threading the ribbon cable through the hole.

  48. HTC Vive OLED Screen Replacement: passo 48, imagem 1 %32 HTC Vive OLED Screen Replacement: passo 48, imagem 2 %32
    • Remove the screen from the eyepiece housing by pulling the two pieces away from each other.

Conclusão

To reassemble your device, follow these instructions in reverse order.

Uma outra pessoa concluiu este guia.

Caleb Watts

Membro desde: 09/25/17

2.427 Reputação

Autoria de 11 guias

Equipe

Cal Poly, Team S18-G1, Forte Fall 2017 Membro de Cal Poly, Team S18-G1, Forte Fall 2017

CPSU-FORTE-F17S18G1

Membros da 5

Autoria de 11 guias

3 comentários

This is a beautiful guide and I’m elated that I’ve found it. However, in order to use it, I need a place that I can get the screen since it has been flickering, color is off, and now it has a solid green vert line. Any direction? Thanks!

Jason - Responder

Hi can you clean the vive OLED screen? if it has smudge mark on it… And what would you use

Al Shelley - Responder

where do you buy a new screen from I’ve looked all over the net for it I can’t find one for my headset (htc vive cosmos elite)

Ian Miller - Responder

Adicione um comentário

Exibir estatísticas:

Últimas 24 horas: 0

Últimos 7 dias: 2

Últimos 30 dias: 3

Duração total: 4,527