Ir para o conteúdo principal

HTC Vive Controller Motherboard Replacement

O que você precisa

  1. HTC Vive Controller Motherboard Replacement, Saucer Panels: passo 1, imagem 1 %32 HTC Vive Controller Motherboard Replacement, Saucer Panels: passo 1, imagem 2 %32 HTC Vive Controller Motherboard Replacement, Saucer Panels: passo 1, imagem 3 %32
    • Turn over the Vive controller so that the bottom saucer is facing up.

    • Use the T5 Torx screwdriver to remove three black 21mm screws from the bottom saucer.

  2. HTC Vive Controller Motherboard Replacement: passo 2, imagem 1 %32 HTC Vive Controller Motherboard Replacement: passo 2, imagem 2 %32
    • Use the nylon spudger to separate the top and bottom saucer covers all around the edges.

    • Remove only the top saucer cover by pulling up with your hand.

  3. HTC Vive Controller Motherboard Replacement: passo 3, imagem 1 %32 HTC Vive Controller Motherboard Replacement: passo 3, imagem 2 %32
    • Use the Phillips 00 screwdriver to remove the three silver 12.8mm screws from the exposed upper sensor panel.

  4. HTC Vive Controller Motherboard Replacement: passo 4, imagem 1 %32 HTC Vive Controller Motherboard Replacement: passo 4, imagem 2 %32 HTC Vive Controller Motherboard Replacement: passo 4, imagem 3 %32
    • Carefully pull away the bottom saucer cover with your hand.

    • To aid in removing the saucer cover, squeeze the base of the controller with your other hand, as shown in the second image of this step. Squeezing will make the clips easier to release and help prevent them from breaking.

  5. HTC Vive Controller Motherboard Replacement, Front Panel: passo 5, imagem 1 %32 HTC Vive Controller Motherboard Replacement, Front Panel: passo 5, imagem 2 %32
    • Use the T5 Torx screwdriver to remove the two black 5.2mm screws on the back gray panel.

  6. HTC Vive Controller Motherboard Replacement: passo 6, imagem 1 %32
    • Turn over the Vive controller so that the exposed bottom saucer panel is facing up.

    • Use the T5 Torx screwdriver to remove the three black 5.2mm screws.

  7. HTC Vive Controller Motherboard Replacement: passo 7, imagem 1 %32 HTC Vive Controller Motherboard Replacement: passo 7, imagem 2 %32
    • Use the nylon spudger to separate the front panel gently by running the spudger around the edges of the handle.

    • Only separate the front panel around the edges. Do not try to completely remove the panel yet.

    • Gently lift the right side of the panel to the left.

  8. HTC Vive Controller Motherboard Replacement: passo 8, imagem 1 %32
    • Disconnect the upper ribbon cable gently by pulling the ribbon up and away from the motherboard with two fingers.

    • Do not try to disconnect the ribbon cables from the front panel.

  9. HTC Vive Controller Motherboard Replacement: passo 9, imagem 1 %32 HTC Vive Controller Motherboard Replacement: passo 9, imagem 2 %32
    • Disconnect the middle ribbon cable gently by pulling the ribbon cable up and away from the motherboard with two fingers.

    • Do not try to disconnect the ribbon cables from the front panel.

  10. HTC Vive Controller Motherboard Replacement: passo 10, imagem 1 %32 HTC Vive Controller Motherboard Replacement: passo 10, imagem 2 %32 HTC Vive Controller Motherboard Replacement: passo 10, imagem 3 %32
    • Use the nylon spudger to lift the white tab by 90 degrees.

    • Disconnect the bottom ribbon cable gently by pulling the ribbon cable down with two fingers.

  11. HTC Vive Controller Motherboard Replacement, Battery: passo 11, imagem 1 %32 HTC Vive Controller Motherboard Replacement, Battery: passo 11, imagem 2 %32
    • Use the Phillips 00 screwdriver to remove two black 2.8mm screws from the silver plate.

    • Use the Phillips 00 screwdriver to remove the black 5.8mm screw from the bottom right corner of the silver plate.

  12. HTC Vive Controller Motherboard Replacement: passo 12, imagem 1 %32
    • Remove the silver plate by pinching it with two fingers and lifting up.

  13. HTC Vive Controller Motherboard Replacement: passo 13, imagem 1 %32
    • Use the Phillips 00 screwdriver to remove the black 5.8mm screw from the top left of the battery frame.

  14. HTC Vive Controller Motherboard Replacement: passo 14, imagem 1 %32 HTC Vive Controller Motherboard Replacement: passo 14, imagem 2 %32
    • Use the T5 Torx screwdriver to remove the two silver 4.2mm screws from the bottom of the battery frame.

  15. HTC Vive Controller Motherboard Replacement: passo 15, imagem 1 %32 HTC Vive Controller Motherboard Replacement: passo 15, imagem 2 %32
    • Disconnect the three-pin cable gently by pinching the cable with two fingers and pulling up.

  16. HTC Vive Controller Motherboard Replacement: passo 16, imagem 1 %32 HTC Vive Controller Motherboard Replacement: passo 16, imagem 2 %32 HTC Vive Controller Motherboard Replacement: passo 16, imagem 3 %32
    • Lift the battery frame to remove the battery from the Vive controller

  17. HTC Vive Controller Motherboard Replacement, Motherboard: passo 17, imagem 1 %32
    • Use the Phillips 00 screwdriver to remove the two black 5.8mm screws from the top of the motherboard.

  18. HTC Vive Controller Motherboard Replacement: passo 18, imagem 1 %32 HTC Vive Controller Motherboard Replacement: passo 18, imagem 2 %32
    • Use the T5 Torx screwdriver to remove the two silver 4.2mm screws from the bottom of the motherboard.

  19. HTC Vive Controller Motherboard Replacement: passo 19, imagem 1 %32 HTC Vive Controller Motherboard Replacement: passo 19, imagem 2 %32 HTC Vive Controller Motherboard Replacement: passo 19, imagem 3 %32
    • Use the nylon spudger to rotate the black tab up by 90 degrees.

    • Disconnect the ribbon cable carefully with your finger.

  20. HTC Vive Controller Motherboard Replacement: passo 20, imagem 1 %32 HTC Vive Controller Motherboard Replacement: passo 20, imagem 2 %32 HTC Vive Controller Motherboard Replacement: passo 20, imagem 3 %32
    • Lift the motherboard up and out of the Vive controller using your hands.

Conclusão

To reassemble your device, follow these instructions in reverse order.

9 outras pessoas executaram este guia.

Equipe

Cal Poly, Team S15-G5, Livingston Fall 2017 Membro de Cal Poly, Team S15-G5, Livingston Fall 2017

CPSU-LIVINGSTON-F17S15G5

Membros da 4

Autoria de 51 guias

13 comentários

Hi, do you know where I can get a new motherboard? I bought my controller second hand and after several months it stoppedworking…. when I took it apart the connection at the bottom has been removed and two wires soldered in place but it’s so small I can’t do it again so I need a new motherboard

thanks

nick.bentley.france - Responder

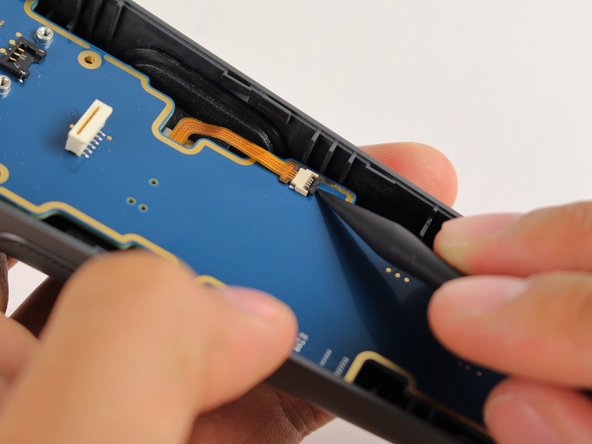
I am looking for the connetor at step 10. The top of the connector is broken (fail quality assurence). I am not interrested to purchase a new controler at 200$ because of a 2 cents connector.

Thank you

Yahveh Me - Responder

I had the same connector problem in step 10, where can I just buy the mother board

Adam Vosburgh -

did either of you find the connector for the power button to mother board in step 10

stang98kjg -

what plug is the for the bottom of the mother board for the main button looking to replace in step 10

angeloro - Responder

Adicione um comentário

Exibir estatísticas:

Últimas 24 horas: 4

Últimos 7 dias: 17

Últimos 30 dias: 68

Duração total: 10,686