Ir para o conteúdo principal

Esta versão pode conter edições incorretas. Mude para o último instantâneo verificado.

O que você precisa

  1. , Aquecimento da bolsa térmica iOpener: passo 1, imagem 1 %32 , Aquecimento da bolsa térmica iOpener: passo 1, imagem 2 %32
    • Recomendamos que você limpe o micro-ondas antes de prosseguir, pois qualquer sujeira desagradável na parte inferior pode acabar grudando no iOpener.

    • Coloque o iOpener no centro do micro-ondas.

    • Para microondas com prato giratório: certifique-se de que o prato esteja girando livremente. Se o iOpener ficar preso, ele poderá superaquecer e queimar.

  2. : passo 2, imagem 1 %32
    • Aqueça o iOpener por trinta segundos.

    • Durante o procedimento de reparo, à medida que o iOpener esfriar, reaqueça-o no micro-ondas por mais 30 segundos de cada vez.

    • Tenha cuidado para não superaquecer o iOpener durante o reparo. O superaquecimento pode fazer com que o iOpener se rompa.

    • Nunca toque no iOpener se ele parecer inchado.

    • Se o centro do iOpener ainda estiver muito quente para ser tocado, continue a usá-lo enquanto espera que ele esfrie um pouco mais antes de reaquecê-lo. Um iOpener aquecido adequadamente deve permanecer quente por até 10 minutos.

  3. : passo 3, imagem 1 %32
    • Remova o iOpener do micro-ondas, segurando-o em uma das duas pontas finas, evitando o centro dele, que está quente.

    • O iOpener estará muito quente, portanto tenha cuidado ao manuseá-lo. Use uma luva de forno, se necessário.

  4. , Método de aquecimento alternativo do iOpener: passo 4, imagem 1 %32 , Método de aquecimento alternativo do iOpener: passo 4, imagem 2 %32
    • Se você não tiver um micro-ondas, siga este passo para aquecer o iOpener em água fervida.

    • Encha uma panela ou frigideira com água suficiente para submergir completamente um iOpener.

    • Aqueça a água até ferver. Desligue o fogo.

    • Coloque um iOpener na água quente por 2 a 3 minutos. Certifique-se de que o iOpener esteja totalmente submerso na água.

    • Use um pegador para retirar o iOpener aquecido da água quente.

    • Seque bem o iOpener com uma toalha.

    • O iOpener estará muito quente, portanto, tenha cuidado para segurá-lo apenas pelas abas das extremidades.

    • Sua bolsa térmica iOpener está pronta para o uso! Se precisar reaquecer o iOpener, aqueça a água até ferver, desligue o fogo e coloque o iOpener na água por 2 a 3 minutos.

  5. Este passo não foi traduzido. Ajude a traduzi-lo

    : passo 5, imagem 1 %32
    • Handling it by the tag, place the heated iOpener across the bottom casing.

    • Let the iOpener sit for at least a minute to soften the adhesive beneath the casing.

  6. Este passo não foi traduzido. Ajude a traduzi-lo

    : passo 6, imagem 1 %32 : passo 6, imagem 2 %32 : passo 6, imagem 3 %32
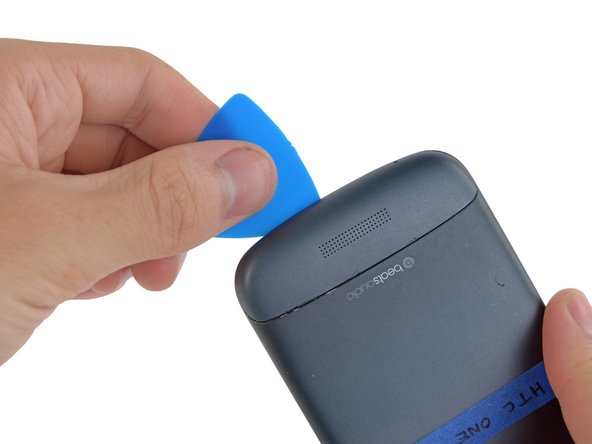
    • Gently place an opening pick in the corner of the gap between the bottom casing and rear case.

    • Slide the opening pick along the side of the casing, prying it away from the adhesive as you go.

  7. Este passo não foi traduzido. Ajude a traduzi-lo

    : passo 7, imagem 1 %32
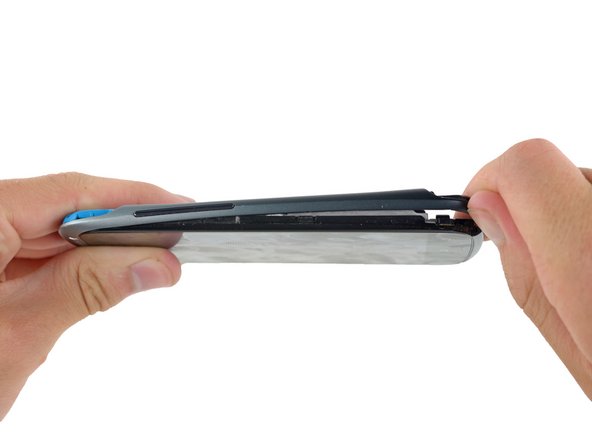
    • Use your fingers to pull the bottom casing off the rest of the phone.

  8. Este passo não foi traduzido. Ajude a traduzi-lo

    : passo 8, imagem 1 %32 : passo 8, imagem 2 %32
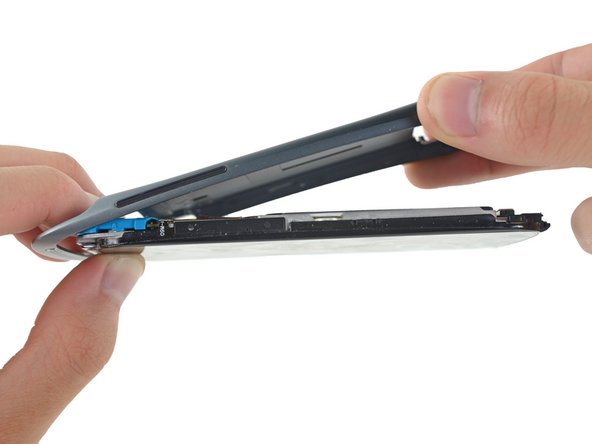
    • Starting at the groove near the headphone jack, use a plastic opening tool to lift the top casing.

  9. Este passo não foi traduzido. Ajude a traduzi-lo

    : passo 9, imagem 1 %32
    • Use your fingers to pull the top casing off of the rest of the phone.

  10. Este passo não foi traduzido. Ajude a traduzi-lo

    : passo 10, imagem 1 %32
    • Remove the following screws holding the rear case to the rest of the phone:

    • Two 3.15 mm Phillips #00 screws

    • One 4.15 Torx T5 screw

    • One 4 mm Torx T5 screw

  11. Este passo não foi traduzido. Ajude a traduzi-lo

    : passo 11, imagem 1 %32 : passo 11, imagem 2 %32 : passo 11, imagem 3 %32
    • Place your fingers on either side of the phone and gently push up on the rear case.

    • It is important to start from the bottom of the phone because the rear case wraps around the front of the phone at the top which makes it impossible to start prying from there.

  12. Este passo não foi traduzido. Ajude a traduzi-lo

    : passo 12, imagem 1 %32
    • Pull the rear case away from the rest of the phone with your hands.

  13. Este passo não foi traduzido. Ajude a traduzi-lo

    : passo 13, imagem 1 %32 : passo 13, imagem 2 %32
    • Using the pointed end of a spudger, lift the battery cable and release the connector.

  14. Este passo não foi traduzido. Ajude a traduzi-lo

    : passo 14, imagem 1 %32 : passo 14, imagem 2 %32
    • Switching to the flat end of the spudger, work your way underneath the battery and peel it away from the adhesive.

  15. Este passo não foi traduzido. Ajude a traduzi-lo

    : passo 15, imagem 1 %32
    • Remove the battery from the phone.

  16. Este passo não foi traduzido. Ajude a traduzi-lo

    : passo 16, imagem 1 %32
    • Remove the three 3.15mm Phillips #00 screws from the turquoise case.

  17. Este passo não foi traduzido. Ajude a traduzi-lo

    : passo 17, imagem 1 %32 : passo 17, imagem 2 %32
    • Using a plastic opening tool, lift the turquoise case from the end near the headphone jack.

  18. Este passo não foi traduzido. Ajude a traduzi-lo

    : passo 18, imagem 1 %32
    • Remove the turquoise cover from the phone.

  19. Este passo não foi traduzido. Ajude a traduzi-lo

    : passo 19, imagem 1 %32 : passo 19, imagem 2 %32
    • A camera filter is now free to move, so remove it using tweezers.

  20. Este passo não foi traduzido. Ajude a traduzi-lo

    : passo 20, imagem 1 %32 : passo 20, imagem 2 %32 : passo 20, imagem 3 %32
    • Use tweezers to lift the yellow polyimide tape that covers the ZIF connectors.

  21. Este passo não foi traduzido. Ajude a traduzi-lo

    : passo 21, imagem 1 %32 : passo 21, imagem 2 %32
    • Use the pointed end of a spudger to lift the white tab on the largest ZIF connector opposite the USB connector.

  22. Este passo não foi traduzido. Ajude a traduzi-lo

    : passo 22, imagem 1 %32 : passo 22, imagem 2 %32 : passo 22, imagem 3 %32
    • Use the pointed edge of a spudger to work the ZIF cable out of its connector.

    • To do this, you may have to slowly work both sides until the whole cable is released.

  23. Este passo não foi traduzido. Ajude a traduzi-lo

    : passo 23, imagem 1 %32
    • Repeat the procedure from steps 19 and 20 to remove the cables from the remaining ZIF connectors.

  24. Este passo não foi traduzido. Ajude a traduzi-lo

    : passo 24, imagem 1 %32 : passo 24, imagem 2 %32
    • Using the pointed end of the spudger, pop the antenna cable from its connector on the motherboard.

  25. Este passo não foi traduzido. Ajude a traduzi-lo

    : passo 25, imagem 1 %32
    • Remove the 3.15 mm Phillips #00 screw from the motherboard.

  26. Este passo não foi traduzido. Ajude a traduzi-lo

    : passo 26, imagem 1 %32 : passo 26, imagem 2 %32
    • Remove the motherboard from the rest of the phone.

  27. Este passo não foi traduzido. Ajude a traduzi-lo

    : passo 27, imagem 1 %32
    • Remove the plastic casing from the phone assembly.

    • If you are having difficulty removing the casing, use a plastic opening tool to gently pry it from the phone.

  28. Este passo não foi traduzido. Ajude a traduzi-lo

    : passo 28, imagem 1 %32
    • Remove the speaker.

Linha de Chegada

Adam Redmond

Membro desde: 05/16/17

535 Reputação

Autoria de 5 guias

Equipe

IUPUI, Team S4-G3, Harley Spring 2017 Membro de IUPUI, Team S4-G3, Harley Spring 2017

IUPUI-HARLEY-S17S4G3

Membros da 3

Autoria de 5 guias

0 comentários

Adicione um comentário

Exibir estatísticas:

Últimas 24 horas: 0

Últimos 7 dias: 2

Últimos 30 dias: 2

Duração total: 345