Ir para o conteúdo principal

Este guia tem alterações mais recentes. Mudar para a última versão não verificada.

HTC Droid Eris Midframe Replacement

O que você precisa

  1. HTC Droid Eris Midframe Replacement, Battery: passo 1, imagem 1 %32 HTC Droid Eris Midframe Replacement, Battery: passo 1, imagem 2 %32
    • Place the device on a flat surface with the headphone outlet facing you.

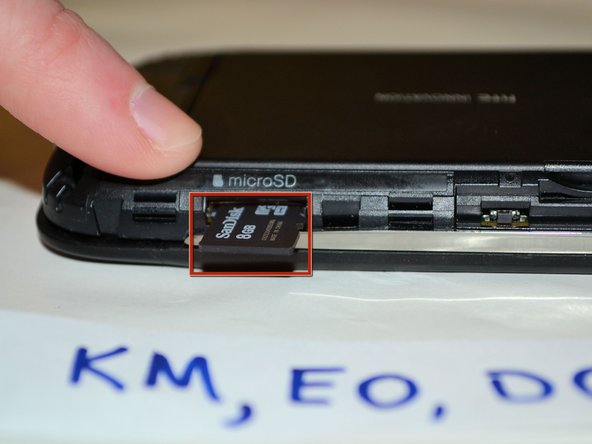
    • Place the tip of one of your fingers over the highlighted spot.

    • Next, pull the back cover upwards. If this feels difficult, use the spudger.

  2. HTC Droid Eris Midframe Replacement: passo 2, imagem 1 %32 HTC Droid Eris Midframe Replacement: passo 2, imagem 2 %32
    • Lay the device on a flat surface with the screen facing downward. Use one hand to hold the device in place.

    • With your free hand, stick one of your fingers in the marked gap. Pull gently upwards towards you.

    • If the battery is not coming out with this technique, use the plastic opening tool.

  3. HTC Droid Eris Midframe Replacement, Midframe: passo 3, imagem 1 %32 HTC Droid Eris Midframe Replacement, Midframe: passo 3, imagem 2 %32
    • At the lower right hand corner of the phone (as highlighted in the picture as shown) use one hand to hold the device in place and use your finger (on your free hand) to push the micro SD card inwards until you hear a "click" sound and it pops out.

    • If that method is difficult, use the plastic opening tool to push the micro SD card inwards and it will make a "click" sound and pop out.

  4. HTC Droid Eris Midframe Replacement: passo 4, imagem 1 %32 HTC Droid Eris Midframe Replacement: passo 4, imagem 2 %32
    • Use the T-4 screwdriver to remove the three .050 mm screws from the back cover.

    • Place the screws in a safe place. The screws are extremely small and easy to lose. You will need to use the screws in order to put the device back together again.

  5. HTC Droid Eris Midframe Replacement: passo 5, imagem 1 %32 HTC Droid Eris Midframe Replacement: passo 5, imagem 2 %32
    • Use the plastic opening tool and place it in the gap by the chrome bezels which are located on both sides of the device. Pull the plastic opening tool downward so that the plastic case will pry open. Start prying open the device and work clockwise.

    • DON’T BREAK THE CLIPS (you can damage the frame this way). Pry it gently until you hear it click and start to see it open.

    • ''After the clips are disengaged, there are no cables holding the back panel in its place, you should be able to pull the midframe out easily..'

Conclusão

To reassemble your device, follow these instructions in reverse order.

Elizabeth Ofori

Membro desde: 04/15/13

648 Reputação

Autoria de 6 guias

Equipe

SUNY Cortland, Team 1-2, Getto Spring 2013 Membro de SUNY Cortland, Team 1-2, Getto Spring 2013

SUNYCORT-GETTO-S13S1G2

Membros da 5

Autoria de 12 guias

0 comentários

Adicione um comentário

Exibir estatísticas:

Últimas 24 horas: 0

Últimos 7 dias: 0

Últimos 30 dias: 0

Duração total: 328