Ir para o conteúdo principal

Este guia tem alterações mais recentes. Mudar para a última versão não verificada.

HP Stream 13-c110nr Heat Sink Replacement

O que você precisa

  1. HP Stream 13-c110nr Heat Sink Replacement, Keyboard Assembly: passo 1, imagem 1 %32
    • Close the device.

    • Remove AC adapter plug from electrical outlet.

    • Remove AC adapter from device.

    • Turn the device off.

    • Unplug all external devices from device.

    • If you are unsure whether the computer is off or in hibernation mode, start the computer and then shutdown the operating system.

  2. HP Stream 13-c110nr Heat Sink Replacement: passo 2, imagem 1 %32
    • Turn the device upside down with the back facing towards you.

  3. HP Stream 13-c110nr Heat Sink Replacement: passo 3, imagem 1 %32 HP Stream 13-c110nr Heat Sink Replacement: passo 3, imagem 2 %32 HP Stream 13-c110nr Heat Sink Replacement: passo 3, imagem 3 %32
    • Use a pick to remove the two (2) large computer feet along the back edge of the device.

    • Use a pick to remove the two (2) small computer feet.

    • Use a pick to remove the one (1) screw cover.

    • Place rubber computer feet in safe place for reassembly.

  4. HP Stream 13-c110nr Heat Sink Replacement: passo 4, imagem 1 %32 HP Stream 13-c110nr Heat Sink Replacement: passo 4, imagem 2 %32 HP Stream 13-c110nr Heat Sink Replacement: passo 4, imagem 3 %32
    Ferramenta utilizada nesse passo:
    Magnetic Project Mat
    $19.95
    Comprar
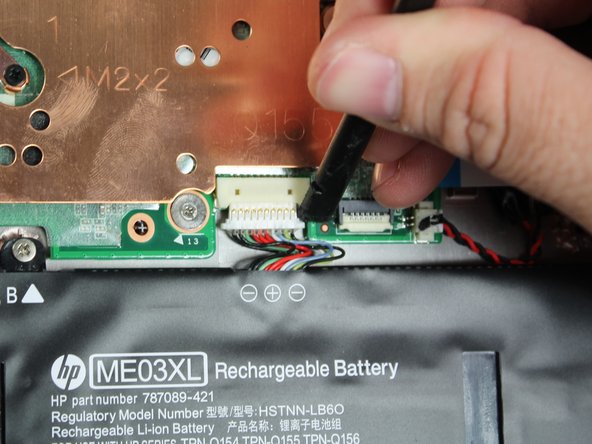
    • Remove the thirteen (13) Phillips P0 PM2.5x6.0 mm screws.

    • Place the thirteen (13) screws on magnetic mat for reassembly.

  5. HP Stream 13-c110nr Heat Sink Replacement: passo 5, imagem 1 %32
    • Turn the device over with the front facing towards you.

    • Open the device as shown.

  6. HP Stream 13-c110nr Heat Sink Replacement: passo 6, imagem 1 %32 HP Stream 13-c110nr Heat Sink Replacement: passo 6, imagem 2 %32 HP Stream 13-c110nr Heat Sink Replacement: passo 6, imagem 3 %32
    • Insert the Spudger between the Top Cover and Bottom Cover to lift the front edge until it separates from the Bottom Cover.

    • Do not completely remove the Keyboard/Top cover from the Bottom cover yet.

  7. HP Stream 13-c110nr Heat Sink Replacement: passo 7, imagem 1 %32
    • Disconnect the Touchpad cable.

  8. HP Stream 13-c110nr Heat Sink Replacement: passo 8, imagem 1 %32 HP Stream 13-c110nr Heat Sink Replacement: passo 8, imagem 2 %32
    • Disconnect the Keyboard Cable.

  9. HP Stream 13-c110nr Heat Sink Replacement: passo 9, imagem 1 %32 HP Stream 13-c110nr Heat Sink Replacement: passo 9, imagem 2 %32
    • Disconnect the Power connector cable.

  10. HP Stream 13-c110nr Heat Sink Replacement: passo 10, imagem 1 %32
    • Remove the Keyboard/Top Cover from the device.

  11. HP Stream 13-c110nr Heat Sink Replacement, Battery Assembly: passo 11, imagem 1 %32 HP Stream 13-c110nr Heat Sink Replacement, Battery Assembly: passo 11, imagem 2 %32
    • Use a pick to detach the Battery assembly cable.

  12. HP Stream 13-c110nr Heat Sink Replacement: passo 12, imagem 1 %32 HP Stream 13-c110nr Heat Sink Replacement: passo 12, imagem 2 %32
    • Remove eight (8) Phillips P0 PM2.0x3.0 mm screws from Battery assembly.

    • Place eight (8) screws on magnetic mat for reassembly.

  13. HP Stream 13-c110nr Heat Sink Replacement: passo 13, imagem 1 %32
    • Remove Battery Assembly from device.

  14. HP Stream 13-c110nr Heat Sink Replacement, Heat Sink: passo 14, imagem 1 %32 HP Stream 13-c110nr Heat Sink Replacement, Heat Sink: passo 14, imagem 2 %32
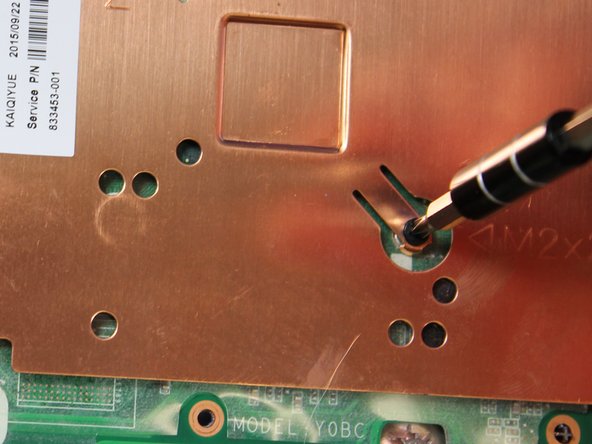
    • Remove two (2) Phillips P0 PM2.0x2.0 mm screws.

    • Place two (2) screws on magnetic mat for reassembly.

  15. HP Stream 13-c110nr Heat Sink Replacement: passo 15, imagem 1 %32
    • Remove the Heat Sink from the System Board.

Conclusão

To reassemble your device, follow these instructions in reverse order.

0 comentários

Adicione um comentário

Exibir estatísticas:

Últimas 24 horas: 0

Últimos 7 dias: 0

Últimos 30 dias: 0

Duração total: 128