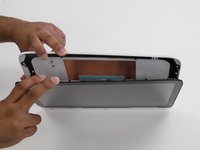
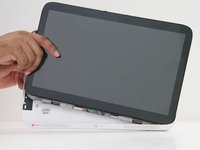
Ir para o conteúdo principal

HP Split x2 Rear Cover Replacement

O que você precisa

  1. HP Split x2 Rear Cover Replacement, Rear Cover: passo 1, imagem 1 %32
    • Opening the device voids the manufacturer warranty.

    • Power down the HP Split x2 before beginning the repair

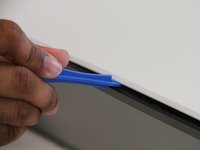
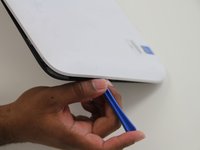
    • Separate the tablet from the keyboard by pushing the slider to the left and lifting the tablet from the keyboard.

  2. HP Split x2 Rear Cover Replacement: passo 2, imagem 1 %32 HP Split x2 Rear Cover Replacement: passo 2, imagem 2 %32 HP Split x2 Rear Cover Replacement: passo 2, imagem 3 %32
    • Remove the four white caps on the bottom edge of the tablet.

    • Use a tweezer to grasp white caps.

    • The white caps are easily lost. Store them in a secure place.

  3. HP Split x2 Rear Cover Replacement: passo 3, imagem 1 %32
    • Use a Phillips #000 screwdriver to remove the four 3mm screws.

  4. HP Split x2 Rear Cover Replacement: passo 4, imagem 1 %32 HP Split x2 Rear Cover Replacement: passo 4, imagem 2 %32
    • Use a plastic opening tool to pry the tabs on the top, left and right sides of the tablet.

    • Only the top and sides have tabs. Remove all tabs before lifting screen.

  5. HP Split x2 Rear Cover Replacement: passo 5, imagem 1 %32 HP Split x2 Rear Cover Replacement: passo 5, imagem 2 %32
    • Separate the cover and the screen.

    • Gently lift the screen out of the cover.

Conclusão

To reassemble your device, follow these instructions in reverse order.

6 outras pessoas executaram este guia.

Ricky Huitema

Membro desde: 09/24/15

449 Reputação

Autoria de 2 guias

Equipe

Texas Tech, Team 22-5, Rauch Fall 2015 Membro de Texas Tech, Team 22-5, Rauch Fall 2015

TTU-RAUCH-F15S22G5

Membros da 3

Autoria de 2 guias

0 comentários

Adicione um comentário

Exibir estatísticas:

Últimas 24 horas: 6

Últimos 7 dias: 6

Últimos 30 dias: 23

Duração total: 3,880