Ir para o conteúdo principal

HP ElitePad 1000 G2 Battery Replacement

O que você precisa

  1. HP ElitePad 1000 G2 Battery Replacement, Display: passo 1, imagem 1 %32 HP ElitePad 1000 G2 Battery Replacement, Display: passo 1, imagem 2 %32 HP ElitePad 1000 G2 Battery Replacement, Display: passo 1, imagem 3 %32
    • Before disassembling the tablet: make sure the tablet is off, disconnect the power cord from the tablet, and disconnect all external devices from the tablet.

    • Using a Phillips #00 screwdriver, remove the two Phillips PM 1.4×3.2mm screws located next to the charging port.

  2. HP ElitePad 1000 G2 Battery Replacement: passo 2, imagem 1 %32 HP ElitePad 1000 G2 Battery Replacement: passo 2, imagem 2 %32 HP ElitePad 1000 G2 Battery Replacement: passo 2, imagem 3 %32
    • Place the suction cup on the lower right corner of the tablet display glass, making sure to place the suction cup inside the edges of the border of the display glass.

    • Insert a plastic pick in between the display and the tablet case. Then use a plastic removal tool to separate the display further.

    • Pull on the suction cup while using the prying tool to separate the display from the tablet.

    • Gently lift the display from the tablet in order to avoid damaging the cables.

  3. HP ElitePad 1000 G2 Battery Replacement: passo 3, imagem 1 %32 HP ElitePad 1000 G2 Battery Replacement: passo 3, imagem 2 %32 HP ElitePad 1000 G2 Battery Replacement: passo 3, imagem 3 %32
    • To disconnect the cables, use the spudger tool to gently pull back on the black tab located on the side of the connector while gently pulling the cable.

    • Release the zero insertion force (ZIF) connector to which the TouchScreen cable is attached, and then disconnect the TouchScreen cable from the system board.

  4. HP ElitePad 1000 G2 Battery Replacement: passo 4, imagem 1 %32 HP ElitePad 1000 G2 Battery Replacement: passo 4, imagem 2 %32
    • Release the ZIF connector to which the display cable is attached, and then disconnect the display cable from the system board.

  5. HP ElitePad 1000 G2 Battery Replacement: passo 5, imagem 1 %32 HP ElitePad 1000 G2 Battery Replacement: passo 5, imagem 2 %32
    • Remove the display from the tablet.

  6. HP ElitePad 1000 G2 Battery Replacement, NFC Antenna: passo 6, imagem 1 %32 HP ElitePad 1000 G2 Battery Replacement, NFC Antenna: passo 6, imagem 2 %32
    • Locate the NFC antenna.

    • Release the ZIF connector to which the NFC antenna cable is attached.

    • To disconnect the cable, use the plastic prying tool to gently push on the tab located on the side of the connector.

  7. HP ElitePad 1000 G2 Battery Replacement: passo 7, imagem 1 %32 HP ElitePad 1000 G2 Battery Replacement: passo 7, imagem 2 %32
    • Detach the NFC antenna from the surface of the system board.

    • The NFC antenna is attached to the system board with double-sided adhesive.

    • Remove the NFC antenna.

  8. HP ElitePad 1000 G2 Battery Replacement, Battery: passo 8, imagem 1 %32
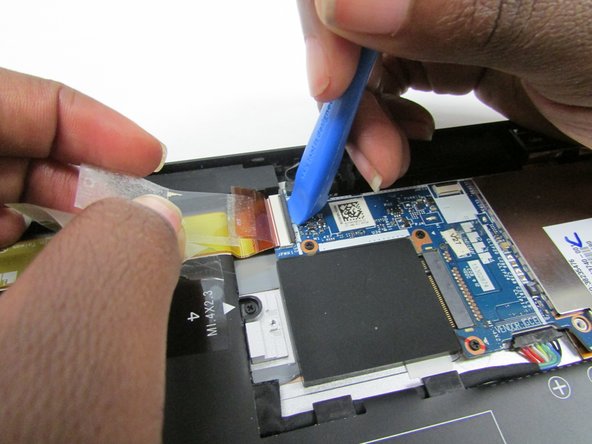
    • Locate the power button board ribbon cable.

    • Locate the battery to motherboard connector.

  9. HP ElitePad 1000 G2 Battery Replacement: passo 9, imagem 1 %32 HP ElitePad 1000 G2 Battery Replacement: passo 9, imagem 2 %32 HP ElitePad 1000 G2 Battery Replacement: passo 9, imagem 3 %32
    • Lift the clear tape attached to the power button board ribbon cable.

    • Disconnect the ZIF connector by using a plastic removal tool to gently pull up on the black tab.

    • Lift the power button board ribbon cable up and away so that it doesn't get in the way of the battery during removal.

  10. HP ElitePad 1000 G2 Battery Replacement: passo 10, imagem 1 %32 HP ElitePad 1000 G2 Battery Replacement: passo 10, imagem 2 %32
    • Disconnect the battery to system board connector by pushing gently on it with a plastic pry tool and then pull it away from the system board.

  11. HP ElitePad 1000 G2 Battery Replacement: passo 11, imagem 1 %32
    • Using a philips 00 screw driver take out the six Phillips PM1.3×2.0mm screws

  12. HP ElitePad 1000 G2 Battery Replacement: passo 12, imagem 1 %32 HP ElitePad 1000 G2 Battery Replacement: passo 12, imagem 2 %32
    • Carefully lift the battery away from the bottom cover.

Conclusão

To reassemble your device, follow these instructions in reverse order.

7 outras pessoas executaram este guia.

0 comentários

Adicione um comentário

Exibir estatísticas:

Últimas 24 horas: 6

Últimos 7 dias: 22

Últimos 30 dias: 87

Duração total: 7,159