Ir para o conteúdo principal

HP EliteBook 820 G3 Hard Drive Replacement

O que você precisa

  1. HP EliteBook 820 G3 Hard Drive Replacement, Back Cover: passo 1, imagem 1 %32 HP EliteBook 820 G3 Hard Drive Replacement, Back Cover: passo 1, imagem 2 %32
    • Remove the eleven 3 mm screws with a Phillips #00 screwdriver.

    • Keep track of where the screw covers were attached to as there are four different sizes.

  2. HP EliteBook 820 G3 Hard Drive Replacement: passo 2, imagem 1 %32 HP EliteBook 820 G3 Hard Drive Replacement: passo 2, imagem 2 %32
    • Remove the SD card blank and the single 3 mm screw beneath it using a Phillips #00 screwdriver.

    • Lift off the back cover with your hands.

  3. HP EliteBook 820 G3 Hard Drive Replacement, Hard Drive: passo 3, imagem 1 %32 HP EliteBook 820 G3 Hard Drive Replacement, Hard Drive: passo 3, imagem 2 %32
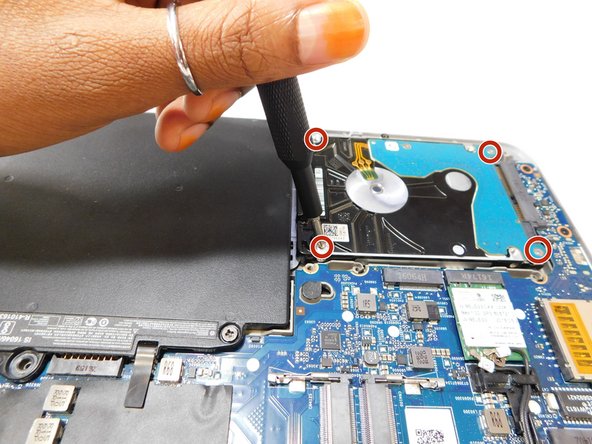
    • Remove the four 3 mm screws from the hard drive using a Phillips #00 screwdriver.

  4. HP EliteBook 820 G3 Hard Drive Replacement: passo 4, imagem 1 %32 HP EliteBook 820 G3 Hard Drive Replacement: passo 4, imagem 2 %32
    • Slide the hard drive away from the system board connector to disconnect the hard drive from the system board.

    • Place it in a static dissipative bag.

Conclusão

To reassemble your device, follow these instructions in reverse order.

Uma outra pessoa concluiu este guia.

Sarah Bisimwa

Membro desde: 08/25/22

247 Reputação

Autoria de 2 guias

Equipe

Gateway, Team 1-1, Class Fall 2022 Membro de Gateway, Team 1-1, Class Fall 2022

GCC-CLASS-F22S1G1

Membros da 4

Autoria de 5 guias

0 comentários

Adicione um comentário

Exibir estatísticas:

Últimas 24 horas: 4

Últimos 7 dias: 23

Últimos 30 dias: 79

Duração total: 1,115