Ir para o conteúdo principal

HP Elite x2 1012 G2 Battery Replacement

O que você precisa

  1. HP Elite x2 1012 G2 Battery Replacement, Screen: passo 1, imagem 1 %32
    • Make sure the device is turned off before starting.

    • Orient the device so the back is facing you, with the kickstand up.

  2. HP Elite x2 1012 G2 Battery Replacement: passo 2, imagem 1 %32 HP Elite x2 1012 G2 Battery Replacement: passo 2, imagem 2 %32 HP Elite x2 1012 G2 Battery Replacement: passo 2, imagem 3 %32
    • Remove the six 3mm Torx T5 screws underneath the kickstand.

  3. HP Elite x2 1012 G2 Battery Replacement: passo 3, imagem 1 %32 HP Elite x2 1012 G2 Battery Replacement: passo 3, imagem 2 %32
    • Turn the device over so the screen is facing you.

    • Place a suction cup firmly onto a corner of the screen.

    • Lift up gently until you see the screen separate from the casing.

    • Repeat this process for all four corners.

    • During reassembly, certain clips/edges may not snap into place properly even with a lot of force. To counteract this, lift the edge up, place the suction cup further inwards on the screen and pull it slightly upwards while pressing the edge of the screen downwards. The edge should snap correctly into the housing.

  4. HP Elite x2 1012 G2 Battery Replacement: passo 4, imagem 1 %32
    • Lift the screen up and off of the device.

    • Pry each corner up first, otherwise you may damage or crack the screen.

  5. HP Elite x2 1012 G2 Battery Replacement: passo 5, imagem 1 %32 HP Elite x2 1012 G2 Battery Replacement: passo 5, imagem 2 %32 HP Elite x2 1012 G2 Battery Replacement: passo 5, imagem 3 %32
    • Remove the two connectors on the back of the screen by lifting the connector tabs on the motherboard with a plastic opening tool and pulling gently.

  6. HP Elite x2 1012 G2 Battery Replacement: passo 6, imagem 1 %32 HP Elite x2 1012 G2 Battery Replacement: passo 6, imagem 2 %32
    • Remove the screen by gently lifting it off of the device.

  7. HP Elite x2 1012 G2 Battery Replacement, Battery: passo 7, imagem 1 %32
    • Orient the device so that the battery is closest to you.

    • The battery is the large, black rectangle at the bottom of the device.

  8. HP Elite x2 1012 G2 Battery Replacement: passo 8, imagem 1 %32 HP Elite x2 1012 G2 Battery Replacement: passo 8, imagem 2 %32
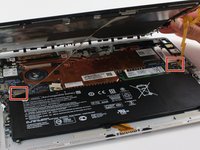
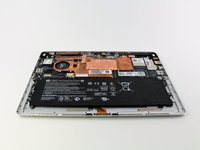
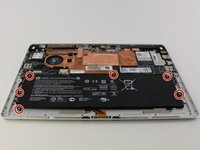
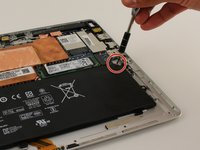
    • Remove all six Phillips 3 mm screws around the battery by rotating in the counterclockwise direction with a Phillips screwdriver.

    Hat wunderbar geklappt mit dem Akku tauschen, habe vergebens nach Kreuzschlitzschrauben gesucht, entweder hat da jemmand schon mal was versucht oder liegt es daran das es ein G1 war, bevor ich mir einen neuen Akku gekauft habe über ebay habe ich vorher die Schritte 1-8 befolgt wie oben angegeben und aufpassen man sollte schon die richtige Volt und Ampere vergleichen, wollte erst einen kaufen für 37,99 €, beim näheren hinsehen habe ich gemerkt das dieser nicht passt, nun habe ich 44,99€ bezahlt und TOP, Gruß Mario

    Mario Zilius - Responder

  9. HP Elite x2 1012 G2 Battery Replacement: passo 9, imagem 1 %32 HP Elite x2 1012 G2 Battery Replacement: passo 9, imagem 2 %32
    • Remove the battery's connector by pushing both sides of the tab towards yourself with a plastic opening tool.

  10. HP Elite x2 1012 G2 Battery Replacement: passo 10, imagem 1 %32
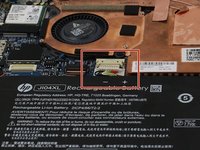
    • Lift the battery out of the device.

    Beim "HP Elite x2 1012 G1" ist es fast identisch.

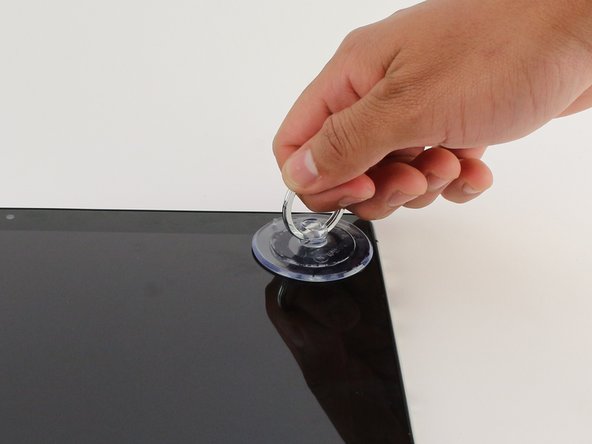
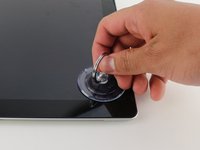
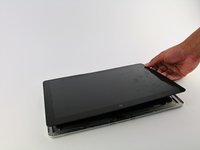
    - Bei Schritt 3 konnte ich das Display nicht vollständig mit dem Saugnapf anheben. Musste mit einem Kunststoffkeil vorsichtig nachhelfen

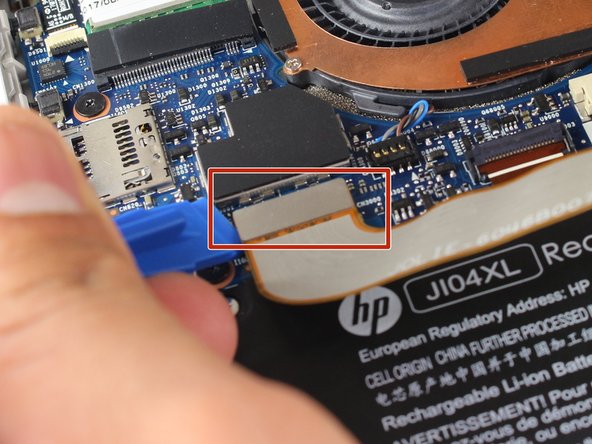
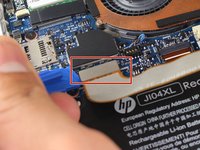
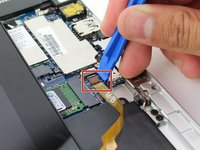
    - Bei Schritt 5 habe ich den Stecker am Display, nicht am Motherboard entfernt

    - Bei Schritt 8: der Akku für das G1 hat sieben Schrauben

    :)

    Anselmbe - Responder

Conclusão

To reassemble your device, follow these instructions in reverse order.

16 outras pessoas executaram este guia.

Andy Velazquez

Membro desde: 04/18/18

350 Reputação

Autoria de 1 guia

Equipe

Cal Poly, Team S18-G5, Livingston Spring 2018 Membro de Cal Poly, Team S18-G5, Livingston Spring 2018

CPSU-LIVINGSTON-S18S18G5

4 Membros

Autoria de 13 guias

6 comentários

how do you test the battery? what voltage should it be maintaining?

scott kay - Responder

Hi, after the replacement battery
toch not working, help pls?

Parsa Aghabeikzadeh - Responder

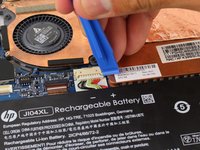
The first "Foil-Connector" in step 5 is for the Touch Feature. Make sure it fits propper!

Anselmbe -

PC not coming on, also not charging.

Abiola - Responder

If your Notebook isn't charging, has Problems with touch or is not booting anymore, please check all of the three connectors you were to disconnect and make sure the fit propperly.

Maybe you need a magnifying glas to check the correct fitting.

Anselmbe - Responder

Comentar

Exibir estatísticas:

Últimas 24 horas: 12

Últimos 7 dias: 80

Últimos 30 dias: 328

Ao todo: 26,098