Introdução
If you are planning on replacing any of the internal components of your HP 17-x061nr laptop then you will need to remove the back. This particular laptop is built with a solid back cover that the keyboard and internal components are seated into. There are a lot of screws that hold the laptop together including 2 that are hidden under the rubber footrests. Pay careful attention to this guide and you will have your laptop disassembled and be able to replace any internal components easily.
O que você precisa
-
-
With the laptop upside down, remove the battery by hand and the twelve 7.0 mm screws that are holding the back case to the front. Use a JIS #0 screwdriver to remove the screws.
-
-
-
-
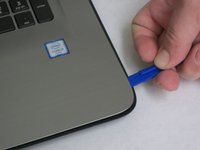
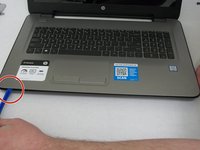
Flip the computer over and use a plastic opening tool to wedge between the back and front cases.
-
Trace the perimeter of the laptop. Make sure to keep the tool inserted between the front and back cases. You will hear popping sounds as the back case becomes disengaged from the front plate.
-
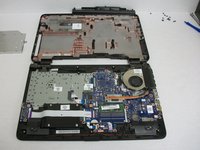
Flip the laptop over and lift the back case off. Now you have access to all of the internal hardware.
-


To reassemble your device, follow these instructions in reverse order.
Cancelar: não concluí este guia.
7 outras pessoas executaram este guia.
Equipe

Washington State, Team S1-G1, Lobnitz Spring 2018 Membro de Washington State, Team S1-G1, Lobnitz Spring 2018
WSU-LOBNITZ-S18S1G1
5 Membros
Autoria de 5 guias
3Comentários do guia
I have a 17-x051nr but the steps are exactly the same. Thank you! (I never like peeling off the bottom feet unless I know for sure there’s a screw under there)
i searched all over for how to do this with my 17 inch HP Elite Notebook. Your instructions were perfect! Thank you!
Thank you! Also worked for HP-14AN013NA