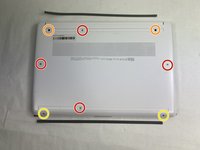
Ir para o conteúdo principal

HP 14-dq0052dx Daughterboard Replacement

O que você precisa

  1. HP 14-dq0052dx Daughterboard Replacement, Back Panel: passo 1, imagem 1 %32
    • Orient your laptop so that the vents are facing upwards.

  2. HP 14-dq0052dx Daughterboard Replacement: passo 2, imagem 1 %32
    • Remove the rubber feet.

  3. HP 14-dq0052dx Daughterboard Replacement: passo 3, imagem 1 %32 HP 14-dq0052dx Daughterboard Replacement: passo 3, imagem 2 %32
    • Remove the four M2.0 x 6 mm screws using a JIS #1 screwdriver.

    • Remove the two M2.5 x 6 mm screws using a JIS #1 screwdriver.

    • Remove the two M2.0 x 4 mm screws using a JIS #1 screwdriver.

    • Use an iFixit opening tool to pry the back cover away from the laptop.

  4. HP 14-dq0052dx Daughterboard Replacement, Daughterboard: passo 4, imagem 1 %32
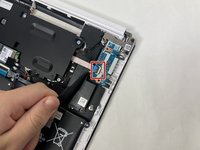
    • Remove the single 3 mm screw from the daughterboard using a JIS #1 screwdriver.

  5. HP 14-dq0052dx Daughterboard Replacement: passo 5, imagem 1 %32 HP 14-dq0052dx Daughterboard Replacement: passo 5, imagem 2 %32
    • Detach the cable connector from the daughterboard using a pair of tweezers.

    • Remove the daughterboard from the laptop.

Conclusão

To reassemble your device, follow these instructions in reverse order.

Kristen Gismondi

Membro desde: 11/12/14

92.630 Reputação

Autoria de 241 guias

Equipe

iFixit Membro de iFixit

Staff

118 Membros

Autoria de 19.648 guias

0Comentários do guia

Comentar

Visualizações:

Últimas 24 horas: 2

Últimos 7 dias: 9

Últimos 30 dias: 18

Ao todo: 58