Ir para o conteúdo principal

HMDX Jam Plus Micro USB Jack Replacement

O que você precisa

  1. HMDX Jam Plus  Micro USB Jack Replacement, Battery: passo 1, imagem 1 %32 HMDX Jam Plus  Micro USB Jack Replacement, Battery: passo 1, imagem 2 %32 HMDX Jam Plus  Micro USB Jack Replacement, Battery: passo 1, imagem 3 %32
    • Flip the device over so the bottom is facing up.

    • Use the large plastic opening tool to gently pry the rubber base from the device.

    • Slowly move the plastic opening tool around the edge of the rubber base to separate it from the plastic.

  2. HMDX Jam Plus  Micro USB Jack Replacement: passo 2, imagem 1 %32 HMDX Jam Plus  Micro USB Jack Replacement: passo 2, imagem 2 %32
    • Use a Phillips #1 screwdriver to remove the four black 9mm screws from the device.

  3. HMDX Jam Plus  Micro USB Jack Replacement: passo 3, imagem 1 %32 HMDX Jam Plus  Micro USB Jack Replacement: passo 3, imagem 2 %32
    • Gently separate the base from the rest of the device to reveal the battery and the main board.

  4. HMDX Jam Plus  Micro USB Jack Replacement: passo 4, imagem 1 %32 HMDX Jam Plus  Micro USB Jack Replacement: passo 4, imagem 2 %32 HMDX Jam Plus  Micro USB Jack Replacement: passo 4, imagem 3 %32
    • Carefully use the plastic opening tool to remove the glue around the battery and speaker connectors.

    • Pull gently on the connectors to separate each one from the main board.

    • The battery is connected to board in the red socket and the speaker is connected in the white socket.

  5. HMDX Jam Plus  Micro USB Jack Replacement: passo 5, imagem 1 %32 HMDX Jam Plus  Micro USB Jack Replacement: passo 5, imagem 2 %32 HMDX Jam Plus  Micro USB Jack Replacement: passo 5, imagem 3 %32
    • Batteries can be very dangerous if punctured. Use extra caution when using tools around the battery.

    • Use the plastic opening tool to gently pry the battery free from the rest of the device.

  6. HMDX Jam Plus  Micro USB Jack Replacement: passo 6, imagem 1 %32 HMDX Jam Plus  Micro USB Jack Replacement: passo 6, imagem 2 %32
    • Use new adhesive to secure battery back to the rest of the device.

  7. HMDX Jam Plus  Micro USB Jack Replacement, Micro USB Jack: passo 7, imagem 1 %32 HMDX Jam Plus  Micro USB Jack Replacement, Micro USB Jack: passo 7, imagem 2 %32
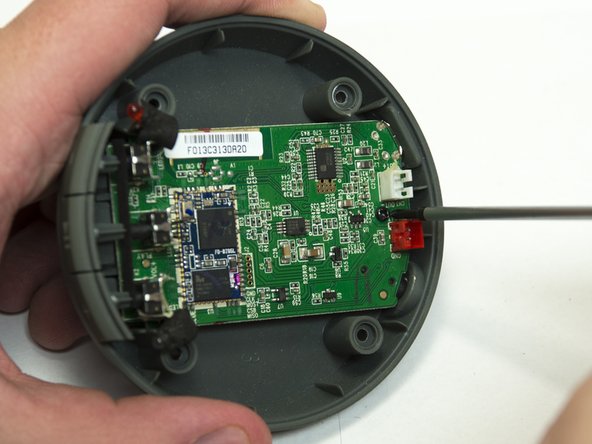
    • Remove the three black 6mm screws from the main board using a Philips #00 screwdriver.

  8. HMDX Jam Plus  Micro USB Jack Replacement: passo 8, imagem 1 %32 HMDX Jam Plus  Micro USB Jack Replacement: passo 8, imagem 2 %32
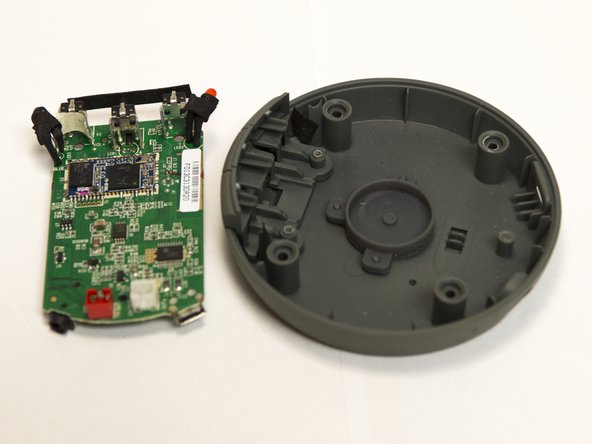
    • Carefully lift the main board away from the plastic.

    • Lift the side with the buttons first and be careful not to damage the Line In Jack or the Micro USB Jack.

  9. HMDX Jam Plus  Micro USB Jack Replacement: passo 9, imagem 1 %32
    Ferramenta utilizada nesse passo:
    Tweezers
    $4.99
    Comprar
    • Use the Micro soldering iron to heat up each pad and use the desoldering wick to wick up the melted solder.

    • The surface mount jack should pull from the surface without much force. Use tweezers to apply upward pressure on on the jack.

    • Do not apply too much heat to the board as it may damage other portions of the board.

Conclusão

To reassemble your device, follow these instructions in reverse order.

Maxwell Erickson

Membro desde: 10/22/15

587 Reputação

Autoria de 4 guias

Equipe

Montana Tech, Team 10-3, Shirk Fall 2015 Membro de Montana Tech, Team 10-3, Shirk Fall 2015

MTUM-SHIRK-F15S10G3

Membros da 4

Autoria de 4 guias

0 comentários

Adicione um comentário

Exibir estatísticas:

Últimas 24 horas: 3

Últimos 7 dias: 6

Últimos 30 dias: 11

Duração total: 730