Ir para o conteúdo principal

Esta versão pode conter edições incorretas. Mude para o último instantâneo verificado.

O que você precisa

  1. Este passo não foi traduzido. Ajude a traduzi-lo

    : passo 1, imagem 1 %32
    • Flip phone over so its backside is facing up.

  2. Este passo não foi traduzido. Ajude a traduzi-lo

    : passo 2, imagem 1 %32
    • Push from indentation and slide battery cover away from phone to remove battery cover.

  3. Este passo não foi traduzido. Ajude a traduzi-lo

    : passo 3, imagem 1 %32
    • Take out the battery once cover is off by gently prying with your fingers.

  4. Este passo não foi traduzido. Ajude a traduzi-lo

    : passo 4, imagem 1 %32
    • Using a philips screwdriver, unscrew all 4 screws along the edge of the phone

  5. Este passo não foi traduzido. Ajude a traduzi-lo

    : passo 5, imagem 1 %32 : passo 5, imagem 2 %32
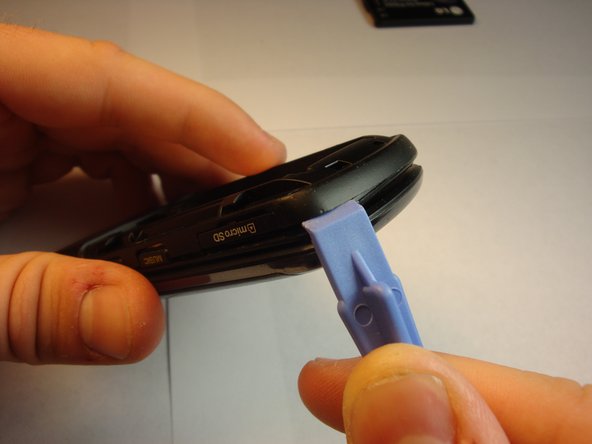
    • Using your plastic pry tool, insert the tool between the phone’s keypad cover and back cover and gently pry apart.

  6. Este passo não foi traduzido. Ajude a traduzi-lo

    : passo 6, imagem 1 %32
    • Once the covers have been separated the motherboard will be visible. Do not separate the two covers completely. The covers will be held together by a screw on the axis of the phone.

Linha de Chegada

Uma outra pessoa concluiu este guia.

Jack Foley

Membro desde: 04/25/13

37 Reputação

Autoria de 3 guias

Equipe

Cal Poly, Team 13-62, Johann Spring 2013 Membro de Cal Poly, Team 13-62, Johann Spring 2013

CPSU-JOHANN-S13S13G62

Membros da 4

Autoria de 12 guias

Um comentário

Concerning a LG Chocolate 3 still activated and perfectly working but with a damaged frame. Can you take the activated internal parts out of a damaged frame phone and install in a like new condition identical phone frame ?

Zamora - Responder

Adicione um comentário

Exibir estatísticas:

Últimas 24 horas: 0

Últimos 7 dias: 10

Últimos 30 dias: 12

Duração total: 408