Ir para o conteúdo principal

Gateway LT2514u Keyboard Replacement

O que você precisa

  1. Gateway LT2514u Keyboard Replacement, Battery: passo 1, imagem 1 %32 Gateway LT2514u Keyboard Replacement, Battery: passo 1, imagem 2 %32
    • With the netbook's lid closed, flip it over and slide the latch on the upper left hand side of the netbook to the left.

    • You should see an orange indicator when the battery is unlocked.

  2. Gateway LT2514u Keyboard Replacement: passo 2, imagem 1 %32 Gateway LT2514u Keyboard Replacement: passo 2, imagem 2 %32
    • In the upper right-hand corner of the netbook, slide and hold the switch to the right.

    • Use your other hand to slide out the battery.

    • If the release switch in the upper right-hand area is missing, you can still remove the battery by following Step 3. Otherwise, skip it.

  3. Gateway LT2514u Keyboard Replacement: passo 3, imagem 1 %32 Gateway LT2514u Keyboard Replacement: passo 3, imagem 2 %32 Gateway LT2514u Keyboard Replacement: passo 3, imagem 3 %32
    Ferramenta utilizada nesse passo:
    Tweezers
    $4.99
    Comprar
    • If the release switch in the upper right-hand area is missing, insert a slender tool (we used tweezers) into the left side of the smaller hole.

    • Slide and hold the tweezers to the right and use your other hand to slide the battery out.

  4. Gateway LT2514u Keyboard Replacement, Keyboard: passo 4, imagem 1 %32 Gateway LT2514u Keyboard Replacement, Keyboard: passo 4, imagem 2 %32 Gateway LT2514u Keyboard Replacement, Keyboard: passo 4, imagem 3 %32
    • Open the netbook screen all the way and, using a plastic opening tool, pry the upper right-hand corner of the keyboard tray up.

    • With the plastic opening tool still in place at the corner, use a credit card (or something similar) to press the release tab at the upper right-hand corner of the keyboard tray. It is located right above the Del key.

    • With the credit card pushed up against the tab, slide the plastic opening tool along the top edge of the keyboard towards the credit card. Continue with this method until you have gotten to all tabs. There are 5 total across the top.

  5. Gateway LT2514u Keyboard Replacement: passo 5, imagem 1 %32 Gateway LT2514u Keyboard Replacement: passo 5, imagem 2 %32 Gateway LT2514u Keyboard Replacement: passo 5, imagem 3 %32
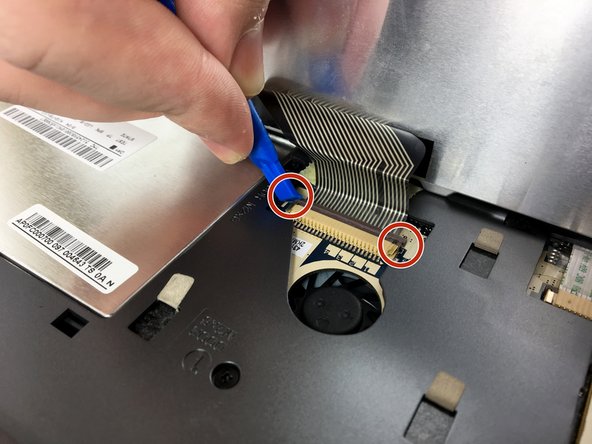
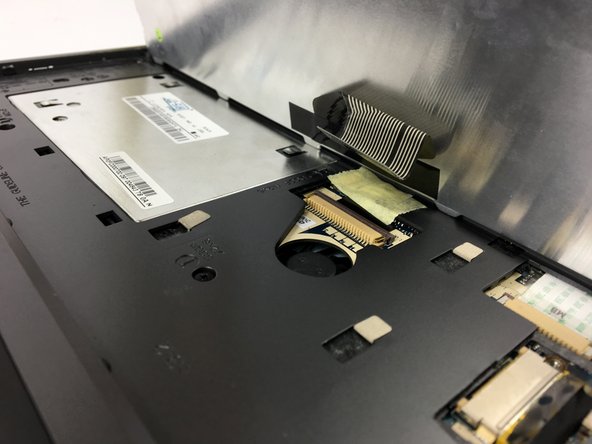
    • After releasing all 5 tabs, carefully lift the keyboard along its top edge until you see the ribbon that connects the keyboard to the motherboard.

    • Using a plastic opening tool, slide the 2 clips that hold the keyboard ribbon in place outward.

    • Carefully slide the ribbon out and you can now pull the keyboard away from the netbook.

Conclusão

To reassemble your device, follow these instructions in reverse order.

Brian Garver

Membro desde: 10/04/16

839 Reputação

Autoria de 6 guias

Equipe

USF Tampa, Team 3-2, Sullivan Fall 2016 Membro de USF Tampa, Team 3-2, Sullivan Fall 2016

USFT-SULLIVAN-F16S3G2

Membros da 3

Autoria de 12 guias

Um comentário

Nice and straight forward!

Jeffrey Ibarra - Responder

Adicione um comentário

Exibir estatísticas:

Últimas 24 horas: 0

Últimos 7 dias: 7

Últimos 30 dias: 9

Duração total: 371