Esta versão pode conter edições incorretas. Mude para o último instantâneo verificado.
O que você precisa
-
Este passo não foi traduzido. Ajude a traduzi-lo
-
Unlock the tab located in the top left corner of the netbook.
-
The red tab indicated that the battery has been properly unlocked.
-
Remove the battery.
-
-
Este passo não foi traduzido. Ajude a traduzi-lo
-
Remove six (6) 5mm screws, two (2) 17.5mm screws, and three (3) 2.5mm screws from the back, using the Phillips #0 screwdriver, as marked here.
-
-
-
Este passo não foi traduzido. Ajude a traduzi-lo
-
Pry up the keyboard using a spudger or plastic opening tool in the exact location shown in the photograph.
-
Carefully disconnect the keyboard ribbon cable from the motherboard, and remove the keyboard.
-
-
Este passo não foi traduzido. Ajude a traduzi-lo
-
Remove the five (5) 5mm screws shown here using the Phillips #0 screwdriver.
-
-
Este passo não foi traduzido. Ajude a traduzi-lo
-
Separate the upper cover from the back cover. It is possible to do this without a tool, but you may also use a plastic opening tool for added leverage.
-
Be careful to keep even pressure all the way around the cover so that it is not bent beyond repair.
-
Carefully disconnect two ribbon cables to complete the separation of the upper cover.
-
-
Este passo não foi traduzido. Ajude a traduzi-lo
-
Remove the 5mm screw of the left speaker cover using a Phillips #0 screwdriver, as shown here.
-
-
Este passo não foi traduzido. Ajude a traduzi-lo
-
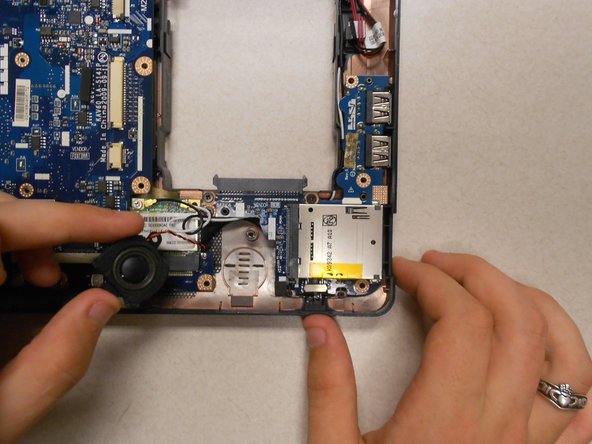
Disconnect the speaker's connection to the motherboard by lightly pulling on the connector until it pops apart from the motherboard.
-
-
Este passo não foi traduzido. Ajude a traduzi-lo
-
Repeat the previous steps for the right speaker. Remove the 5mm screw of the right speaker cover using a Phillips #0 screwdriver.
-


Equipe

Clemson, Team 14-3, Benson Fall 2013 Membro de Clemson, Team 14-3, Benson Fall 2013
CLEM-BENSON-F13S14G3
Membros da 3
Autoria de 22 guias