Ir para o conteúdo principal

Garmin Nuvi 1490T Display Screen Replacement

O que você precisa

  1. Garmin Nuvi 1490T Display Screen Replacement, Front Frame Panel: passo 1, imagem 1 %32
    • Power off your GPS before moving on.

    • Locate the crevice that separates the frame from the body.

    Front panel is very fragile. Exercise extreme care.

    May be able to purchase part separately from Garmin should you have a mishap.

    K Alphonso - Responder

  2. Garmin Nuvi 1490T Display Screen Replacement: passo 2, imagem 1 %32
    • Carefully insert the plastic prying tool into the crevice to separate the frame from the body.

    • Applying excessive force can lead to a damaged or scratched display screen.

  3. Garmin Nuvi 1490T Display Screen Replacement: passo 3, imagem 1 %32 Garmin Nuvi 1490T Display Screen Replacement: passo 3, imagem 2 %32
    • Slide the plastic prying tool around the perimeter to completely remove the frame.

  4. Garmin Nuvi 1490T Display Screen Replacement, Second Frame Panel: passo 4, imagem 1 %32 Garmin Nuvi 1490T Display Screen Replacement, Second Frame Panel: passo 4, imagem 2 %32 Garmin Nuvi 1490T Display Screen Replacement, Second Frame Panel: passo 4, imagem 3 %32
    • Remove the four 11.0 mm screws using the Torx T5 screwdriver.

  5. Garmin Nuvi 1490T Display Screen Replacement: passo 5, imagem 1 %32 Garmin Nuvi 1490T Display Screen Replacement: passo 5, imagem 2 %32 Garmin Nuvi 1490T Display Screen Replacement: passo 5, imagem 3 %32
    • Using the plastic prying tool, dislodge the frame from the body of the device.

    • Using your hands, completely disconnect the frame from the body.

    • Set the pieces of the frame aside.

  6. Garmin Nuvi 1490T Display Screen Replacement, Display Screen: passo 6, imagem 1 %32 Garmin Nuvi 1490T Display Screen Replacement, Display Screen: passo 6, imagem 2 %32 Garmin Nuvi 1490T Display Screen Replacement, Display Screen: passo 6, imagem 3 %32
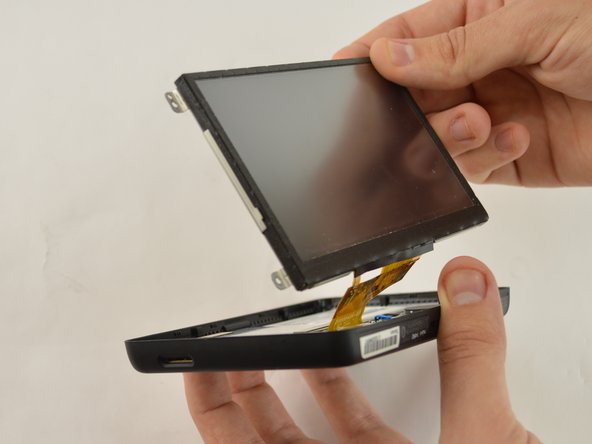
    • Gently lift up the display screen using your fingers to make sure the only thing connecting it to the body is the ribbon cable.

  7. Garmin Nuvi 1490T Display Screen Replacement: passo 7, imagem 1 %32 Garmin Nuvi 1490T Display Screen Replacement: passo 7, imagem 2 %32
    • Remove the piece of tape that is covering the connecting point of the motherboard and display.

  8. Garmin Nuvi 1490T Display Screen Replacement: passo 8, imagem 1 %32 Garmin Nuvi 1490T Display Screen Replacement: passo 8, imagem 2 %32 Garmin Nuvi 1490T Display Screen Replacement: passo 8, imagem 3 %32
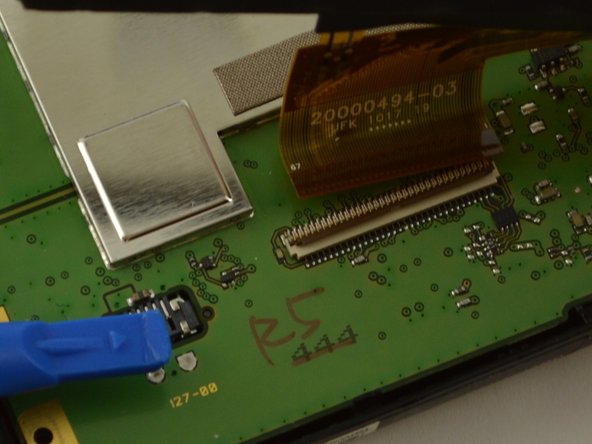
    • Using the plastic opening tool or your fingers, lift up the ZIF connector holding the ribbon cable in place.

    • Carefully pull the ribbon cable out of the connector with tweezers or two fingers.

    • Gently disconnect the display by pulling upward. Set display aside.

    • If the display screen does not disconnect easily, make sure the ZIF connector is no longer holding it in place.

    wow no idea what you are trying to say here...

    Karen Dennis - Responder

    You don't need to remove this. if you go to youtube there is a video of a little boy showing how to do this and it is much more helpful. This step is not clear and you can damage the device taking that ribbon off!

    Karen Dennis - Responder

    can you be more specific about video? I have no idea how to replace the flat cable into the ZIF connector

    Alex - Responder

    The ZIF (Zero Insertion Force) connector is a locking connector. You need to lift the dark plastic tab that runs across the connector so that it pivots up on the hinge located near the middle of the connector. This plastic tab is a lock that secures the ribbon cable in place for the screen to work. Once the hinge is lifted, the ribbon cable should be easy to slide out of the connector. To reassemble, you must slide the cable back into the connector as far as possible with the hinge open. Then gently close the hinge until it locks into place and reapply the tape.

    Dave Marzetti - Responder

    In the first photo, the ZIF is shown in the locked position, and in the second photo, you can see the locking tab in the unlocked position. Be careful not to force the tab or you will break it and will have a much more serious problem.

    Dave Marzetti - Responder

Conclusão

To reassemble your device, follow these instructions in reverse order.

5 outras pessoas executaram este guia.

Ricardo Solis

Membro desde: 01/20/16

1.037 Reputação

Autoria de 6 guias

Equipe

USF Tampa, Team 15-2, Remmell Spring 2016 Membro de USF Tampa, Team 15-2, Remmell Spring 2016

USFT-REMMELL-S16S15G2

Membros da 4

Autoria de 6 guias

Um comentário

Awesome!! Thank you for putting this out there. Helped me save buying a new gps when the screen on my got damaged.

George Gearing - Responder

Adicione um comentário

Exibir estatísticas:

Últimas 24 horas: 0

Últimos 7 dias: 2

Últimos 30 dias: 5

Duração total: 2,642