Ir para o conteúdo principal

Garmin Nuvi 1490T Battery Replacement

O que você precisa

  1. Garmin Nuvi 1490T Battery Replacement, Front Frame Panel: passo 1, imagem 1 %32
    • Power off your GPS before moving on.

    • Locate the crevice that separates the frame from the body.

  2. Garmin Nuvi 1490T Battery Replacement: passo 2, imagem 1 %32
    • Carefully insert the plastic prying tool into the crevice to separate the frame from the body.

    • Applying excessive force can lead to a damaged or scratched display screen.

  3. Garmin Nuvi 1490T Battery Replacement: passo 3, imagem 1 %32 Garmin Nuvi 1490T Battery Replacement: passo 3, imagem 2 %32
    • Slide the plastic prying tool around the perimeter to completely remove the frame.

  4. Garmin Nuvi 1490T Battery Replacement, Second Frame Panel: passo 4, imagem 1 %32 Garmin Nuvi 1490T Battery Replacement, Second Frame Panel: passo 4, imagem 2 %32 Garmin Nuvi 1490T Battery Replacement, Second Frame Panel: passo 4, imagem 3 %32
    • Remove the four 11.0 mm screws using the Torx T5 screwdriver.

  5. Garmin Nuvi 1490T Battery Replacement: passo 5, imagem 1 %32 Garmin Nuvi 1490T Battery Replacement: passo 5, imagem 2 %32 Garmin Nuvi 1490T Battery Replacement: passo 5, imagem 3 %32
    • Using the plastic prying tool, dislodge the frame from the body of the device.

    • Using your hands, completely disconnect the frame from the body.

    • Set the pieces of the frame aside.

  6. Garmin Nuvi 1490T Battery Replacement, Display Screen: passo 6, imagem 1 %32 Garmin Nuvi 1490T Battery Replacement, Display Screen: passo 6, imagem 2 %32 Garmin Nuvi 1490T Battery Replacement, Display Screen: passo 6, imagem 3 %32
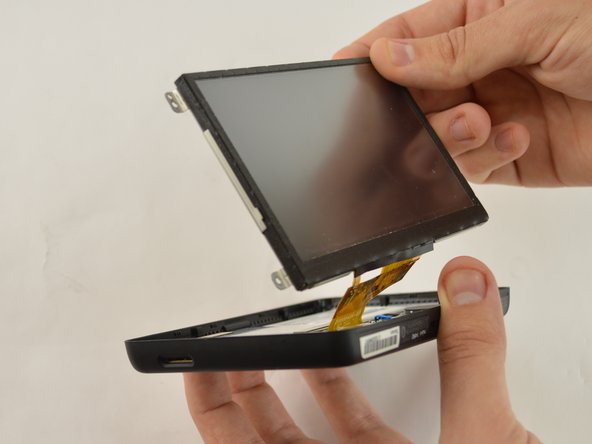
    • Gently lift up the display screen using your fingers to make sure the only thing connecting it to the body is the ribbon cable.

  7. Garmin Nuvi 1490T Battery Replacement: passo 7, imagem 1 %32 Garmin Nuvi 1490T Battery Replacement: passo 7, imagem 2 %32
    • Remove the piece of tape that is covering the connecting point of the motherboard and display.

  8. Garmin Nuvi 1490T Battery Replacement: passo 8, imagem 1 %32 Garmin Nuvi 1490T Battery Replacement: passo 8, imagem 2 %32 Garmin Nuvi 1490T Battery Replacement: passo 8, imagem 3 %32
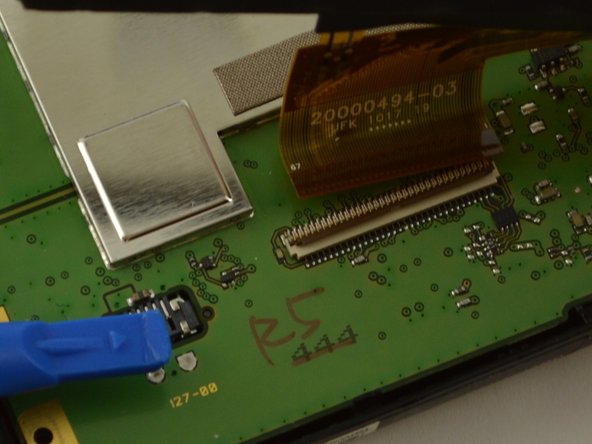
    • Using the plastic opening tool or your fingers, lift up the ZIF connector holding the ribbon cable in place.

    • Carefully pull the ribbon cable out of the connector with tweezers or two fingers.

    • Gently disconnect the display by pulling upward. Set display aside.

    • If the display screen does not disconnect easily, make sure the ZIF connector is no longer holding it in place.

  9. Garmin Nuvi 1490T Battery Replacement, Battery: passo 9, imagem 1 %32 Garmin Nuvi 1490T Battery Replacement, Battery: passo 9, imagem 2 %32 Garmin Nuvi 1490T Battery Replacement, Battery: passo 9, imagem 3 %32
    • Using the T5 Torx screw driver, remove the two 5.0 mm screws.

    • Using your hands, lift up the motherboard and fold it over.

  10. Garmin Nuvi 1490T Battery Replacement: passo 10, imagem 1 %32 Garmin Nuvi 1490T Battery Replacement: passo 10, imagem 2 %32 Garmin Nuvi 1490T Battery Replacement: passo 10, imagem 3 %32
    • Fold motherboard out of the way to reveal the white plastic end of the battery plug.

    • Using the tweezers, pull the white plastic connector to disconnect the battery from the motherboard.

    • Let the cord hang unattached.

  11. Garmin Nuvi 1490T Battery Replacement: passo 11, imagem 1 %32 Garmin Nuvi 1490T Battery Replacement: passo 11, imagem 2 %32
    • Return motherboard back to original position by flipping it back over.

    • Using the nylon spudger, dislodge the battery out of its socket.

    • Use a tool that is ESD-safe such as a nylon spudger or a plastic prying tool. Never use a metal spudger to take out the battery.

Conclusão

To reassemble your device, follow these instructions in reverse order.

7 outras pessoas executaram este guia.

Ricardo Solis

Membro desde: 01/20/16

1.037 Reputação

Autoria de 6 guias

Equipe

USF Tampa, Team 15-2, Remmell Spring 2016 Membro de USF Tampa, Team 15-2, Remmell Spring 2016

USFT-REMMELL-S16S15G2

Membros da 4

Autoria de 6 guias

2 comentários

Great guide and very informative. Here is a replacement battery that is reasonably priced and it comes with all of the tools needed for installation. It even has a 1 year replacement warranty!

Nuvi 1490T Battery 361-00019-16

Mike - Responder

Thanks for the great instructions! Had I not given up on Garmin's video instruction I'm sure I would have destroyed my GPS. You saved the day for me. Again, THANKS!

Mike Billmaier - Responder

Adicione um comentário

Exibir estatísticas:

Últimas 24 horas: 0

Últimos 7 dias: 7

Últimos 30 dias: 30

Duração total: 5,812