Ir para o conteúdo principal

Fujifilm FinePix 4700 Zoom Display Screen Replacement

O que você precisa

  1. Fujifilm FinePix 4700 Zoom Display Screen Replacement, Back Cover: passo 1, imagem 1 %32 Fujifilm FinePix 4700 Zoom Display Screen Replacement, Back Cover: passo 1, imagem 2 %32 Fujifilm FinePix 4700 Zoom Display Screen Replacement, Back Cover: passo 1, imagem 3 %32
    • Use the Phillips #00 screwdriver to remove the 7 screws on the sides of the camera:

    • Four 3.95mm Phillips screws located on the bottom of the camera

    • Two 3.95mm Phillips screws located on the right side of the camera

    • One 3.95mm Phillips screw located on the left side of the camera

  2. Fujifilm FinePix 4700 Zoom Display Screen Replacement: passo 2, imagem 1 %32
    • Slide open the battery compartment cover with your thumb.

  3. Fujifilm FinePix 4700 Zoom Display Screen Replacement: passo 3, imagem 1 %32 Fujifilm FinePix 4700 Zoom Display Screen Replacement: passo 3, imagem 2 %32 Fujifilm FinePix 4700 Zoom Display Screen Replacement: passo 3, imagem 3 %32
    • Wedge the edge of the spudger between the front and back case, near the corner of the flash.

    • Carefully run the spudger along the right edge of the camera, creating an opening.

    • Insert the spudger into the left side of the camera, above the screwhole. Then carefully run it along this edge.

  4. Fujifilm FinePix 4700 Zoom Display Screen Replacement: passo 4, imagem 1 %32 Fujifilm FinePix 4700 Zoom Display Screen Replacement: passo 4, imagem 2 %32
    • Watch out for the orange ribbon that is still attached to the back cover when you lift it up. It is very delicate and might rip.

    • Slowly lift the back cover straight up, lightly jiggling it if necessary.

    • Remove the battery compartment cover.

  5. Fujifilm FinePix 4700 Zoom Display Screen Replacement: passo 5, imagem 1 %32
    • Gently insert the spudger under the clip holding the orange ribbon. The clip should lift up and the ribbon will slide out.

    • This step will free the back cover from the rest of the camera.

  6. Fujifilm FinePix 4700 Zoom Display Screen Replacement, Motherboard Unit: passo 6, imagem 1 %32
    • Pull gently when removing the speaker so you don't rip the wire attached to it.

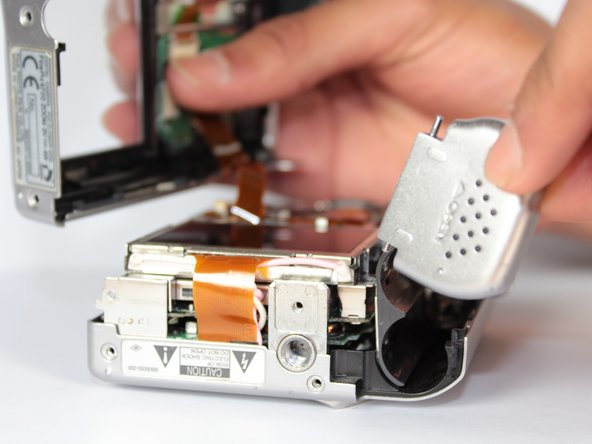
    • Use the tweezers to grab the speaker (located on left side of the camera) and pull straight up.

    • The speaker will still be connected to the motherboard, but it will not be attached to the front case.

  7. Fujifilm FinePix 4700 Zoom Display Screen Replacement: passo 7, imagem 1 %32
    • Use the tweezers to pull gently on the small orange ribbon, located in upper left hand corner near the flash, to remove the square insert.

  8. Fujifilm FinePix 4700 Zoom Display Screen Replacement: passo 8, imagem 1 %32
    • Use your fingers to slowly pull the flash straight up.

    • The step may take a little jiggling.

  9. Fujifilm FinePix 4700 Zoom Display Screen Replacement: passo 9, imagem 1 %32 Fujifilm FinePix 4700 Zoom Display Screen Replacement: passo 9, imagem 2 %32
    • Do not fully separate the motherboard unit from the front cover. There is still a ribbon attached and it will rip.

    • Slightly separate the front cover from the motherboard unit (which consists of the motherboard, speaker, screen, and battery compartment).

    • Rotate the bottom portion of the motherboard unit (the screen and battery compartment) over the lens unit.

  10. Fujifilm FinePix 4700 Zoom Display Screen Replacement: passo 10, imagem 1 %32
    • Use your fingers to remove the tripod mount.

  11. Fujifilm FinePix 4700 Zoom Display Screen Replacement: passo 11, imagem 1 %32 Fujifilm FinePix 4700 Zoom Display Screen Replacement: passo 11, imagem 2 %32 Fujifilm FinePix 4700 Zoom Display Screen Replacement: passo 11, imagem 3 %32
    • Be gentle when undoing the ribbon clips. They break easily.

    • Gently stick the spudger under the ribbon clips and lift them up.

    • Use the tweezers to pull both ribbons out of the ribbon clips.

    • The motherboard unit should now be free from the rest of the camera.

  12. Fujifilm FinePix 4700 Zoom Display Screen Replacement, Display Screen: passo 12, imagem 1 %32 Fujifilm FinePix 4700 Zoom Display Screen Replacement, Display Screen: passo 12, imagem 2 %32 Fujifilm FinePix 4700 Zoom Display Screen Replacement, Display Screen: passo 12, imagem 3 %32
    • Be gentle when undoing the ribbon clip. It breaks easily.

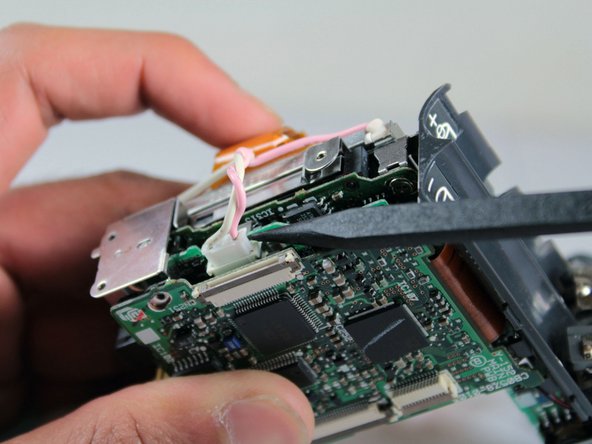
    • Locate the orange ribbon that goes from the screen to the bottom side of the motherboard.

    • Stick the spudger under the ribbon clip connecting and lift it up. Use the tweezers to pull out the ribbon.

    • Use the pointed end of the spudger to unplug the connector for the pink and white screen wires by pulling it straight out.

  13. Fujifilm FinePix 4700 Zoom Display Screen Replacement: passo 13, imagem 1 %32 Fujifilm FinePix 4700 Zoom Display Screen Replacement: passo 13, imagem 2 %32 Fujifilm FinePix 4700 Zoom Display Screen Replacement: passo 13, imagem 3 %32
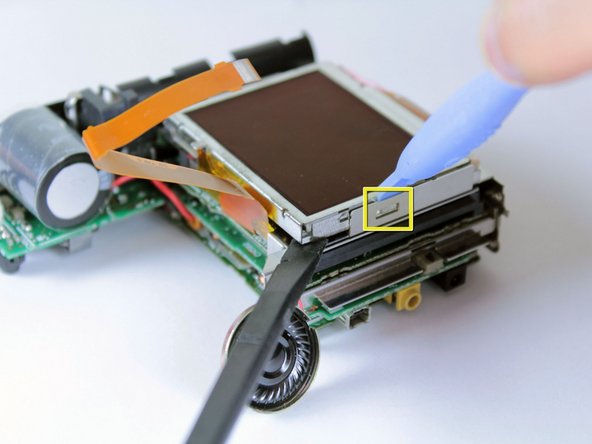
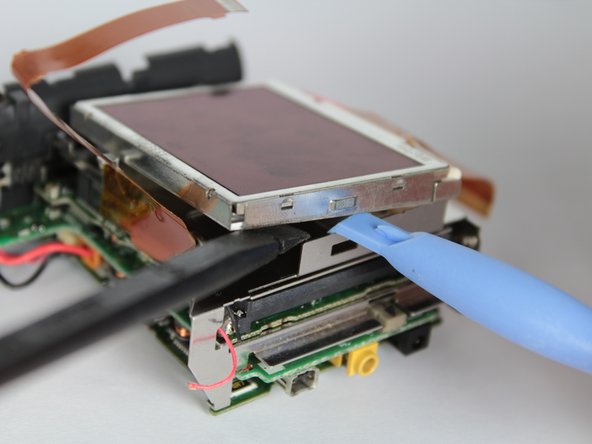
    • Wedge the plastic opening tool between the edge of the screen and the metal bracket, on the opposite side of the battery compartment.

    • Use the spudger to pry up the corner of the screen adjacent to the metal bracket.

    • The best place to wedge the tool is directly above the rectangular space in the bracket.

    • The screen should come out easily. If it doesn't, jiggle it a little bit. If jiggling doesn't work, use the plastic opening tool to create a larger gap between the screen and the bracket.

Conclusão

To reassemble your device, follow these instructions in reverse order.

Sarah Daliva

Membro desde: 04/04/12

14 Reputação

Autoria de 2 guias

Equipe

Cal Poly, Team 14-8, Forte Spring 2012 Membro de Cal Poly, Team 14-8, Forte Spring 2012

CPSU-FORTE-S12S14G8

Membros da 5

Autoria de 17 guias

0 comentários

Adicione um comentário

Exibir estatísticas:

Últimas 24 horas: 0

Últimos 7 dias: 0

Últimos 30 dias: 4

Duração total: 1,123