Ir para o conteúdo principal

Fast Fix Screen Replacement

O que você precisa

  1. Fast Fix Screen Replacement, Screen: passo 1, imagem 1 %32 Fast Fix Screen Replacement, Screen: passo 1, imagem 2 %32 Fast Fix Screen Replacement, Screen: passo 1, imagem 3 %32
    • Slide both battery latches to release cover.

    • Remove battery.

  2. Fast Fix Screen Replacement: passo 2, imagem 1 %32 Fast Fix Screen Replacement: passo 2, imagem 2 %32
    • Remove the M2.5 X 5mm phillips screw for the CD drive.

    • Remove the CD drive.

  3. Fast Fix Screen Replacement: passo 3, imagem 1 %32 Fast Fix Screen Replacement: passo 3, imagem 2 %32
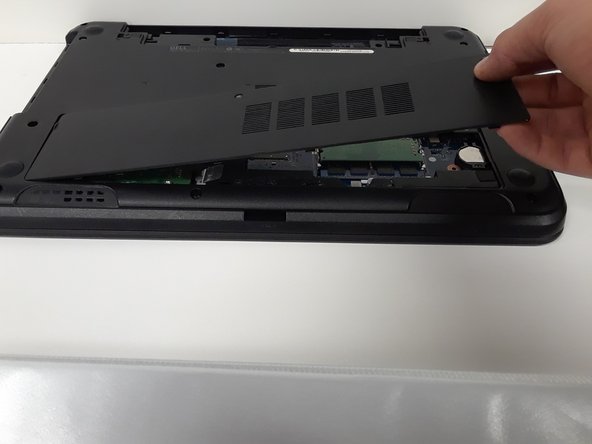
    • Loosen 2 screws on access door.

    • They cannot be removed

    • Remove the access door.

  4. Fast Fix Screen Replacement: passo 4, imagem 1 %32
    • Remove 12 M2.5 X 5MM Phillips bottom palm rest screws.

  5. Fast Fix Screen Replacement: passo 5, imagem 1 %32 Fast Fix Screen Replacement: passo 5, imagem 2 %32 Fast Fix Screen Replacement: passo 5, imagem 3 %32
    • Use a small screwdriver to press in the keyboard latches.

    • Remove the keyboard.

    • Unplug the keyboard cable at the ZIF connection.

  6. Fast Fix Screen Replacement: passo 6, imagem 1 %32 Fast Fix Screen Replacement: passo 6, imagem 2 %32 Fast Fix Screen Replacement: passo 6, imagem 3 %32
    • Remove the palm-rest cable by releasing the ZIF latch and pulling the wire out.

    • Remove 5 M2.5 X 5mm Phillips and 2 M2 X 3mm Phillips palm-rest screws.

  7. Fast Fix Screen Replacement: passo 7, imagem 1 %32
    • Use a small flat screwdriver to pry the palm-rest off of the computer.

  8. Fast Fix Screen Replacement: passo 8, imagem 1 %32 Fast Fix Screen Replacement: passo 8, imagem 2 %32 Fast Fix Screen Replacement: passo 8, imagem 3 %32
    • Remove the wireless antenna

    • Remove the LCD cable

  9. Fast Fix Screen Replacement: passo 9, imagem 1 %32
    • Remove the 1 M2.5 x 5mm Phillips left hinge screw and 2 M2.5 x 5mm Phillips right hinge screw.

  10. Fast Fix Screen Replacement: passo 10, imagem 1 %32
    • Pry off the LCD bevel using a small flat screwdriver.

  11. Fast Fix Screen Replacement: passo 11, imagem 1 %32
    • Remove the 4 M2 X 3mm Philips LCD screws.

  12. Fast Fix Screen Replacement: passo 12, imagem 1 %32 Fast Fix Screen Replacement: passo 12, imagem 2 %32
    • Unplug the screen cable and remove the screen.

Conclusão

To reassemble your device, follow these instructions in reverse order.

3 outras pessoas executaram este guia.

Carl Kangas

Membro desde: 10/01/17

182 Reputação

Autoria de 1 guia

Equipe

Um comentário

Hello good day, I have a question, I have managed to replace the screen and the computer started the first time without problems, but after I started it again the computer did not turn on the screen again, will you have any possible solution?

vikingo1ero - Responder

Adicione um comentário

Exibir estatísticas:

Últimas 24 horas: 1

Últimos 7 dias: 3

Últimos 30 dias: 27

Duração total: 2,893