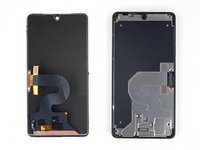
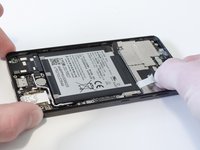
Ir para o conteúdo principal

Essential Phone Battery Replacement

O que você precisa

  1. Essential Phone Battery Replacement, Display: passo 1, imagem 1 %32
    • Power your phone off before you begin.

    • If possible, drain the battery before disassembly. When the battery is charged, there's increased risk of a dangerous thermal event if the battery is overheated or damaged during repairs.

    • If your display is cracked, completely cover it with packing tape to contain the glass shards and avoid injury.

  2. Essential Phone Battery Replacement: passo 2, imagem 1 %32 Essential Phone Battery Replacement: passo 2, imagem 2 %32
    • Heat the perimeter of the display to soften the adhesive securing it.

    • If available, use a hot plate or heat pad. Place the Essential Phone face-down and heat it to 85° C for at least 15 minutes.

    • Otherwise, use a heat gun to evenly heat the entire perimeter of the display until it's too hot to touch. Try to maintain a high temperature for 15-20 minutes—but beware that without exact control over the temperature, you can easily destroy the display.
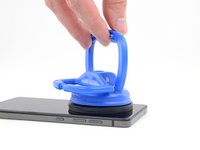
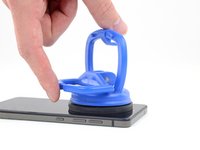
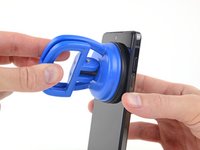
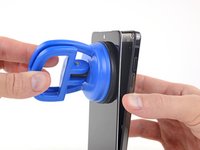
    • Wear heat-resistant anti-static gloves as needed to safely handle the phone after this step.

  3. Essential Phone Battery Replacement: passo 3, imagem 1 %32 Essential Phone Battery Replacement: passo 3, imagem 2 %32
    • In the following steps, you will separate the display panel and cover glass assembly from the Essential Phone's chassis.

    • For reference, the back of the display panel is shown at left. Note the contours of the display panel. Tools can only safely be inserted into the camera notch at the top, and along the very thin (just over 1 mm) black bezel surrounding the display.

    • Inserting tools at any other location risks permanent damage to the LCD.

  4. Essential Phone Battery Replacement: passo 4, imagem 1 %32 Essential Phone Battery Replacement: passo 4, imagem 2 %32 Essential Phone Battery Replacement: passo 4, imagem 3 %32
    Ferramenta utilizada nesse passo:
    Heavy-Duty Suction Cups (Pair)
    $14.95
    Comprar
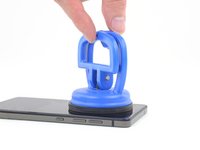
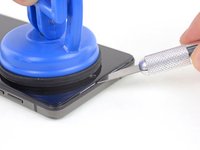
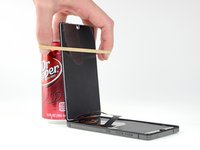
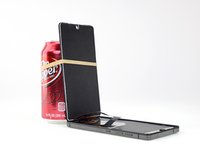
    • While the phone is still hot, apply a heavy-duty suction cup to the top half of the display.

    • After positioning the suction cup, gently press down, and then close the handle to securely fasten the suction cup to the display surface.
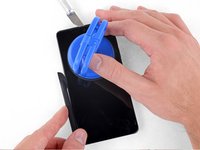
    • If your display is badly cracked, the suction cup may not adhere. Skip the next step below and use your blade to slice under the display as best you can.

  5. Essential Phone Battery Replacement: passo 5, imagem 1 %32 Essential Phone Battery Replacement: passo 5, imagem 2 %32
    • Pull on the suction cup handle to open a slight gap between the top edge of the display and the Essential Phone's titanium enclosure.

    • You only need a very slight gap, but this may require a significant amount of force. If you're having trouble, apply more heat and try again.

  6. Essential Phone Battery Replacement: passo 6, imagem 1 %32 Essential Phone Battery Replacement: passo 6, imagem 2 %32 Essential Phone Battery Replacement: passo 6, imagem 3 %32
    • Insert a thin blade or pry tool into the camera notch at the top of the display.

    • The gap where you can safely insert a tool is only about 5 mm wide. If you hit the LCD with your tool, you will damage it.

    • Use your suction cup and blade or pry tool to widen the gap at the top of the display until you can insert a second tool under the glass, closer to the corner.

  7. Essential Phone Battery Replacement: passo 7, imagem 1 %32 Essential Phone Battery Replacement: passo 7, imagem 2 %32 Essential Phone Battery Replacement: passo 7, imagem 3 %32
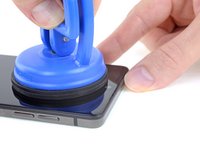
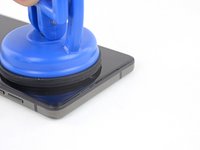
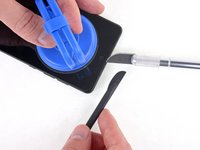
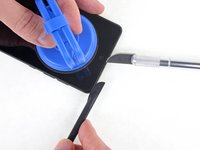
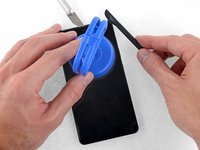
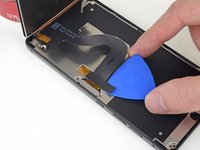
    • Insert a halberd spudger no more than 1 mm under the display, and cut the adhesive all along the top edge.

    • The bezel surrounding the LCD panel is slightly over 1 mm deep. If you insert your tool any deeper, you can damage the display.

  8. Essential Phone Battery Replacement: passo 8, imagem 1 %32 Essential Phone Battery Replacement: passo 8, imagem 2 %32 Essential Phone Battery Replacement: passo 8, imagem 3 %32
    • Continue carefully separating the adhesive at the top corners and down both sides of the display.

    • Do not insert your tool more than 1 mm.

    • Do not pry or slice on the bottom edge yet. The display's FPC is folded under the bottom edge and may be damaged.

  9. Essential Phone Battery Replacement: passo 9, imagem 1 %32 Essential Phone Battery Replacement: passo 9, imagem 2 %32
    • Pull carefully on the suction cup to swing the top edge of the display away from the chassis.

    • Leave the bottom edge connected for now; the glue will most likely continue to hold it in place.

  10. Essential Phone Battery Replacement: passo 10, imagem 1 %32
    • Carefully open the clamp on the suction cup to release the suction, and remove the suction cup.

  11. Essential Phone Battery Replacement: passo 11, imagem 1 %32 Essential Phone Battery Replacement: passo 11, imagem 2 %32 Essential Phone Battery Replacement: passo 11, imagem 3 %32
    • Swing the display open to about 90° and prop it up against something sturdy so it doesn't move while you work.

    • An unopened soda or can of soup works well as a prop.

    • If needed, gently add a rubber band to help secure the display.

  12. Essential Phone Battery Replacement: passo 12, imagem 1 %32
    • Use a Phillips #00 driver to remove the two 1.5 mm screws securing the display cable.

  13. Essential Phone Battery Replacement: passo 13, imagem 1 %32 Essential Phone Battery Replacement: passo 13, imagem 2 %32
    • Carefully slide a pick underneath the display cable to separate the adhesive securing it to the metal shield beneath.

    • If necessary, add a little heat to soften the adhesive and make it easier to separate.

    • The two adhesive pads securing the display cable are conductive and should be firmly re-adhered during assembly. If necessary, replace the pads.

  14. Essential Phone Battery Replacement: passo 14, imagem 1 %32 Essential Phone Battery Replacement: passo 14, imagem 2 %32
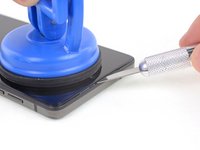
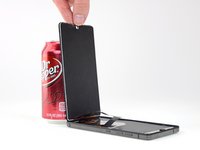
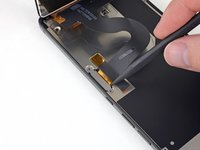
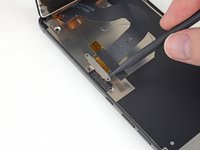
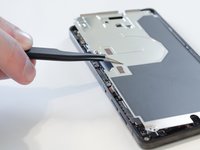
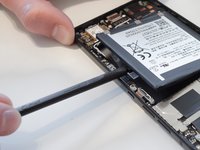
    • Use the point of a spudger to pry the display cable pop connector straight up from its socket.

  15. Essential Phone Battery Replacement: passo 15, imagem 1 %32
    • Use your halberd spudger to carefully separate any remaining adhesive along the bottom edge of the phone.

  16. Essential Phone Battery Replacement: passo 16, imagem 1 %32
    Ferramenta utilizada nesse passo:
    Tesa 61395 Tape
    $5.99
    Comprar
    • Remove the display.

    • Before installing the display, remove all traces of the old adhesive, then clean and prep the glued areas of the chassis and display (if you're re-using it) with isopropyl alcohol and a lint-free cloth.

    • Connect the display and power on the Essential Phone to test your repair before sealing the display panel in place.

    • You may re-secure the display with a strong double-sided adhesive tape, such as 1 mm Tesa 61395.

  17. Essential Phone Battery Replacement, Battery: passo 17, imagem 1 %32 Essential Phone Battery Replacement, Battery: passo 17, imagem 2 %32
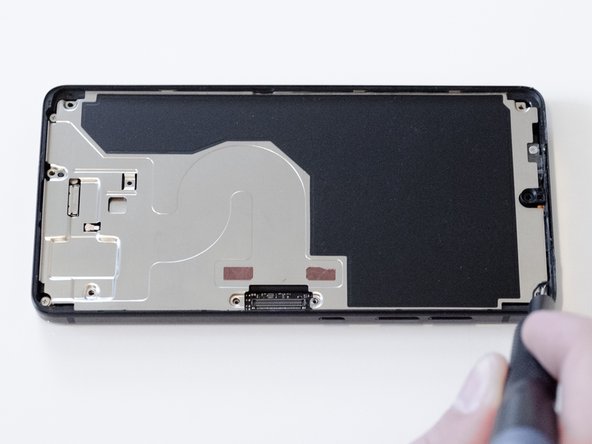
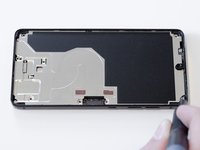
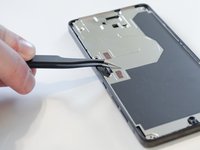
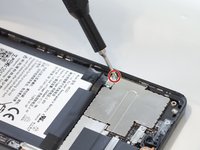
    • Use a Phillips #000 driver to remove the six 3.4mm screws holding on the back panel.

  18. Essential Phone Battery Replacement: passo 18, imagem 1 %32 Essential Phone Battery Replacement: passo 18, imagem 2 %32
    • Use tweezers to carefully lift the back panel off of the phone.

    • Make sure to only lift the panel from the rectangular space adjacent to the power button.

  19. Essential Phone Battery Replacement: passo 19, imagem 1 %32 Essential Phone Battery Replacement: passo 19, imagem 2 %32
    • Use a Phillips #000 screwdriver to remove the 2.4mm screw securing the battery clip over the battery connector.

    • The battery clip should come off with the screw. If it doesn't, carefully remove it using tweezers.

    • Using the tweezers carefully disconnect the battery from the motherboard.

  20. Essential Phone Battery Replacement: passo 20, imagem 1 %32 Essential Phone Battery Replacement: passo 20, imagem 2 %32 Essential Phone Battery Replacement: passo 20, imagem 3 %32
    • Pull off the two pieces of black adhesive tape on the battery.

    • If the tape doesn't pull the battery out with it, use a spudger to carefully pry the battery from the phone.

    • In this case, use the spudger to also separate any extra adhesive under the battery.

  21. Essential Phone Battery Replacement: passo 21, imagem 1 %32
    • Remove the battery from the phone.

    • After reassembling the phone, force restart your phone to prevent potential software issues.

Conclusão

To reassemble your device, follow these instructions in reverse order.

14 outras pessoas executaram este guia.

Seth Santa Maria

Membro desde: 04/18/19

756 Reputação

Autoria de 4 guias

Equipe

Cal Poly, Team S2-G7, Maness Spring 2019 Membro de Cal Poly, Team S2-G7, Maness Spring 2019

CPSU-MANESS-S19S2G7

Membros da 3

Autoria de 4 guias

4 comentários

Is more glue needed when the display is put back in? The guide doesn’t mention that process.

Terry Cameron - Responder

Yes when you re-install the display you’ll need to add more adhesive as it destroy it during the removal process. They recommend using '''Tesa 61395 Tape (1mm)''' however I got away with using 2mm tape as it was all I had on hand and it worked just fine, however the application was a little difficult. I’d also recommend getting some small conductive tape for the display adhesive pads as well as the couple of conductive pads on the bottom of the battery.

Justin W -

can you also do the putting it back guide pls

Deepa Patri (CONT) - Responder

Is there any possibility of paying you to do this procedure on my Essential phone? I'm local to you, I think, and would supply the battery.

Let me know how to get in touch.

Thanks!

Vincent - Responder

Adicione um comentário

Exibir estatísticas:

Últimas 24 horas: 4

Últimos 7 dias: 41

Últimos 30 dias: 173

Duração total: 18,798