Este guia tem alterações mais recentes. Mudar para a última versão não verificada.
Introdução
Here is a DualShock 4 controller that had a drift to both analog joysticks. Fairly straight forward replacement of the joysticks resolved the issue.
O que você precisa
-
-
Using the Phillips #00 Screwdriver, remove the four 6.0 mm screws securing the rear cover to the controller.
-
-
-
Wedge a plastic opening tool into the case-splittings and pull down to crack open the casing near the following buttons:
-
Share button
-
Options button
-
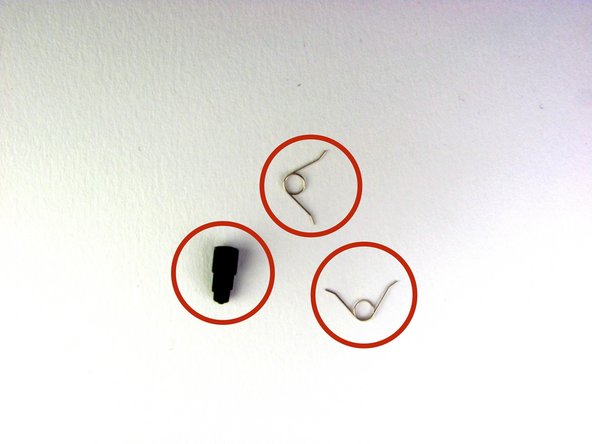
Split the plastic covers of the controller apart, taking note that they will still be attached by circuit board ribbons.
-
2 Trigger Springs
-
1 Grey Reset Button Extension
-
-
-
Use tweezers or your fingers to grab and disconnect the head of the battery cable from the motherboard.
-
-
-
-
Remove the single 6.0 mm Phillips screw found below the battery retainer with the Phillips #00 Screwdriver.
-
-
-
Gently detach the touchpad ribbon connected to the motherboard using the blunt forceps. The touchpad ribbon is connected to the motherboard by a connector that flips to tighten and loosen. During reassembly, to reattach the ribbon, the plastic tray will need to be gently removed from the motherboard and the flip-lock flipped up.
-
-
-
Successful disassembly of the controller will result in the following three parts, respectively:
-
Motherboard Assembly
-
Front Cover
-
Rear Cover
-
-
-
These are the solder connections that will need to be desoldered. Since the board is upside down, left will become right.
-
Use a desoldering wick and flux to melt and remove the solder
-
This may take a bit of practice since all the solder will have to be removed. It does help to pull a bit on the joystick while melting the solder and using the wick.
-
-
-
Once all the contacts are desoldered, the old joystick can be removed.
-
Check that all the holes are cleared of old solder. Hypodermic needles as well as very small drill bits can be used to clear the holes.
-
Insert the new joystick into the circuit board. Make sure it is properly seated and that all the contacts line up with the holes in the circuit board.
-
To reassemble your device, follow these instructions in reverse order.
To reassemble your device, follow these instructions in reverse order.
Cancelar: não concluí este guia.
33 outras pessoas executaram este guia.
14 comentários
I just tried to remove both joystick and replaced them but unfortunately only one joystick works and that one that works it's stuck on and only moves in one direction.
I've not been able to actually get the solder out, would love any suggestions or tips.
send me a couple of pictures on what your repair looks like thus far. Send them to my email. Click on my username and my email address is on my profile. Let's see what you got so far.
This is a very difficult repair, what this guy didn't mention is you need a very expensive solder station with an electric solder sucker. The solder needs removing and it's nearly impossible without damaging the tracking.
You definitely need some soldering experience but the repairability is not that difficult. The soldering points are big enough for any cheap ($40) soldering iron can get too. As for removing them, it helps to use flux and also a soldering wick to absorb all the old solder. It is not easy but not the most difficult repair. P.S you do not need the expensive soldering stating with hot air etcetera. This works perfectly as it get hot beyond the required point to melt the solder


