Ir para o conteúdo principal

DualShock 4 CHU-ZCT2U Battery Case Replacement

Guia arquivado
Este guia é mantido exclusivamente para fins históricos. Use a versão atualizada do guia para executar o reparo.

O que você precisa

  1. DualShock 4 CHU-ZCT2U Battery Case Replacement, Outer Shell: passo 1, imagem 1 %32 DualShock 4 CHU-ZCT2U Battery Case Replacement, Outer Shell: passo 1, imagem 2 %32 DualShock 4 CHU-ZCT2U Battery Case Replacement, Outer Shell: passo 1, imagem 3 %32
    • Unscrew the four 6.5mm screws, using a Phillips-Head screwdriver.

    • Pry the two halves of the shell apart using a plastic opening tool.

    • Be careful, as there will be a ribbon connecting the inner workings of the controller. It will not separate into two parts just by pulling apart the shell.

  2. DualShock 4 CHU-ZCT2U Battery Case Replacement: passo 2, imagem 1 %32 DualShock 4 CHU-ZCT2U Battery Case Replacement: passo 2, imagem 2 %32 DualShock 4 CHU-ZCT2U Battery Case Replacement: passo 2, imagem 3 %32
    • Pull the ribbon cable out of the motherboard port to fully separate the two halves, using a pair of tweezers.

  3. DualShock 4 CHU-ZCT2U Battery Case Replacement, Battery: passo 3, imagem 1 %32 DualShock 4 CHU-ZCT2U Battery Case Replacement, Battery: passo 3, imagem 2 %32 DualShock 4 CHU-ZCT2U Battery Case Replacement, Battery: passo 3, imagem 3 %32
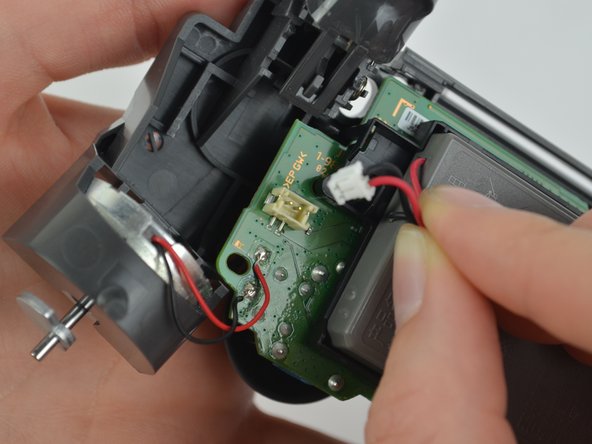
    • Unplug the black and red wires from the power port located on the motherboard.

    • Remove the old battery from the controller.

  4. DualShock 4 CHU-ZCT2U Battery Case Replacement: passo 4, imagem 1 %32 DualShock 4 CHU-ZCT2U Battery Case Replacement: passo 4, imagem 2 %32
    • Remove the 6.43mm screw connecting the motherboard to the inner workings of the controller, using a Phillips-Head screwdriver.

  5. DualShock 4 CHU-ZCT2U Battery Case Replacement: passo 5, imagem 1 %32 DualShock 4 CHU-ZCT2U Battery Case Replacement: passo 5, imagem 2 %32 DualShock 4 CHU-ZCT2U Battery Case Replacement: passo 5, imagem 3 %32
    • Unhook the battery case from the motherboard, and pull it off.

Conclusão

To reassemble your device, follow these instructions in reverse order.

19 outras pessoas executaram este guia.

Michelle Joseph

Membro desde: 10/09/17

1.762 Reputação

Autoria de 3 guias

Equipe

USF Tampa, Team S1-G5, Leahy Fall 2017 Membro de USF Tampa, Team S1-G5, Leahy Fall 2017

USFT-LEAHY-F17S1G5

Membros da 3

Autoria de 22 guias

0 comentários

Adicione um comentário

Exibir estatísticas:

Últimas 24 horas: 0

Últimos 7 dias: 0

Últimos 30 dias: 3

Duração total: 12,310