Introdução
This iFixit guide shows you how to fix your misaligned drawer tracks or rollers that fall out of their tracks using a 3d printed spacer.
O que você precisa
-
-
This is a common issue with misaligned drawer tracks. The rollers can fall out of the tracks and make the drawer hard to open. This is diagnosed by a difficult pull or a grinding sensation as the drawer is opened. This often leads to premature wear and crooked drawer facings.
-
-
-
Start by removing the drawer. Pull the drawer out until it stops. You now have 1 or 2 dimples in the track (orange arrows) that stop the drawer from falling out. You have to slightly lift and pull the drawer to continue removing it. When the roller reaches the end-stop (red box), you are ready to pull the drawer up and out of the track.
-
-
-
Using your screwdriver, remove the wood screw holding up the track side. Remember: Righty-Tighty, Lefty-Loosy!
-
-
-
-
At this point we need to find the correct gap that will correctly align our drawer. This is done by using machine washers and reinstalling the drawer to get the correct "feel". Look for an easy pull and no grinding or falling out of the track.
-
Once you have found the correct spacing, use calipers or a small ruler to measure the washer width in (mm).
-
-
-
Don't get fooled by the improved functionality of the drawer with just the washers installed. It will work...for a while. The red arrow shows the crookedness of the track once weight is added to the drawer.
-
-
-
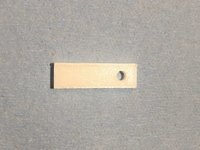
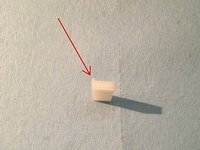
Use the washer measurement to choose which size spacer you need. 3D print the spacer or order it printed online. The red arrows point to a lip on the spacer that aligns to the outer edge of the track. This keeps it from spinning once installed.
-
-
-
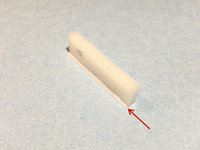
Install the printed spacer between the track and the wood. Make sure the small lip on the spacer is on the flat outside edge of the track (arrow). Reinstall the drawer and check functionality.
-


Cancelar: não concluí este guia.
5 outras pessoas executaram este guia.
Documentos anexados
4Comentários do guia
This tutorial is rated as “easy” but it involves 3D printing? Can we just use a piece of wood as a spacer? Seems kind of unnecessary.
I guess "easy" is a relative term in this tutorial. A small piece of wood definitely would be an option for this spacer. This assumes that cutting the wood and drilling a hole and sanding it down are all easy endeavors for the individual. My experience with a wood spacer is that it tended to split or spin around while installing it. The spacers in this tutorial have been designed to not spin around and to be "easily" installed once printed. They allow precise alignment of the drawer with other drawers by using different widths as necessary on either or both sides. Another option would be to get someone else to print the piece or to order it printed online.
Looks like a great fix. Would the spacer need to be placed on both sides of the drawer or is one sufficient?
One side would work just fine. The spacer is designed to be used on either or both sides. You could use different widths on either side to align it almost perfectly with the other drawers if needed.