Esta versão pode conter edições incorretas. Mude para o último instantâneo verificado.
O que você precisa
-
Este passo não foi traduzido. Ajude a traduzi-lo
-
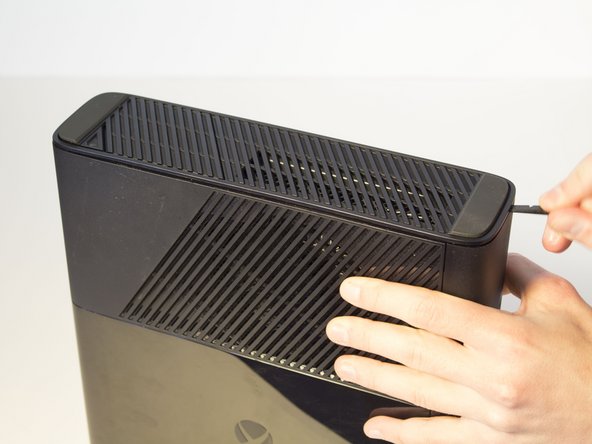
Push the Spudger into the crevice between the grated top panel of the Xbox and the bottom body with the rubber feet.
-
Pull back on the spudger like a lever, keeping it pressed firmly into the crevice.
-
-
Este passo não foi traduzido. Ajude a traduzi-lo
-
Slide the spudger along the separation you have created between the grated panel and the bottom body of the Xbox.
-
Periodically pull back on the spudger like a lever, keeping it pressed firmly into the crevice.
-
-
Este passo não foi traduzido. Ajude a traduzi-lo
-
Continue sliding the spudger along the perimeter of the left grated face of the Xbox.
-
Pull the top panel off.
-
-
Este passo não foi traduzido. Ajude a traduzi-lo
-
Remove the 11 mm screw left of the green wifi-card using the T9 Torx screw bit.
-
-
Este passo não foi traduzido. Ajude a traduzi-lo
-
Firmly grip the green Wi-Fi card and pull it out of the Xbox.
-
-
Este passo não foi traduzido. Ajude a traduzi-lo
-
Push the spudger into the crevice between the right grated face and the top body of the Xbox. It's easier to begin away from the vent.
-
Pull up on the spudger like a lever, keeping it pressed firmly into the crevice.
-
-
Este passo não foi traduzido. Ajude a traduzi-lo
-
Slide the spudger along the crevice to separate the grated face and the top body.
-
-
-
Este passo não foi traduzido. Ajude a traduzi-lo
-
Wiggle the spudger in the crevice as you slide the spudger to loosen the bottom plate.
-
Slide the spudger along the crevice, going completely about the perimeter of the bottom panel.
-
Pull the bottom panel off.
-
-
Este passo não foi traduzido. Ajude a traduzi-lo
-
In front of the CD drive you will find the Xbox logo. Press on the area left of the Xbox logo, and the disk tray panel will pop off.
-
-
Este passo não foi traduzido. Ajude a traduzi-lo
-
Beginning on the left side without the grate, run the spudger along the crevice until you've reached the grated part, while holding the part that's being separated as you go.
-
-
Este passo não foi traduzido. Ajude a traduzi-lo
-
Keep holding the partially separated panel open. It's easiest to do this by wedging a spudger into the opening but can also be held open by your hands.
-
Rotate the Xbox to the left to locate the clip connecting the front panel to the body. Insert the spudger inside the gap to release the clip. This may require wiggling the spudger. The clip will pop off, making the front panel looser.
-
-
Este passo não foi traduzido. Ajude a traduzi-lo
-
Flip the Xbox so the opposite side is towards you. Make sure to keep the separation open.
-
Locate the other clip and insert the spudger to remove it.
-
-
Este passo não foi traduzido. Ajude a traduzi-lo
-
Continue to run the spudger along the crease to release any further clips that may still be attatched.
-
Now that the front panel has been released from its clips you can pull off the front panel.
-
-
Este passo não foi traduzido. Ajude a traduzi-lo
-
Find the brown section where the ribbon cable enters the green board. Flip the brown part up and pull out the plastic tab at the end of the ribbon.
-
-
Este passo não foi traduzido. Ajude a traduzi-lo
-
Orient the Xbox so the bottom body is facing upwards. Make sure you see the rubber feet to know you have the correct side of the device.
-
Lift the bottom body slightly away from the core at a 45 degree angle.
-
-
Este passo não foi traduzido. Ajude a traduzi-lo
-
Rotate the Xbox so you are now looking at the back of the device.
-
Remove the sticker from the back of the Xbox.
-
-
Este passo não foi traduzido. Ajude a traduzi-lo
-
Turn the Xbox to the left to locate the clip holding the body together.
-
With a spudger, press up on the clip like a latch. Move to the far end to undo the other clip the same way.
-
-
Este passo não foi traduzido. Ajude a traduzi-lo
-
Push the spudger into the crevice. Slide the spudger along the vertical crevice to detach the last clip. The bottom body should slide off after this.
-
-
Este passo não foi traduzido. Ajude a traduzi-lo
-
Remove the five long black 55 mm screws labeled C2-5 and C7 with a T9 Torx screwdriver.
-
Carefully flip the device and pull off the body by lifting from the metal section that is attached to the plastic exterior.
-
Cancelar: não concluí este guia.
18 outras pessoas executaram este guia.
2 comentários
Thank you for sharing your instructions. I'd just like to ask if dismantelling the Xbox and cleaning out dust and dirt would help with the overheating message problem that I have? I know that there are videos etc on how to redo the solder connection that often leads to this fault, but my soldering skills are a bit "rusty" ! Do you have any other suggestions for this fault?
De - dusting certainly wouldn't hurt.


