Ir para o conteúdo principal

Griffin iFM 4027 Central Button Replacement

O que você precisa

  1. Griffin iFM 4027 Central Button Replacement, Right Side Panel: passo 1, imagem 1 %32
    Ferramenta utilizada nesse passo:
    iFixit Opening Tool
    $1.99
    Comprar
    • First, lodge the tip of the plastic iFixit opening tool into the top corner of the device.

    • Apply pressure upward with the iFixit Opening Tool. This should release the two panels away from each other.

  2. Griffin iFM 4027 Central Button Replacement: passo 2, imagem 1 %32 Griffin iFM 4027 Central Button Replacement: passo 2, imagem 2 %32 Griffin iFM 4027 Central Button Replacement: passo 2, imagem 3 %32
    • Use your fingers to separate the right side panel from the device.

    • Turn the panel over so that the outer edge is facing downward.

    • Use your fingers to dislodge the buttons, and then set them aside for later.

  3. Griffin iFM 4027 Central Button Replacement, Left Side Panel: passo 3, imagem 1 %32
    • Lodge the tip of the plastic opening tool into the top arc where the side and main part of the device meet.

    • Push the plastic opening tool upward until the side panel detaches.

  4. Griffin iFM 4027 Central Button Replacement: passo 4, imagem 1 %32 Griffin iFM 4027 Central Button Replacement: passo 4, imagem 2 %32 Griffin iFM 4027 Central Button Replacement: passo 4, imagem 3 %32
    • Slide the plastic opening tool along the panel seam and push upward until the side panel detaches from the main device.

    • Turn over the detached side panel, so that the outer side is facing downward.

    • Then use your fingers to disassemble the panel button and set it off to the side.

  5. Griffin iFM 4027 Central Button Replacement, Central Button: passo 5, imagem 1 %32 Griffin iFM 4027 Central Button Replacement, Central Button: passo 5, imagem 2 %32
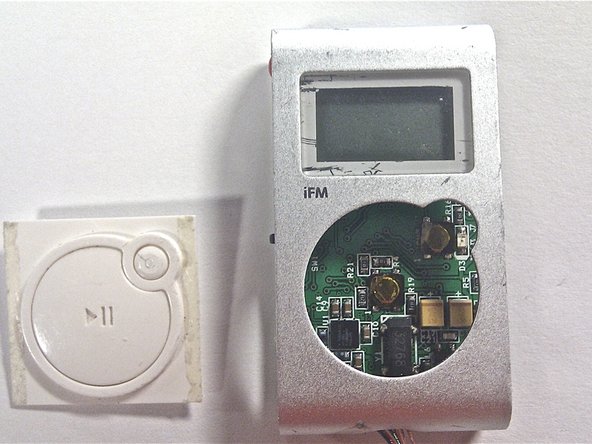
    • Use your fingers to push down on the center button and move it to the left, sliding it out from under the front panel.

    • Once removed, set the center button aside.

  6. Griffin iFM 4027 Central Button Replacement: passo 6, imagem 1 %32 Griffin iFM 4027 Central Button Replacement: passo 6, imagem 2 %32 Griffin iFM 4027 Central Button Replacement: passo 6, imagem 3 %32
    • Notice in the attached image that the backside of the button has an elevated corner. This corner must be applying pressure on the golden plate seen in the picture to the right. The center pressure point of the button must also apply pressure to the golden plate in the middle. These plates are both circled in red in the picture to the left.

    • Carefully slide in the button, flat side first (the side not containing the high corner).

Conclusão

To reassemble your device, follow these instructions in reverse order.

Alexander

Membro desde: 03/09/12

101 Reputação

Autoria de 6 guias

Equipe

Clemson, Team 15-3, Benson Spring 2012 Membro de Clemson, Team 15-3, Benson Spring 2012

CLEM-BENSON-S12S15G3

Membros da 3

Autoria de 6 guias

0 comentários

Adicione um comentário

Exibir estatísticas:

Últimas 24 horas: 0

Últimos 7 dias: 0

Últimos 30 dias: 1

Duração total: 1,044