Ir para o conteúdo principal
Participe da comunidade de reparos - Criar conta

Disassembling Canon PowerShot S50 Outer Casing

O que você precisa

  1. Disassembling Canon PowerShot S50 Outer Casing, Battery: passo 1, imagem 1 %32 Disassembling Canon PowerShot S50 Outer Casing, Battery: passo 1, imagem 2 %32
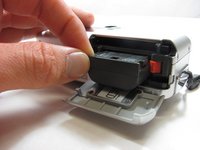
    • Place camera LCD side up and press up on the battery door.

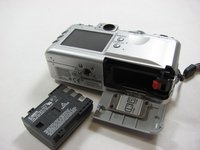
    • Let it swing open until you can see the battery inside.

  2. Disassembling Canon PowerShot S50 Outer Casing: passo 2, imagem 1 %32
    • Press down on the orange plastic.

    • This will gently eject the battery from its compartment.

  3. Disassembling Canon PowerShot S50 Outer Casing: passo 3, imagem 1 %32 Disassembling Canon PowerShot S50 Outer Casing: passo 3, imagem 2 %32
    • Holding the edges, slide out the battery.

  4. Disassembling Canon PowerShot S50 Outer Casing, Front Panel/Battery Door: passo 4, imagem 1 %32
    • Look at the camera from the side with the lanyard and 4 screws.

    • Remove the two 3.4 mm screws on the metallic colored part.

  5. Disassembling Canon PowerShot S50 Outer Casing: passo 5, imagem 1 %32
    • Remove the 3mm screw on the top left.

    • NOTE: When reassembling, it is helpful to put the top screw back in before placing the front cover back on the camera.

    • Now remove the 5.3mm screw on the bottom.

  6. Disassembling Canon PowerShot S50 Outer Casing: passo 6, imagem 1 %32
    • Place the camera LCD side down.

    • Remove the two 5.3mm screws by the battery door.

  7. Disassembling Canon PowerShot S50 Outer Casing: passo 7, imagem 1 %32
    • Remove the four 3.4mm screws on the bottom of the camera around the tripod mount.

    • Make sure to keep these screws separate from the previous 5.3 mm screws.

  8. Disassembling Canon PowerShot S50 Outer Casing: passo 8, imagem 1 %32
    • Stand the camera back up.

    • Remove the two 3.6mm screws on the side with the A/V Out port.

  9. Disassembling Canon PowerShot S50 Outer Casing: passo 9, imagem 1 %32
    • Lift open the rubber flap covering the A/V Out port.

    • Remove the 3.4mm screw in the center.

    • During reassembly, put the A/V out rubber door on before replacing the front panel of the camera

  10. Disassembling Canon PowerShot S50 Outer Casing: passo 10, imagem 1 %32
    • Use a spudger and gently open up the front panel of the camera.

    • A thin plastic ribbon will stay connected by a brown piece to front panel of the camera.

  11. Disassembling Canon PowerShot S50 Outer Casing: passo 11, imagem 1 %32
    • There will be a brown plastic piece keeping the thin plastic ribbon in place.

    • Use the spudger to pull out the brown plastic piece attached to the orange plastic.

  12. Disassembling Canon PowerShot S50 Outer Casing: passo 12, imagem 1 %32
    Ferramenta utilizada neste passo:
    Tweezers
    $4.99
    • Use a pair of tweezers and remove the metal piece inside the camera.

  13. Disassembling Canon PowerShot S50 Outer Casing: passo 13, imagem 1 %32
    • Remove the battery door

    • NOTE: Putting this back on requires aligning the spring on the back of the door with the hole on the camera

  14. Disassembling Canon PowerShot S50 Outer Casing, Outer Casing: passo 14, imagem 1 %32
    • Using a spudger, gently separate the back panel from the rest of the camera and remove it.

Conclusão

To reassemble your device, follow these instructions in reverse order.

Uma outra pessoa concluiu este guia.

Karim

Membro desde: 04/12/12

45 Reputação

Autoria de 3 guias

Equipe

Cal Poly, Team 7-34, Maness Spring 2012 Membro de Cal Poly, Team 7-34, Maness Spring 2012

CPSU-MANESS-S12S7G34

5 Membros

Autoria de 6 guias

1Comentário do guia

Hey, i have this camera, and i recently dropped it :( a big part of the buttons don’t work anymore. do you have any idea what i can do to fix it?

Luna Scholten - Responder Compartilhar

Comentar

Visualizações:

Últimas 24 horas: 2

Últimos 7 dias: 6

Últimos 30 dias: 39

Ao todo: 2,046