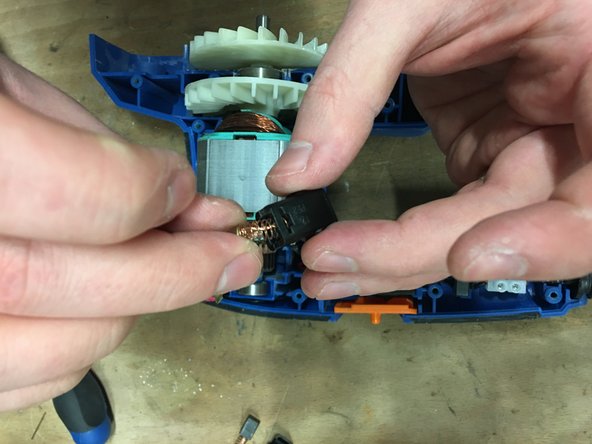
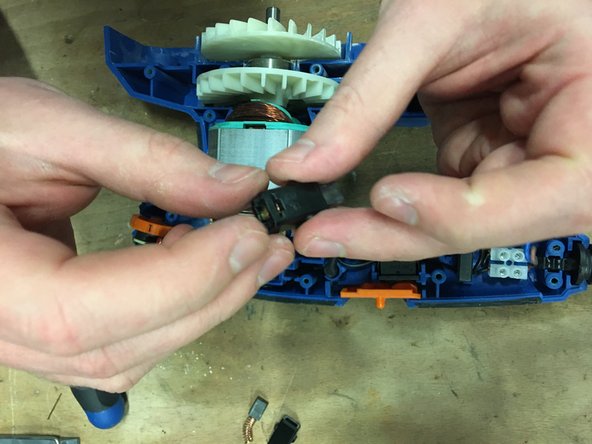
Ir para o conteúdo principal

Dexter 330W Wired Vibrating Sander - 330SHS2.5 Carbon Replacement

O que você precisa

  1. Dexter 330W Wired Vibrating Sander - 330SHS2.5 Carbon Replacement, Unplug: passo 1, imagem 1 %32
    • Before starting, remember to disconnect the outlet from the mains.

  2. Dexter 330W Wired Vibrating Sander - 330SHS2.5 Carbon Replacement: passo 2, imagem 1 %32 Dexter 330W Wired Vibrating Sander - 330SHS2.5 Carbon Replacement: passo 2, imagem 2 %32
    • Remove the dust case and the seal on the back of the device.

  3. Dexter 330W Wired Vibrating Sander - 330SHS2.5 Carbon Replacement: passo 3, imagem 1 %32 Dexter 330W Wired Vibrating Sander - 330SHS2.5 Carbon Replacement: passo 3, imagem 2 %32 Dexter 330W Wired Vibrating Sander - 330SHS2.5 Carbon Replacement: passo 3, imagem 3 %32
    • Unscrew the six screws from the pad.

    • Lock the motor with a screwdriver to be able to unscrew the centre screw, you will not be able to get there without blocking the gear.

  4. Dexter 330W Wired Vibrating Sander - 330SHS2.5 Carbon Replacement: passo 4, imagem 1 %32 Dexter 330W Wired Vibrating Sander - 330SHS2.5 Carbon Replacement: passo 4, imagem 2 %32
    • Using a screwdriver or screwdriver, unscrew and open the device.

    • Lift the two coals with a screwdriver to get them out of their homes.

    • Press the tab to disconnect the carbon from the engine

  5. Dexter 330W Wired Vibrating Sander - 330SHS2.5 Carbon Replacement: passo 7, imagem 1 %32 Dexter 330W Wired Vibrating Sander - 330SHS2.5 Carbon Replacement: passo 7, imagem 2 %32 Dexter 330W Wired Vibrating Sander - 330SHS2.5 Carbon Replacement: passo 7, imagem 3 %32
    • Remove the coals from the coal door.

    • Then put the new ones inside.

  6. Dexter 330W Wired Vibrating Sander - 330SHS2.5 Carbon Replacement: passo 8, imagem 1 %32
    • Using a screwdriver, lift the connecter tab before reconnecting it.

    • Reconnect the carbon and check that they hold well.

  7. Dexter 330W Wired Vibrating Sander - 330SHS2.5 Carbon Replacement: passo 10, imagem 1 %32
    • Put the two coals back in their homes.

  8. Dexter 330W Wired Vibrating Sander - 330SHS2.5 Carbon Replacement: passo 11, imagem 1 %32 Dexter 330W Wired Vibrating Sander - 330SHS2.5 Carbon Replacement: passo 11, imagem 2 %32 Dexter 330W Wired Vibrating Sander - 330SHS2.5 Carbon Replacement: passo 11, imagem 3 %32
    • Replace the shell, then screw it back on.

    • Remember to put the joint back in its place.

  9. Dexter 330W Wired Vibrating Sander - 330SHS2.5 Carbon Replacement: passo 12, imagem 1 %32 Dexter 330W Wired Vibrating Sander - 330SHS2.5 Carbon Replacement: passo 12, imagem 2 %32
    • Reposition the part, then lock the engine with a screwdriver to screw.

    • Put the tray back on and screw the screws.

  10. Dexter 330W Wired Vibrating Sander - 330SHS2.5 Carbon Replacement: passo 13, imagem 1 %32
    • Finally, reposition the vacuum bag.

Linha de Chegada

Um agradecimento especial a esses tradutores:

fr en

100%

HelloMacOS está nos ajudando a consertar o mundo! Quer contribuir?
Comece a traduzir ›

Céline Chemineau

Membro desde: 01/29/20

16.581 Reputação

Autoria de 95 guias

Equipe

Leroy Merlin Membro de Leroy Merlin

Community

Membros da 36

Autoria de 239 guias

0 comentários

Adicione um comentário

Exibir estatísticas:

Últimas 24 horas: 0

Últimos 7 dias: 3

Últimos 30 dias: 4

Duração total: 267