Introdução
The PAC115EC Delonghi air conditioner. This guide probably works for many of them that are very similar with the same design flaws. There is a second cooling system with no filtering AT ALL on the bottom that needs to be cleaned out. This looks to be by design- without cleaning this cooling system it will eventually stop cooling properly and be next to useless as an air conditioner.
O que você precisa
-
-
These are easy to open and properly clean.
-
-
-
There are about 9-10 screws that can be accessed with a regualr phillips screw driver on the back of the unit. Some of the screws are deep in the recessed plastic and you will need a longer screwdriver. once all of them are out the rear plastic cover slides off straight back. Make sure the power is unplugged.
-
-
-
-
Once the rear cover is off there are 3 or 4 screws on a top insert that will need to be removed to take the front off. It is clipped in on the sides and there will be a ribbon cable to the top control panel. Be careful not to rip it apart- and disconnect the control interface. I did not take pictures for this step-sorry.
-
-
-
Now that both of the plastic covers are off you can see just how much accumulated dust this thing has sucked in unfiltered. *once again make sure this is unplugged!*
-
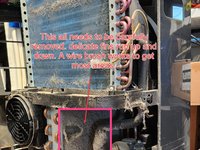
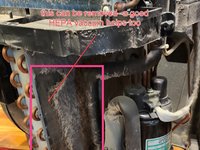
The lower cooling system is going to be packed with stuff drawn into the cooling fins. Carefully wipe downwards with a wire brush- the fins are very fragile and any sideways movement could damage the fins. The fins are difficult to access around the condenser pump and hoses.
The lower cooling fins need to be cleaned completely on both the front and the back. I did not try to go into the other side with the fan system, but cleaned the heck out of everything I could with the vacuum and brush.
mines even worse than this, it's pretty bad
-
-
-
once the unit is reasonably cleaned up you can carefully replace the front- attach the control wire. Reclip the front and then maneuver the rear cover into place- it should align right up but you may need to nudge it a bit to get it right. put the screws back in and give it a try. Provided you did everything correctly it should power on.
I'm still amazed that they can sell this unit with no filtering in the lower system. The only way to fix this is to open it up to clean it. Might be a built in obsolescence to keep people buying these when they stop working too well- who knows? All I can say for sure is this is a terrible design and it will clog up if not cleaned every so often.
I can't recall a time when I've ever seen a filter on the condenser-side of the cooling system for any appliance that has a compressor whether it be on a car, in a fridge, a dehumidifier, a heat-pump clothes dryer or any air conditioner of any kind, portable or central on a building, can you? Therefore, I'm not sure it's a "built-in obsolescence" thing. More realistically, it might be a airflow requirement thing. Putting filters will undoubtedly increase said unit's complexity and size.
Agree it’s a horrible design flaw. With a heavy shedding dog it was like a dogfelt mat on the bottom cooling system. Had totally stopped. Compressor would not engage. Ours is the ex290, 14kBtu unit. I have some Park brand brushes for cleaning my mountain bikes and between my Milwaukee shop vac and the very clever brushes it’s back to good. Condensation reservoir fills up in an hour again now which is a pita but means it’s working fine. I’m going to plumb it with tubing to outside this year.
Yup if you are condensing that much water it must be working. Here in Colorado condensation is not a huge factor with relative humidity at no greater than 30% so I rarely need to empty the resivoir. As for designing some sort of filter for the lower condenser side some sort of mesh taped over the lower fins would al least stop the larger dander and particles from ingressing into the unit- if you are reading this I have every confidince a DIY'er can figure something out similar to the magnetic strip-mesh that works great on a modern desktop these days...:)
I go a step further and disassemble the fan and motor behind the upper coil to clean the mould out of the machine. Once you have removed these you can easily clean the upper cooling coil by applying compressed air from where the motor and fan sat. I found mould all over the fan and it's houseing and down into the drip trays . For the fan and houseing I applied sellys rapid mould killer . Then left them in the shower to soak careful it's very caustic so turn your extraction fan on about 4mins then I wash them of with jet mode hand shower . I figure it's going to clean the shower floor so why not . It's alot of effort to remove the drip tray . So I use gloves and wipe on the mixture by hand then useing a wet cloth I wipe rinse wipe rinse and so on enough make sure the reaction has stopped. Looking at the amount of dust in this unit above I think the owner needs a new vacuum cleaners well lol or needs to use it more often 😂.
-
To reassemble your device, follow these instructions in reverse order.
To reassemble your device, follow these instructions in reverse order.
Cancelar: não concluí este guia.
6 outras pessoas executaram este guia.
9 comentários
I've been looking everywhere for a guide on disassembling the PAC EL290HLWKC-1A (DeLonghi Pinguino Deluxe Portable Air Conditioner) that looks very similar, but not exactly like this one. I can see the accumulation of dust through the slats. I've even cobbled together a flexible tube as a hand-held vacuum cleaner attachment to try and get to it, with minimal success.
The one time I attempted to get the case off, I met with some resistance that indicated I had clearly missed a screw. I never did find it and now I'm still too terrified I'll break it to try again.
I would be most grateful if someone could post a diagram or image showing where all the screws are. I can't be alone in seeking this info as the model sold very well at Costco a few years back.
I have just disassembled this device which is identical to the photo in this post. I could show a lot of pictures.
How can I do it?
I would love to see some pictures, I'm trying to replace the power cord and don't have the schematic where it plugs in
I have a different PAC model with all shallow screws. While this guide is not the same as mine, it gave me encouragement to disassemble mine. Fortunately, it not as dirty but it does need a clean up .
I have stored my el275hgrkc-3al Delonghi in a shed and after I vacuumed the filter, washed it, cleaned out the debris from the vents it has a FUNKY smell. I tried running it for a little bit hoping it would cycle what ever smell is stored, no luck. Any suggestions to what it could be?
Exactly what I determined. I was actually unsure whether or not they put a paper filter over the fins but it turns out it was just hair very neatly matted.
I had a lot of trouble getting behind the compressor even with a brush. I did end up bending some fins back there. Do you have any recommendations for repositioning the compressor or the compressor fins for better cleaning?
Any work arounds for a do it yourself filter?
Hi, I have a pac n80 model. For a few days now, instead of coming out of the tube at the base, the water has been coming out from the sides. While dismantling the air conditioner I noticed that the water created by the first condenser does not flow downwards, but remains there. I tried to disassemble the condenser to investigate better but it is welded to a tube on the right side and I was unable to remove it. My suspicion is that the reservoir, or the path the water follows, is almost completely blocked. Do you have any advice to give me?


