Ir para o conteúdo principal

Este guia tem alterações mais recentes. Mudar para a última versão não verificada.

Dell XPS 13 Motherboard Replacement

Guia arquivado
Este guia é mantido exclusivamente para fins históricos. Use a versão atualizada do guia para executar o reparo.

O que você precisa

  1. Dell XPS 13 Motherboard Replacement, Back Cover: passo 1, imagem 1 %32 Dell XPS 13 Motherboard Replacement, Back Cover: passo 1, imagem 2 %32
    • Remove the eight 4 mm T5 Torx screws from the bottom cover.

  2. Dell XPS 13 Motherboard Replacement: passo 2, imagem 1 %32 Dell XPS 13 Motherboard Replacement: passo 2, imagem 2 %32
    • Use a plastic opening tool to pry open the 'XPS' flap in the middle.

  3. Dell XPS 13 Motherboard Replacement: passo 3, imagem 1 %32
    • Remove the single Phillips screw hidden beneath the flap.

  4. Dell XPS 13 Motherboard Replacement: passo 4, imagem 1 %32
    • Use opening picks or a plastic pry tool to pry open the case clips, beginning from the back edge.

  5. Dell XPS 13 Motherboard Replacement: passo 5, imagem 1 %32
    • Remove the bottom cover.

  6. Dell XPS 13 Motherboard Replacement, Battery Disconnection: passo 6, imagem 1 %32 Dell XPS 13 Motherboard Replacement, Battery Disconnection: passo 6, imagem 2 %32
    • Pull the battery cable connector towards the battery to disconnect it from its socket.

    • If the connector is stubborn, push a little at one side, then the other, to "walk" it out of its socket.

    • If you have trouble walking the connector out of the socket, use the point of a spudger to gently push on the connector indent to slide the connector out.

    • Do not pull up.

    • Open the display and press the power button for five seconds to drain any remaining charge from the system.

  7. Dell XPS 13 Motherboard Replacement, Fan: passo 7, imagem 1 %32 Dell XPS 13 Motherboard Replacement, Fan: passo 7, imagem 2 %32 Dell XPS 13 Motherboard Replacement, Fan: passo 7, imagem 3 %32
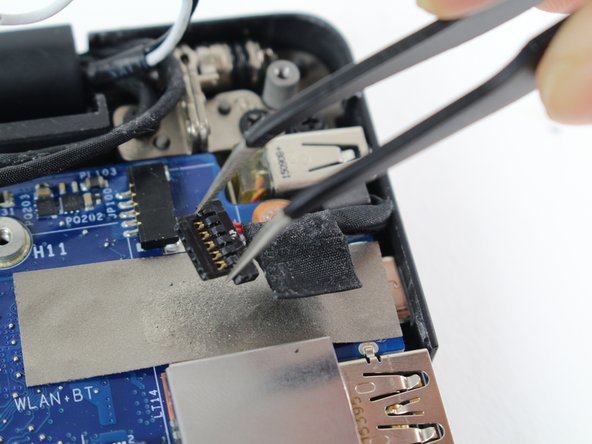
    • Use tweezers to remove the little white connector by pulling it out and away from its socket.

  8. Dell XPS 13 Motherboard Replacement: passo 8, imagem 1 %32 Dell XPS 13 Motherboard Replacement: passo 8, imagem 2 %32
    • Remove the black standard flat connector by lifting the tab up with your hand.

  9. Dell XPS 13 Motherboard Replacement: passo 9, imagem 1 %32 Dell XPS 13 Motherboard Replacement: passo 9, imagem 2 %32
    • Remove the 4 mm Phillips #0 screw that connects the fan to the motherboard.

    • Remove the 4 mm Phillips #0 screw that connects the fan to the base of the computer.

  10. Dell XPS 13 Motherboard Replacement: passo 10, imagem 1 %32 Dell XPS 13 Motherboard Replacement: passo 10, imagem 2 %32
    • Use your right hand to lift up the larger section of the motherboard, closest to the fan.

    • Use your left hand to pull the fan at a 30-degree angle out from underneath the motherboard.

  11. Dell XPS 13 Motherboard Replacement, Battery: passo 11, imagem 1 %32 Dell XPS 13 Motherboard Replacement, Battery: passo 11, imagem 2 %32
    • Remove the four 3 mm Phillips #0 screws located on each corner of the battery.

  12. Dell XPS 13 Motherboard Replacement: passo 12, imagem 1 %32 Dell XPS 13 Motherboard Replacement: passo 12, imagem 2 %32
    • Pull the battery cable connector towards the battery to disconnect it from its socket.

    • Do not pull up.

  13. Dell XPS 13 Motherboard Replacement: passo 13, imagem 1 %32
    • Peel up any tape securing the speaker cables to the battery.

    • You do not need to remove the speakers, only the tape, allowing the battery to be removed out under the speaker cables.

  14. Dell XPS 13 Motherboard Replacement: passo 14, imagem 1 %32
    • Remove the battery.

  15. Dell XPS 13 Motherboard Replacement, Motherboard: passo 15, imagem 1 %32 Dell XPS 13 Motherboard Replacement, Motherboard: passo 15, imagem 2 %32
    • Remove the eight 4 mm Phillips #0 screws from the motherboard.

  16. Dell XPS 13 Motherboard Replacement: passo 16, imagem 1 %32 Dell XPS 13 Motherboard Replacement: passo 16, imagem 2 %32 Dell XPS 13 Motherboard Replacement: passo 16, imagem 3 %32
    • Locate the red and black cable connector at the bottom right of the motherboard.

    • Use tweezers to slowly detach the cable connector from its socket by pulling it to the right and up.

  17. Dell XPS 13 Motherboard Replacement: passo 17, imagem 1 %32 Dell XPS 13 Motherboard Replacement: passo 17, imagem 2 %32 Dell XPS 13 Motherboard Replacement: passo 17, imagem 3 %32
    • Use tweezers to flip open the Zero Insertion Force (ZIF) connector.

    • Use tweezers to detach the ribbon cable from the ZIF by pulling it towards yourself.

  18. Dell XPS 13 Motherboard Replacement: passo 18, imagem 1 %32 Dell XPS 13 Motherboard Replacement: passo 18, imagem 2 %32 Dell XPS 13 Motherboard Replacement: passo 18, imagem 3 %32
    • Use tweezers to flip open the white ZIF connector.

    • Use tweezers to detach the ribbon connector from the ZIF by pulling it towards yourself.

  19. Dell XPS 13 Motherboard Replacement: passo 19, imagem 1 %32 Dell XPS 13 Motherboard Replacement: passo 19, imagem 2 %32 Dell XPS 13 Motherboard Replacement: passo 19, imagem 3 %32
    • Use tweezers to flip open the ZIF connector.

    • Use tweezers to detach the orange ribbon connector from the ZIF by pulling it towards yourself.

  20. Dell XPS 13 Motherboard Replacement: passo 20, imagem 1 %32 Dell XPS 13 Motherboard Replacement: passo 20, imagem 2 %32
    • Use tweezers to detach the black cable connector out of its socket by pulling it to the right.

  21. Dell XPS 13 Motherboard Replacement: passo 21, imagem 1 %32 Dell XPS 13 Motherboard Replacement: passo 21, imagem 2 %32 Dell XPS 13 Motherboard Replacement: passo 21, imagem 3 %32
    • Use tweezers to gently detach the black and white cable connector out of its socket by pulling it to the right.

  22. Dell XPS 13 Motherboard Replacement: passo 22, imagem 1 %32 Dell XPS 13 Motherboard Replacement: passo 22, imagem 2 %32
    • Locate the connector at the top right of the motherboard.

    • Use tweezers to detach the cable connector from its socket by pulling it to the right.

  23. Dell XPS 13 Motherboard Replacement: passo 23, imagem 1 %32 Dell XPS 13 Motherboard Replacement: passo 23, imagem 2 %32 Dell XPS 13 Motherboard Replacement: passo 23, imagem 3 %32
    • Locate the last black cable connector.

    • Use tweezers to detach the black cable connector from its socket by pulling it to the right.

  24. Dell XPS 13 Motherboard Replacement: passo 24, imagem 1 %32
    • Use your hands to lift up the motherboard.

Conclusão

To reassemble your device, follow these instructions in reverse order.

12 outras pessoas executaram este guia.

Evan Shui

Membro desde: 04/26/17

320 Reputação

Autoria de 1 guia

Equipe

Cal Poly, Team S21-G6, Livingston Spring 2017 Membro de Cal Poly, Team S21-G6, Livingston Spring 2017

CPSU-LIVINGSTON-S17S21G6

Membros da 5

Autoria de 30 guias

2 comentários

where is camera cable

phong thanh - Responder

Wow man that is awesome job. Where can you get a newer motheboard for the same laptop?

R E - Responder

Adicione um comentário

Exibir estatísticas:

Últimas 24 horas: 5

Últimos 7 dias: 34

Últimos 30 dias: 207

Duração total: 23,699