Ir para o conteúdo principal

Dell Studio 1558 Fan Replacement

O que você precisa

  1. Dell Studio 1558 Fan Replacement, Battery: passo 1, imagem 1 %32 Dell Studio 1558 Fan Replacement, Battery: passo 1, imagem 2 %32
    • To begin, flip over the laptop.

  2. Dell Studio 1558 Fan Replacement: passo 2, imagem 1 %32
    • Next, slide the slider to the right and hold it in place.

  3. Dell Studio 1558 Fan Replacement: passo 3, imagem 1 %32 Dell Studio 1558 Fan Replacement: passo 3, imagem 2 %32
    • While holding down the slider, gently remove the battery.

  4. Dell Studio 1558 Fan Replacement: passo 4, imagem 1 %32
    • The battery has been successfully removed.

  5. Dell Studio 1558 Fan Replacement, Fan: passo 5, imagem 1 %32 Dell Studio 1558 Fan Replacement, Fan: passo 5, imagem 2 %32 Dell Studio 1558 Fan Replacement, Fan: passo 5, imagem 3 %32
    • Make sure the battery is properly removed. If not, you could experience shocks.

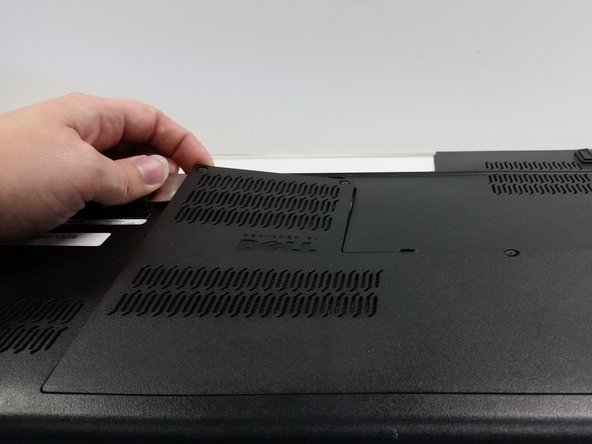
    • Unscrew the three screws (Phillips #0) on the back panel to reveal the innards underneath the panel. It is helpful to keep these screws in the holes of the back panel.

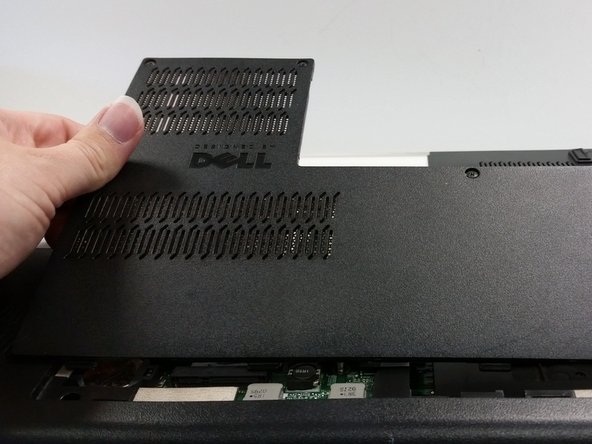
    • Pry the back panel off and set aside.

    • A little bit of force may be necessary in removing the panel as there are some minor plastic clips holding the panel in place in addition to the screws.

  6. Dell Studio 1558 Fan Replacement: passo 6, imagem 1 %32 Dell Studio 1558 Fan Replacement: passo 6, imagem 2 %32
    • Remove the visible screws with a Phillips #0 screwdriver.

    • Note that there are a couple different types of screws, so you might want to organize them, unless you love confusion.

    • There are six regular screws.

    • There is one screw marked M 2X3 .

  7. Dell Studio 1558 Fan Replacement: passo 7, imagem 1 %32 Dell Studio 1558 Fan Replacement: passo 7, imagem 2 %32 Dell Studio 1558 Fan Replacement: passo 7, imagem 3 %32
    • Disconnect the WLAN (wifi) antenna cables.

    • These cables connect like button snaps, so just unsnap them by tugging lightly or gently prying them up away from the WLAN card.

    • Gather the antenna cables (black, white, and grey) and unwind them from the clips they are pinned under to keep them from rattling around.

    • The grey cable may be attached or unattached to the WLAN card depending on the number of antenna cables your card supports.

  8. Dell Studio 1558 Fan Replacement: passo 8, imagem 1 %32 Dell Studio 1558 Fan Replacement: passo 8, imagem 2 %32
    • Remove the screws from the laptop's base.

    • There are seven regular screws.

    • There is one M2X3 screw that is where the battery was located.

  9. Dell Studio 1558 Fan Replacement: passo 9, imagem 1 %32 Dell Studio 1558 Fan Replacement: passo 9, imagem 2 %32 Dell Studio 1558 Fan Replacement: passo 9, imagem 3 %32
    • Now flip the laptop over and open it up.

    • Insert a pry tool under the black plastic guard around the edge of the keyboard and pry the guard up. Plastic snaps are holding the guard in place.

    • You can also do this with your hands once you have enough pried up, but keep in mind that the plastic is thin and capable of breaking if bent too far.

    • Place the keyboard guard in a safe location out of harm's way.

  10. Dell Studio 1558 Fan Replacement: passo 10, imagem 1 %32 Dell Studio 1558 Fan Replacement: passo 10, imagem 2 %32 Dell Studio 1558 Fan Replacement: passo 10, imagem 3 %32
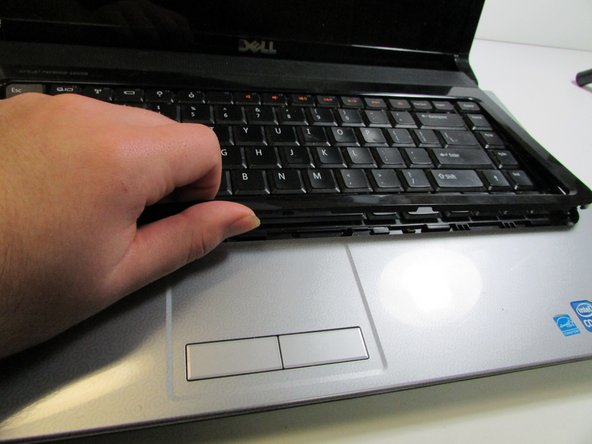
    • Use the Phillips screwdriver to remove the two screws that attach the keyboard to the casing.

    • Once the screws are out, gently tip the keyboard up to view the ribbon cable beneath.

    • A ribbon cable connects the keyboard to the motherboard. Be gentle removing the keyboard as to not damage the ribbon cable beneath.

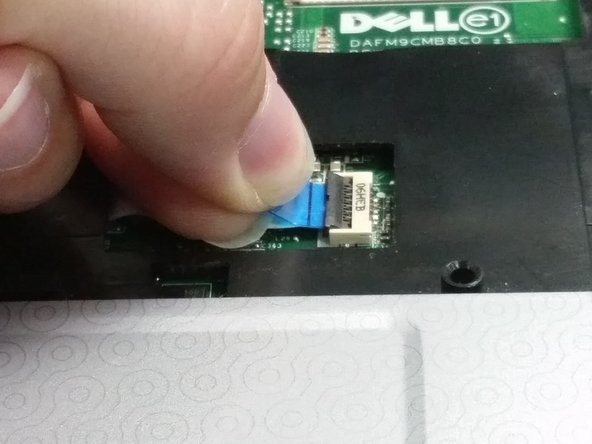
    • Carefully unlatch and remove the ribbon cable from the motherboard by lifting up the black tab (with a spudger or finger) and slipping the cable out.

    • Put the keyboard off to the side. Make sure it is in a secure location.

  11. Dell Studio 1558 Fan Replacement: passo 11, imagem 1 %32 Dell Studio 1558 Fan Replacement: passo 11, imagem 2 %32
    • Remove M2. 5x5 screws (6 total)

    • Remove M2x3 screws (5 total)

  12. Dell Studio 1558 Fan Replacement: passo 12, imagem 1 %32 Dell Studio 1558 Fan Replacement: passo 12, imagem 2 %32 Dell Studio 1558 Fan Replacement: passo 12, imagem 3 %32
    • Let's undo some cables!

    • Disconnect the ribbon from the ZIF (Zero Insertion Force) connector by flipping up the small black flap with a spudger or fingernail and removing the cable using the blue tab to pull away.

    • Undo both bundled cable connectors by pulling collectively on the wires and helping it along with a spudger to disconnect.

    • Once the cables are disconnected, unthread the cables from their grooved paths in the upper housing.

  13. Dell Studio 1558 Fan Replacement: passo 13, imagem 1 %32 Dell Studio 1558 Fan Replacement: passo 13, imagem 2 %32 Dell Studio 1558 Fan Replacement: passo 13, imagem 3 %32
    • Now, to remove the rest of the upper casing (the silver part which includes the touchpad).

    • This step is going to take a little strength and a lot of patience.

    • Take the flat edge of a pry tool and slip it between the upper and lower casings.

    • The silver and black upper panel (which held/surrounded the keyboard) is meant to be removed as one piece. Try to avoid pulling up only the silver portion as it will damage the plastic pins holding it in place.

    • Pry the upper casing up with the pry tool. You will hear some snaps as it comes loose. Those are supposed to happen.

    • Once you got enough lifted up, you can take your hand and pry it up that way.

    • If a part of the case is being very stubborn, double check to make sure any screws have not been forgotten.

  14. Dell Studio 1558 Fan Replacement: passo 14, imagem 1 %32 Dell Studio 1558 Fan Replacement: passo 14, imagem 2 %32
    • Disconnect any visible cables that you can spot and access.

    • There are five bundled cables that you can removed by gently tugging on the gathered wires as you assist it's exit with a spudger.

    • Disconnect the ZIF connector by flipping up the black flap with a fingernail or spudger and then pulling the ribbon cable away.

  15. Dell Studio 1558 Fan Replacement: passo 15, imagem 1 %32 Dell Studio 1558 Fan Replacement: passo 15, imagem 2 %32
    • Remove the screws from the board that are labeled B. There should be 6 of them.

    • We're going to remove the DVD/CD Drive next, so make sure that the two ribbons that are next to the CD drive are disconnected.

  16. Dell Studio 1558 Fan Replacement: passo 16, imagem 1 %32 Dell Studio 1558 Fan Replacement: passo 16, imagem 2 %32 Dell Studio 1558 Fan Replacement: passo 16, imagem 3 %32
    • The next step will be to remove the CD/DVD drive from the laptop.

    • Unscrew the two silver screws attached to the motherboard.

    • Then unscrew the black screw attaching it to the motherboard close to the outer edge of the laptop.

    • Lift the CD ROM slightly, and disengage it from the motherboard.

  17. Dell Studio 1558 Fan Replacement: passo 17, imagem 1 %32 Dell Studio 1558 Fan Replacement: passo 17, imagem 2 %32 Dell Studio 1558 Fan Replacement: passo 17, imagem 3 %32
    • Disconnect two more bundled cables you're now able to access with the CD/DVD drive removed.

  18. Dell Studio 1558 Fan Replacement: passo 18, imagem 1 %32 Dell Studio 1558 Fan Replacement: passo 18, imagem 2 %32 Dell Studio 1558 Fan Replacement: passo 18, imagem 3 %32
    • Lift the motherboard up and out of the case and set the case aside.

    • This should be really simple. If it is a struggle to lift the motherboard out, then there might be a forgotten screw, or a ribbon still connected.

    • Flip the motherboard over to find the fan and heat-sink.

  19. Dell Studio 1558 Fan Replacement: passo 19, imagem 1 %32 Dell Studio 1558 Fan Replacement: passo 19, imagem 2 %32 Dell Studio 1558 Fan Replacement: passo 19, imagem 3 %32
    • Remove the 5 black screws around the edge of the fan.

    • Lift up the black plate

    • Evict any dust bunnies you find inside. (We found a monster.)

  20. Dell Studio 1558 Fan Replacement: passo 20, imagem 1 %32 Dell Studio 1558 Fan Replacement: passo 20, imagem 2 %32
    • In order to completely remove the fan you will need to remove the heat sink from the motherboard.

    • Unscrew the six silver screws that attach the fan casing to the motherboard.

    • Gently pull up the square portion of the copper piping as that covers the processor.

    • When reassembling, it's best practice to properly reapply a thermal paste between the heat sink/pipes and the processor after cleaning the old paste off; failure to do this could cause your processor to overheat, making your computer sluggish, and eventually fail. (You can find other guides on iFixit for how to apply/remove thermal paste.)

  21. Dell Studio 1558 Fan Replacement: passo 21, imagem 1 %32 Dell Studio 1558 Fan Replacement: passo 21, imagem 2 %32 Dell Studio 1558 Fan Replacement: passo 21, imagem 3 %32
    • Undo the cable connector buy pulling firmly on all of the gathered cables together and away from the board.

    • At this point, most fan replacements include the casing that surrounds the fan.

    • If necessary (depending on the part purchased) remove the three screws on the back (two black and one silver). With these screws removed the fan itself should fall right out of the heat sink.

Conclusão

To reassemble your device, follow these instructions in reverse order.

9 outras pessoas executaram este guia.

4 comentários

Thanx really really liked I was jumping with video tutorials that almost 90% make me feel so bored that rarely watch a few seconds

I just want it a guide whit a few steps whit some pics and read over and over until I get what I’m doing jajajaja

Juan “Peke” Sayago - Responder

Thanks this was really helpful !

Could you also help me remove the graphic card?

Rakesh Balakrishnan - Responder

I used this guide to assist with a complete motherboard replacement. Well written, great photos! Good chance to take the fan assembly apart and clean it out. Lots of dust after 10 years.

Kevin Prom - Responder

Thank you very much. Very well written and edited.

Mason Morris - Responder

Adicione um comentário

Exibir estatísticas:

Últimas 24 horas: 2

Últimos 7 dias: 2

Últimos 30 dias: 12

Duração total: 4,329