Esta versão pode conter edições incorretas. Mude para o último instantâneo verificado.
O que você precisa
-
Este passo não foi traduzido. Ajude a traduzi-lo
-
Push the tabs on the left and right of the battery out towards the edge of the case.
-
-
Este passo não foi traduzido. Ajude a traduzi-lo
-
While still pushing in the tabs, using your pinky finger, lift the battery out of the laptop.
-
-
Este passo não foi traduzido. Ajude a traduzi-lo
-
Push the button in on the CD/DVD drive to eject the drive.
-
-
-
Este passo não foi traduzido. Ajude a traduzi-lo
-
Using the screwdriver, remove seven 4mm Phillips #1 screws from the bottom of the laptop.
-
Using the screwdriver, remove two 9mm Phillips #00 screws from the bottom of the laptop.
-
-
Este passo não foi traduzido. Ajude a traduzi-lo
-
Gently lift the back plate off of the laptop making sure all of the tabs on the inside perimeter of the back plate are unhooked before lifting.
-
-
Este passo não foi traduzido. Ajude a traduzi-lo
-
Using the screwdriver, remove four 10mm Phillips #0 spring screws from the fan assembly.
-
-
Este passo não foi traduzido. Ajude a traduzi-lo
-
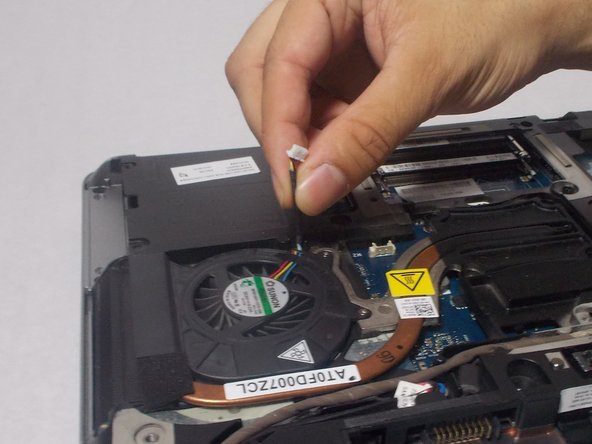
Use the plastic opening tool to unclip the connector.
-


Cancelar: não concluí este guia.
4 outras pessoas executaram este guia.
Equipe

UMass Dartmouth, Team S2-G3, Simcock Spring 2018 Membro de UMass Dartmouth, Team S2-G3, Simcock Spring 2018
UMASSD-SIMCOCK-S18S2G3
Membros da 3
Autoria de 7 guias
Um comentário
very good explanatory steps. but you did not talk about the application of thermal paste for reassembly