Ir para o conteúdo principal

Dell Inspiron 17" 7786 2-in-1 Motherboard Replacement

O que você precisa

  1. Dell Inspiron 17" 7786 2-in-1 Motherboard Replacement, Base Cover: passo 1, imagem 1 %32 Dell Inspiron 17" 7786 2-in-1 Motherboard Replacement, Base Cover: passo 1, imagem 2 %32
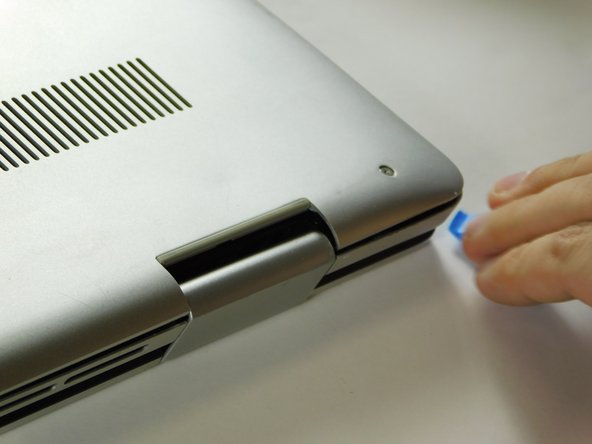
    • Remove the eight M2 5mm screws that secure the base cover using a Phillips #0 screwdriver.

  2. Dell Inspiron 17" 7786 2-in-1 Motherboard Replacement: passo 2, imagem 1 %32 Dell Inspiron 17" 7786 2-in-1 Motherboard Replacement: passo 2, imagem 2 %32
    • Loosen the three captive screws that secure the base closer to the hinges.

    • Do not attempt to remove the three captive screws! You need only to loosen them. They're supposed to stay on the base cover.

  3. Dell Inspiron 17" 7786 2-in-1 Motherboard Replacement: passo 3, imagem 1 %32 Dell Inspiron 17" 7786 2-in-1 Motherboard Replacement: passo 3, imagem 2 %32 Dell Inspiron 17" 7786 2-in-1 Motherboard Replacement: passo 3, imagem 3 %32
    • Carefully pry the base cover using an iFixit opening tool in the crevice near the hinges. Guide the pick along the edges and slightly lift upwards as you go along.

    • Do not start from the speaker end of the edges when opening, or you may cause further damage to your device!

  4. Dell Inspiron 17" 7786 2-in-1 Motherboard Replacement: passo 4, imagem 1 %32 Dell Inspiron 17" 7786 2-in-1 Motherboard Replacement: passo 4, imagem 2 %32 Dell Inspiron 17" 7786 2-in-1 Motherboard Replacement: passo 4, imagem 3 %32
    • Carefully remove the base cover from the laptop.

  5. Dell Inspiron 17" 7786 2-in-1 Motherboard Replacement, Memory Modules (RAM): passo 5, imagem 1 %32
    • Lift the cover to gain access to the memory module.

  6. Dell Inspiron 17" 7786 2-in-1 Motherboard Replacement: passo 6, imagem 1 %32 Dell Inspiron 17" 7786 2-in-1 Motherboard Replacement: passo 6, imagem 2 %32
    • Carefully open the securing clips on the end of each memory module slot until the module stick sticks up.

  7. Dell Inspiron 17" 7786 2-in-1 Motherboard Replacement: passo 7, imagem 1 %32 Dell Inspiron 17" 7786 2-in-1 Motherboard Replacement: passo 7, imagem 2 %32 Dell Inspiron 17" 7786 2-in-1 Motherboard Replacement: passo 7, imagem 3 %32
    • Remove the memory module by sliding it out of the slot.

  8. Dell Inspiron 17" 7786 2-in-1 Motherboard Replacement, Wireless Card (NIC): passo 8, imagem 1 %32 Dell Inspiron 17" 7786 2-in-1 Motherboard Replacement, Wireless Card (NIC): passo 8, imagem 2 %32 Dell Inspiron 17" 7786 2-in-1 Motherboard Replacement, Wireless Card (NIC): passo 8, imagem 3 %32
    • Remove the screw holding down the small bracket for the wireless card using a Phillips #0 screwdriver.

    • Remove the black wired connection from the port over the black triangle.

    • Remove the wire with the white marking from the port above the white triangle.

    • Pull the Wi-Fi card out of its slot.

  9. Dell Inspiron 17" 7786 2-in-1 Motherboard Replacement, Fan: passo 9, imagem 1 %32 Dell Inspiron 17" 7786 2-in-1 Motherboard Replacement, Fan: passo 9, imagem 2 %32
    • Gently remove the I/O cable.

  10. Dell Inspiron 17" 7786 2-in-1 Motherboard Replacement: passo 10, imagem 1 %32 Dell Inspiron 17" 7786 2-in-1 Motherboard Replacement: passo 10, imagem 2 %32
    • Remove the fan cable from the motherboard.

  11. Dell Inspiron 17" 7786 2-in-1 Motherboard Replacement: passo 11, imagem 1 %32
    • Remove two 3 mm screws that secure the fan using a Phillips #0 screwdriver.

  12. Dell Inspiron 17" 7786 2-in-1 Motherboard Replacement: passo 12, imagem 1 %32 Dell Inspiron 17" 7786 2-in-1 Motherboard Replacement: passo 12, imagem 2 %32
    • There is a little piece of tape/sticker on the fan that connects it to the heat sink. Gently remove this.

    • Lift the fan off the palm rest assembly.

  13. Dell Inspiron 17" 7786 2-in-1 Motherboard Replacement, Heatsink: passo 13, imagem 1 %32 Dell Inspiron 17" 7786 2-in-1 Motherboard Replacement, Heatsink: passo 13, imagem 2 %32
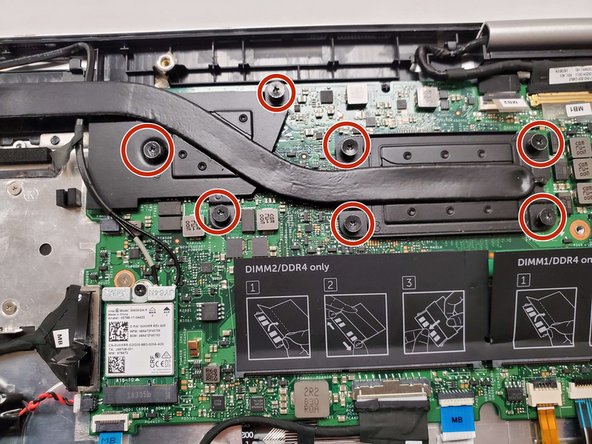
    • Loosen seven 3 mm captive screws securing the heatsink to the motherboard using a Phillips #0 screwdriver.

  14. Dell Inspiron 17" 7786 2-in-1 Motherboard Replacement: passo 14, imagem 1 %32 Dell Inspiron 17" 7786 2-in-1 Motherboard Replacement: passo 14, imagem 2 %32 Dell Inspiron 17" 7786 2-in-1 Motherboard Replacement: passo 14, imagem 3 %32
    • Lift the heatsink off the motherboard.

  15. Dell Inspiron 17" 7786 2-in-1 Motherboard Replacement, Display Assembly: passo 15, imagem 1 %32 Dell Inspiron 17" 7786 2-in-1 Motherboard Replacement, Display Assembly: passo 15, imagem 2 %32
    • Ensure that you have your device opened flat at a 180 degree angle. This will make removal easier.

  16. Dell Inspiron 17" 7786 2-in-1 Motherboard Replacement: passo 16, imagem 1 %32 Dell Inspiron 17" 7786 2-in-1 Motherboard Replacement: passo 16, imagem 2 %32 Dell Inspiron 17" 7786 2-in-1 Motherboard Replacement: passo 16, imagem 3 %32
    Ferramenta utilizada nesse passo:
    Tweezers
    $4.99
    Comprar
    • Locate the ribbon cables for the assembly on the right hand side marked "MB1" and "MB2."

    • The "MB1" ribbon is locked with a copper/brass colored handle that must be lifted upwards. Then you can remove the ribbon by pulling it away from the socket.

    • The "MB2" ribbon is locked in its socket with a black latch. Using a non-metallic precision tool (such as tweezers) lift the latch and pull away the MB2 cable.

  17. Dell Inspiron 17" 7786 2-in-1 Motherboard Replacement: passo 17, imagem 1 %32
    • Remove the two screws holding down the assembly on the right hand area using a Phillips #00 screwdriver.

  18. Dell Inspiron 17" 7786 2-in-1 Motherboard Replacement: passo 18, imagem 1 %32 Dell Inspiron 17" 7786 2-in-1 Motherboard Replacement: passo 18, imagem 2 %32 Dell Inspiron 17" 7786 2-in-1 Motherboard Replacement: passo 18, imagem 3 %32
    • Remove the screw protecting the endpoints of the NIC cables and NIC chip using a Phillips #0 screwdriver.

    • Gently pull away the cabling from the NIC chip.

    • The wires can be removed without removing the heat sink, though this is not advised if you are not familiar with the layout.

  19. Dell Inspiron 17" 7786 2-in-1 Motherboard Replacement: passo 19, imagem 1 %32
    • Remove the two screws holding down the bracket of the assembly on the left hand side using a Phillips #0 screwdriver.

  20. Dell Inspiron 17" 7786 2-in-1 Motherboard Replacement: passo 20, imagem 1 %32 Dell Inspiron 17" 7786 2-in-1 Motherboard Replacement: passo 20, imagem 2 %32
    • Lift the display assembly upwards away from the palm/main assembly.

  21. Dell Inspiron 17" 7786 2-in-1 Motherboard Replacement, Motherboard: passo 21, imagem 1 %32 Dell Inspiron 17" 7786 2-in-1 Motherboard Replacement, Motherboard: passo 21, imagem 2 %32 Dell Inspiron 17" 7786 2-in-1 Motherboard Replacement, Motherboard: passo 21, imagem 3 %32
    • Disconnect all cables from the system board:

    • Keyboard cables with latches

    • HDD cable with latch

    • I/O cable that must be lifted or carefully pried away from the board using a spudger

    • It is intended to pull on the black tab of the plug to remove the cable, though it is prone to ripping when doing so.

  22. Dell Inspiron 17" 7786 2-in-1 Motherboard Replacement: passo 22, imagem 1 %32
    • Disconnect the touch pad cable with the latch.

  23. Dell Inspiron 17" 7786 2-in-1 Motherboard Replacement: passo 23, imagem 1 %32 Dell Inspiron 17" 7786 2-in-1 Motherboard Replacement: passo 23, imagem 2 %32 Dell Inspiron 17" 7786 2-in-1 Motherboard Replacement: passo 23, imagem 3 %32
    • Remove the two screws holding down the system board using a Phillips #0 screwdriver:

    • One screw is located above the RAM slot to the right.

    • Another screw is located next to the I/O cable near the edge on the left.

    • Lift the motherboard out of the laptop.

Conclusão

To reassemble your device, follow these instructions in reverse order.

Antonio Franco

Membro desde: 08/25/22

1.025 Reputação

Autoria de 10 guias

Equipe

Gateway, Team 1-3, Class Fall 2022 Membro de Gateway, Team 1-3, Class Fall 2022

GCC-CLASS-F22S1G3

Membros da 4

Autoria de 15 guias

0 comentários

Adicione um comentário

Exibir estatísticas:

Últimas 24 horas: 0

Últimos 7 dias: 2

Últimos 30 dias: 6

Duração total: 179