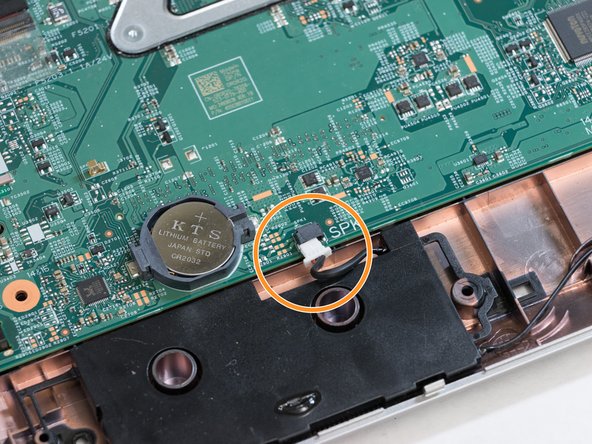
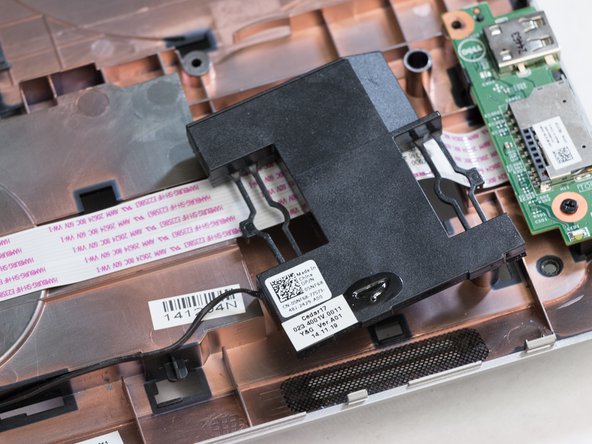
Ir para o conteúdo principal

Dell Inspiron 17-5748 Speakers Replacement

O que você precisa

  1. Dell Inspiron 17-5748 Speakers Replacement, Battery: passo 1, imagem 1 %32
    • Flip the laptop upside down.

    • Locate the battery lock latches.

  2. Dell Inspiron 17-5748 Speakers Replacement: passo 2, imagem 1 %32
    • Slide both lock latches to the unlocked position.

  3. Dell Inspiron 17-5748 Speakers Replacement: passo 3, imagem 1 %32
    • Lift the battery up and out of the laptop battery socket.

  4. Dell Inspiron 17-5748 Speakers Replacement, Speakers: passo 4, imagem 1 %32 Dell Inspiron 17-5748 Speakers Replacement, Speakers: passo 4, imagem 2 %32 Dell Inspiron 17-5748 Speakers Replacement, Speakers: passo 4, imagem 3 %32
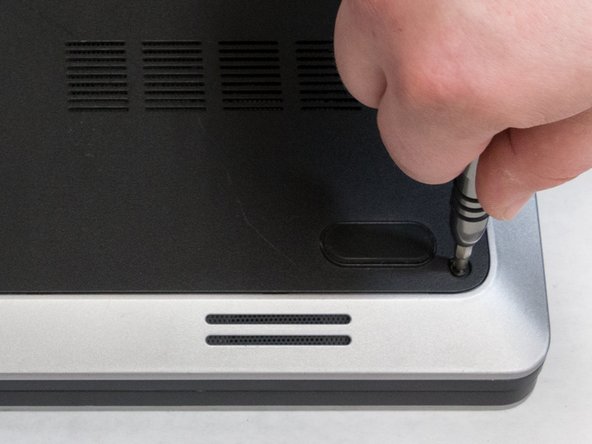
    • Remove the 4.5 mm Phillips #0 screw holding the Optical Drive in place.

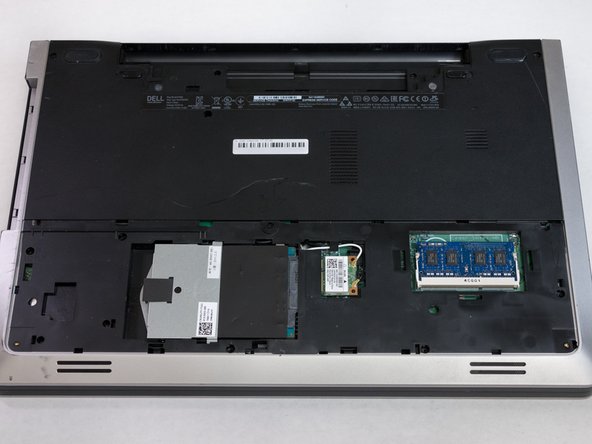
    • Slide the Optical Drive out of the device.

  5. Dell Inspiron 17-5748 Speakers Replacement: passo 5, imagem 1 %32 Dell Inspiron 17-5748 Speakers Replacement: passo 5, imagem 2 %32
    • Remove the two 4.5 mm Phillips #0 screws on the access panel door.

  6. Dell Inspiron 17-5748 Speakers Replacement: passo 6, imagem 1 %32 Dell Inspiron 17-5748 Speakers Replacement: passo 6, imagem 2 %32
    • Using a plastic opening tool, pry open the access panel, exposing the disk drive, RAM, and wireless module.

  7. Dell Inspiron 17-5748 Speakers Replacement: passo 7, imagem 1 %32 Dell Inspiron 17-5748 Speakers Replacement: passo 7, imagem 2 %32 Dell Inspiron 17-5748 Speakers Replacement: passo 7, imagem 3 %32
    • Remove the 2.5 mm Phillips #0 screw securing the hard drive.

    • Slide the hard drive out using the pull tab.

    • Remove the hard drive from the device.

  8. Dell Inspiron 17-5748 Speakers Replacement: passo 8, imagem 1 %32
    • Open the laptop and locate the keyboard.

  9. Dell Inspiron 17-5748 Speakers Replacement: passo 9, imagem 1 %32 Dell Inspiron 17-5748 Speakers Replacement: passo 9, imagem 2 %32
    • Locate the 5 keyboard tabs at the side of the keyboard closest to the screen.

    • Using a metal spudger, gently pry the keyboard tabs inwards until they loosened. You should hear a click.

  10. Dell Inspiron 17-5748 Speakers Replacement: passo 10, imagem 1 %32 Dell Inspiron 17-5748 Speakers Replacement: passo 10, imagem 2 %32
    • Do not remove the keyboard completely. The ribbon cable underneath, attaching it to the motherboard, must still be detached.

    • Lift the keyboard partially and flip it over.

  11. Dell Inspiron 17-5748 Speakers Replacement: passo 11, imagem 1 %32 Dell Inspiron 17-5748 Speakers Replacement: passo 11, imagem 2 %32
    • Detach the ribbon cable from the motherboard by tilting up the black clip, releasing the cable.

    • Gently detach the cable and the keyboard from the laptop.

  12. Dell Inspiron 17-5748 Speakers Replacement: passo 12, imagem 1 %32
    • Remove the five 4.5 mm Phillips #0 screws found under the keyboard.

  13. Dell Inspiron 17-5748 Speakers Replacement: passo 13, imagem 1 %32 Dell Inspiron 17-5748 Speakers Replacement: passo 13, imagem 2 %32 Dell Inspiron 17-5748 Speakers Replacement: passo 13, imagem 3 %32
    • Do not fully remove the palm rest until the ribbon cable underneath is detached.

    • Using a plastic opening tool, separate the plastic palm rest and partially lift the palm rest from the device.

    • Remove both ends of the ribbon cable. This can be done by flipping up the black tabs securing both ends.

    • Remove the palm rest from the device.

  14. Dell Inspiron 17-5748 Speakers Replacement: passo 14, imagem 1 %32 Dell Inspiron 17-5748 Speakers Replacement: passo 14, imagem 2 %32 Dell Inspiron 17-5748 Speakers Replacement: passo 14, imagem 3 %32
    • Locate the first speaker.

    • Unplug the speaker cable.

  15. Dell Inspiron 17-5748 Speakers Replacement: passo 15, imagem 1 %32 Dell Inspiron 17-5748 Speakers Replacement: passo 15, imagem 2 %32
    • Lift the speaker from the corner.

    • Remove the speaker.

  16. Dell Inspiron 17-5748 Speakers Replacement: passo 16, imagem 1 %32 Dell Inspiron 17-5748 Speakers Replacement: passo 16, imagem 2 %32
    • Using the plastic opening tool, gently remove the second speaker.

Conclusão

To reassemble your device, follow these instructions in reverse order.

Uma outra pessoa concluiu este guia.

Bradley

Membro desde: 02/12/18

235 Reputação

Autoria de 1 guia

Equipe

0 comentários

Adicione um comentário

Exibir estatísticas:

Últimas 24 horas: 0

Últimos 7 dias: 1

Últimos 30 dias: 1

Duração total: 526