Ir para o conteúdo principal
Dell Inspiron 1526 Screen Replacement

Dell Inspiron 1526 Screen Replacement

Ahmed Alshamsi

Ahmed Alshamsi e 3 outros colaboradores

Última atualização em December 23, 2019

45 minutos
Difícil

Introdução

Ir para o passo 1

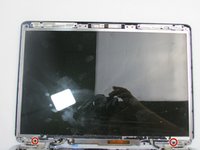
The screen is an essential piece of hardware that, due to its delicate and large profile, is often damaged. In this guide, we will show you how to replace the screen on the Dell Inspiron 1526 Laptop.

O que você precisa

Ferramentas

Exibir mais…

  1. Dell Inspiron 1526 Screen Replacement, Battery: passo 1, imagem 1 %32 Dell Inspiron 1526 Screen Replacement, Battery: passo 1, imagem 2 %32 Dell Inspiron 1526 Screen Replacement, Battery: passo 1, imagem 3 %32
    • Slide the unlock button to the left to release the battery.

    • Slide the battery away from the laptop to remove.

    • The unlock button is located on the bottom of the laptop.

  2. Dell Inspiron 1526 Screen Replacement, Keyboard: passo 2, imagem 1 %32
    • Loosen the two 3.5mm Phillips #1 screws in the battery bay.

  3. Dell Inspiron 1526 Screen Replacement: passo 3, imagem 1 %32
    • Flip the laptop over.

    • Lift the control cover by prying the right side of the cover with an iFixit opening tool.

  4. Dell Inspiron 1526 Screen Replacement: passo 4, imagem 1 %32
    • Carefully lift the control cover up and forward to reveal a single ribbon cable.

  5. Dell Inspiron 1526 Screen Replacement: passo 5, imagem 1 %32
    Ferramenta utilizada neste passo:
    Tweezers
    $4.99
    • Use tweezers to squeeze the tabs on the connector and remove the ribbon cable.

  6. Dell Inspiron 1526 Screen Replacement: passo 6, imagem 1 %32 Dell Inspiron 1526 Screen Replacement: passo 6, imagem 2 %32
    • Remove the control cover.

  7. Dell Inspiron 1526 Screen Replacement: passo 7, imagem 1 %32
    • Remove the two 3mm Phillips #1 screws at the top of the keyboard where the control cover was.

  8. Dell Inspiron 1526 Screen Replacement: passo 8, imagem 1 %32
    • Lift the keyboard gently from the top, but do not remove completely.

    • Looking under the keyboard, towards the touch-pad in the center, lift up the black tab on the connector with tweezers for the keyboard ribbon cable.

  9. Dell Inspiron 1526 Screen Replacement: passo 9, imagem 1 %32 Dell Inspiron 1526 Screen Replacement: passo 9, imagem 2 %32
    • Remove the keyboard.

  10. Dell Inspiron 1526 Screen Replacement, Screen: passo 10, imagem 1 %32 Dell Inspiron 1526 Screen Replacement, Screen: passo 10, imagem 2 %32
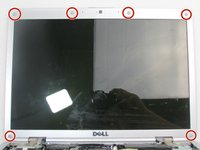
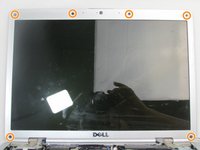
    • Remove the six plastic pads around the bezel using an iFixit opening pick.

    • Remove the six 3mm Phillips #0 screws under each pad.

  11. Dell Inspiron 1526 Screen Replacement: passo 11, imagem 1 %32 Dell Inspiron 1526 Screen Replacement: passo 11, imagem 2 %32 Dell Inspiron 1526 Screen Replacement: passo 11, imagem 3 %32
    • Open the computer so that it rests flat on the table.

    • Separate the bezel from the black plastic frame using a spudger.

    • There are a dozen snaps around the perimeter of the bezel and there are two between the pivot joints of the laptop.

  12. Dell Inspiron 1526 Screen Replacement: passo 12, imagem 1 %32 Dell Inspiron 1526 Screen Replacement: passo 12, imagem 2 %32
    • Remove the two 3mm Phillips #1 screws at the bottom of the display panel.

    • Lift the display slightly from the top, then pull outwards.

    • Flip the display panel around to the back.

    • Disconnect the connector and remove the ribbon cable.

Conclusão

To reassemble your device, follow these instructions in reverse order.

0Comentários do guia

Comentar

Visualizações:

Últimas 24 horas: 0

Últimos 7 dias: 1

Últimos 30 dias: 21

Ao todo: 241