Ir para o conteúdo principal

Dell Inspiron 1525 Wireless Mini-Card Replacement

O que você precisa

  1. Dell Inspiron 1525 Wireless Mini-Card Replacement, Battery: passo 1, imagem 1 %32
    • Locate the battery release switch on the bottom of the laptop.

  2. Dell Inspiron 1525 Wireless Mini-Card Replacement: passo 2, imagem 1 %32 Dell Inspiron 1525 Wireless Mini-Card Replacement: passo 2, imagem 2 %32
    • Slide the battery release switch away from the lock symbol until you hear the battery click.

    • Slide the battery towards the back of the laptop until it comes free.

  3. Dell Inspiron 1525 Wireless Mini-Card Replacement, Bottom Cover: passo 3, imagem 1 %32 Dell Inspiron 1525 Wireless Mini-Card Replacement, Bottom Cover: passo 3, imagem 2 %32
    • Remove/loosen the eight 4.80 mm Phillips #1 screws securing the bottom panel.

    • The screws may only need to be loosened, as they are generally retained by plastic washers.

    • Remove the bottom panel.

  4. Dell Inspiron 1525 Wireless Mini-Card Replacement, Wireless Mini-Card: passo 4, imagem 1 %32 Dell Inspiron 1525 Wireless Mini-Card Replacement, Wireless Mini-Card: passo 4, imagem 2 %32
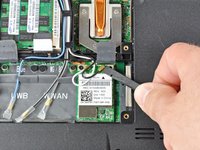
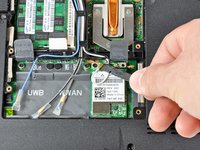
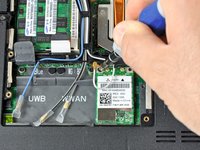
    • Use the flat end of a spudger to gently pry the black and white antenna connectors off the Wireless Mini-Card.

  5. Dell Inspiron 1525 Wireless Mini-Card Replacement: passo 5, imagem 1 %32 Dell Inspiron 1525 Wireless Mini-Card Replacement: passo 5, imagem 2 %32
    • Remove the 3.70 mm Phillips #1 screw securing the card to the laptop.

    • The card will tilt up when you remove the screw.

    • Slide the card straight out.

Conclusão

To reassemble your device, follow these instructions in reverse order.

3 outras pessoas executaram este guia.

0 comentários

Adicione um comentário

Exibir estatísticas:

Últimas 24 horas: 0

Últimos 7 dias: 0

Últimos 30 dias: 8

Duração total: 8,852