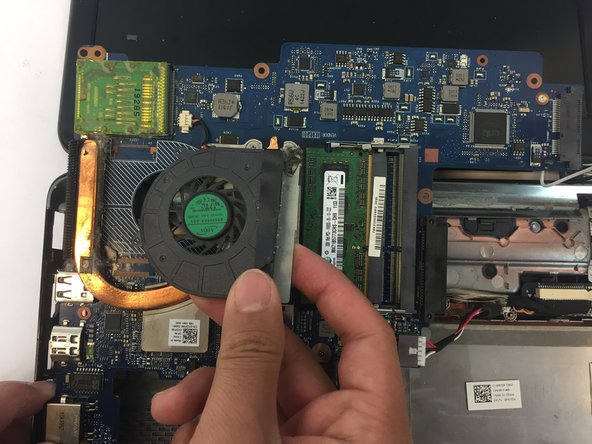
Ir para o conteúdo principal

Dell Inspiron 11z-1121 Fan Replacement

O que você precisa

  1. Dell Inspiron 11z-1121 Fan Replacement, Battery: passo 1, imagem 1 %32 Dell Inspiron 11z-1121 Fan Replacement, Battery: passo 1, imagem 2 %32
    • Slide the latches outward to release the battery.

    • Pull the battery outward to remove.

    • The latches should lock in place, allowing for easy removal.

    • The battery must be removed for safety reasons when replacing other components of the laptop.

  2. Dell Inspiron 11z-1121 Fan Replacement, Keyboard: passo 2, imagem 1 %32 Dell Inspiron 11z-1121 Fan Replacement, Keyboard: passo 2, imagem 2 %32
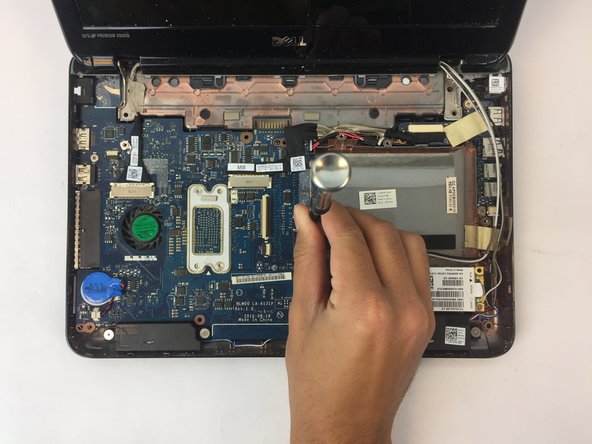
    • Unscrew three black 1mm screws using the PH1 Phillips-head screwdriver on the bottom of the laptop around the battery.

  3. Dell Inspiron 11z-1121 Fan Replacement: passo 3, imagem 1 %32 Dell Inspiron 11z-1121 Fan Replacement: passo 3, imagem 2 %32
    • Flip the laptop over and open it to expose the keyboard.

    • Use a plastic opening tool to pry up the keyboard, starting in the upper corner and working your way around.

    • Once the keyboard is pried up, do not remove the keyboard. There is still a ribbon attaching the keyboard to the laptop.

  4. Dell Inspiron 11z-1121 Fan Replacement: passo 4, imagem 1 %32 Dell Inspiron 11z-1121 Fan Replacement: passo 4, imagem 2 %32
    • Lift the keyboard to expose the ribbon attaching the keyboard to the laptop.

    • Flip up the black retaining flap on the ZIF connector and then pull the ribbon cable away.

    • Remove the keyboard from the laptop.

  5. Dell Inspiron 11z-1121 Fan Replacement, Fan: passo 5, imagem 1 %32 Dell Inspiron 11z-1121 Fan Replacement, Fan: passo 5, imagem 2 %32
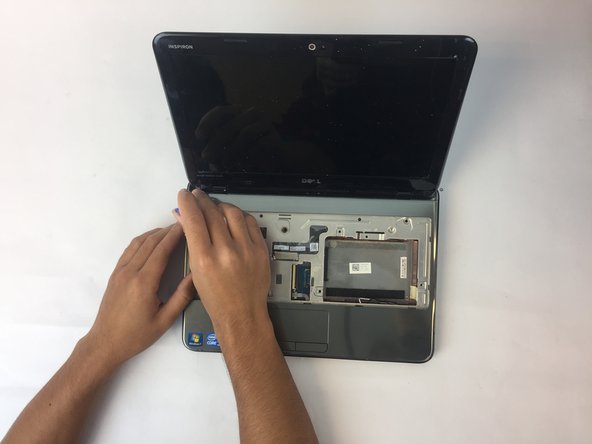
    • Start by prying the outer casing of the laptop using the plastic opening tool. Start from the bottom and work your way around the edges.

  6. Dell Inspiron 11z-1121 Fan Replacement: passo 6, imagem 1 %32 Dell Inspiron 11z-1121 Fan Replacement: passo 6, imagem 2 %32
    • Remove the outer casing to expose the motherboard.

    • Remove five .75 mm screws using a PH1 screwdriver.

    • Make sure to keep track of your screws.

  7. Dell Inspiron 11z-1121 Fan Replacement: passo 7, imagem 1 %32
    • Remove wireless wide area network (WWAN) card by sliding it out of position.

    • Make sure the wires attached to the WWAN card are not detached when doing this step.

  8. Dell Inspiron 11z-1121 Fan Replacement: passo 8, imagem 1 %32 Dell Inspiron 11z-1121 Fan Replacement: passo 8, imagem 2 %32
    • Unscrew the two 0.9 mm screws that are holding down the screen.

    • Lift the screen up and towards yourself to detach the screen from the laptop.

  9. Dell Inspiron 11z-1121 Fan Replacement: passo 9, imagem 1 %32
    • Lay the screen down and pry the left corner of the plastic casing that is located behind the screen.

  10. Dell Inspiron 11z-1121 Fan Replacement: passo 10, imagem 1 %32
    • While holding screen, remove the motherboard by wiggling it around and pulling outwards.

    • In this step you are trying to pull the motherboard out from the VGA socket it is attached to in the back left corner of the laptop.

  11. Dell Inspiron 11z-1121 Fan Replacement: passo 11, imagem 1 %32 Dell Inspiron 11z-1121 Fan Replacement: passo 11, imagem 2 %32
    • Unscrew the two black 0.5 mm screws holding the fan in place.

    • Remove the fan by gently lifting the component upwards.

Conclusão

To reassemble your device, follow these instructions in reverse order.

Cassidy Chen

Membro desde: 10/04/16

289 Reputação

Autoria de 2 guias

Equipe

USF Tampa, Team 1-5, Nance Fall 2016 Membro de USF Tampa, Team 1-5, Nance Fall 2016

USFT-NANCE-F16S1G5

Membros da 4

Autoria de 5 guias

Um comentário

I see there are a few more screws on the bottom. Can't we just unscrew those and take off the bottom panel?

bluejedi - Responder

Adicione um comentário

Exibir estatísticas:

Últimas 24 horas: 0

Últimos 7 dias: 0

Últimos 30 dias: 5

Duração total: 978