Ir para o conteúdo principal

DeLonghi ESAM xxxx - (Different Types) Pressure Regulator Installation

O que você precisa

  1. DeLonghi ESAM xxxx - (Different Types) Pressure Regulator Installation, Preparations: passo 1, imagem 1 %32
    • Pull the plug!

    • Remove the drip tray, the water tank and the pulp container.

  2. DeLonghi ESAM xxxx - (Different Types) Pressure Regulator Installation, Unscrew the rear panel: passo 2, imagem 1 %32 DeLonghi ESAM xxxx - (Different Types) Pressure Regulator Installation, Unscrew the rear panel: passo 2, imagem 2 %32
    • The rear panel and side panels are attached with six phillips screws #2. Screw them out.

  3. DeLonghi ESAM xxxx - (Different Types) Pressure Regulator Installation, Remove right side panel: passo 3, imagem 1 %32 DeLonghi ESAM xxxx - (Different Types) Pressure Regulator Installation, Remove right side panel: passo 3, imagem 2 %32
    • Slide the right side panel about 2 cm to the back.

    • Then solve it.

  4. DeLonghi ESAM xxxx - (Different Types) Pressure Regulator Installation, Remove left side panel: passo 4, imagem 1 %32 DeLonghi ESAM xxxx - (Different Types) Pressure Regulator Installation, Remove left side panel: passo 4, imagem 2 %32 DeLonghi ESAM xxxx - (Different Types) Pressure Regulator Installation, Remove left side panel: passo 4, imagem 3 %32
    • The left side is a bit stuck. Place a plastic opening tool in the gap between the front and left side panel above the opening for the water tank. Lift the gap slightly larger.

    • Then place the tool in the gap between the front and left side panel under the opening for the water tank. Increase the gap and push the side part about 2 cm to the rear.

    • Lift out the left side piece.

  5. DeLonghi ESAM xxxx - (Different Types) Pressure Regulator Installation, Remove rear panel: passo 5, imagem 1 %32
    • Take out the rear panel.

  6. DeLonghi ESAM xxxx - (Different Types) Pressure Regulator Installation, Unscrew top cover: passo 6, imagem 1 %32 DeLonghi ESAM xxxx - (Different Types) Pressure Regulator Installation, Unscrew top cover: passo 6, imagem 2 %32 DeLonghi ESAM xxxx - (Different Types) Pressure Regulator Installation, Unscrew top cover: passo 6, imagem 3 %32
    • The front panel is secured with four PH2 Phillips screws, two left and one right each. Turn it out.

    • Use a plastic opening tool to lever off the steam tap.

    • Carefully pull the front panel about 1 cm forward so that there is a gap between the top cover and the front panel,

    • Do not pull the front panel too far, it is still attached with different hoses and cables.

  7. DeLonghi ESAM xxxx - (Different Types) Pressure Regulator Installation, Remove top cover: passo 7, imagem 1 %32 DeLonghi ESAM xxxx - (Different Types) Pressure Regulator Installation, Remove top cover: passo 7, imagem 2 %32 DeLonghi ESAM xxxx - (Different Types) Pressure Regulator Installation, Remove top cover: passo 7, imagem 3 %32
    • Two Phillips screws PH2 hold the lid at the back. Turn it out.

    • Lift the lid upwards.

  8. DeLonghi ESAM xxxx - (Different Types) Pressure Regulator Installation, pressure regulator: passo 8, imagem 1 %32 DeLonghi ESAM xxxx - (Different Types) Pressure Regulator Installation, pressure regulator: passo 8, imagem 2 %32
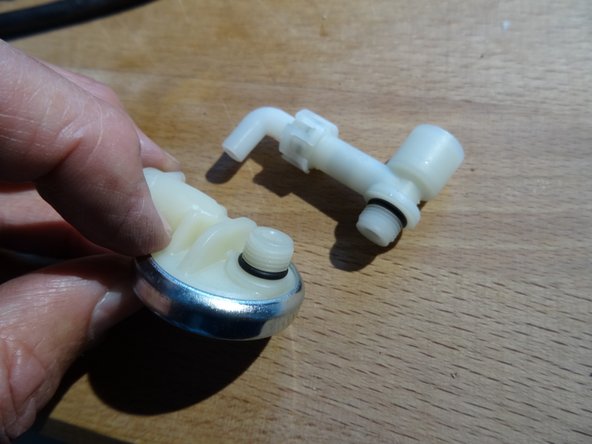
    • The old safety valve - seen in the first photo already expanded - is screwed on the pump. It is replaced by a combination of safety valve and pressure balance valve. The diaphragm valve dampens the shocks of the pump, making the flow of water quieter and quieter.

  9. DeLonghi ESAM xxxx - (Different Types) Pressure Regulator Installation: passo 9, imagem 1 %32 DeLonghi ESAM xxxx - (Different Types) Pressure Regulator Installation: passo 9, imagem 2 %32
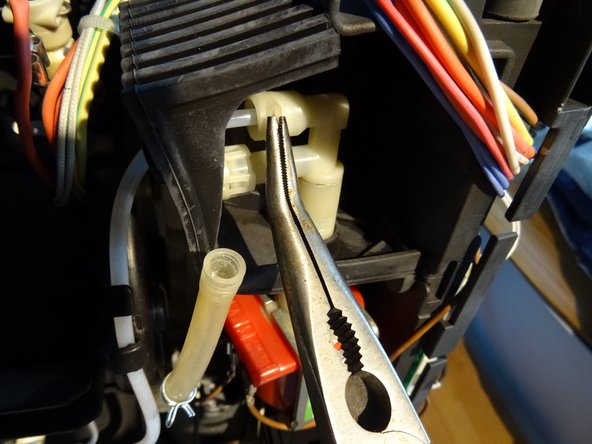
    • Remove the two hoses from the valve. For the thicker hose you have to squeeze the hose clamp with pliers, push it away and you can pull off the hose.

    • With the thinner pressure hose above you have to pull out first a clamp, then the hose comes out easily. There may be a gasket on the hose or it may stick in the valve.

  10. DeLonghi ESAM xxxx - (Different Types) Pressure Regulator Installation: passo 10, imagem 1 %32
    • Pull the pump slightly out of the housing in its rubber mount. Place a fork wrench SW 12 on the pump tube.

    • Then turn out the old valve.

  11. DeLonghi ESAM xxxx - (Different Types) Pressure Regulator Installation: passo 11, imagem 1 %32 DeLonghi ESAM xxxx - (Different Types) Pressure Regulator Installation: passo 11, imagem 2 %32
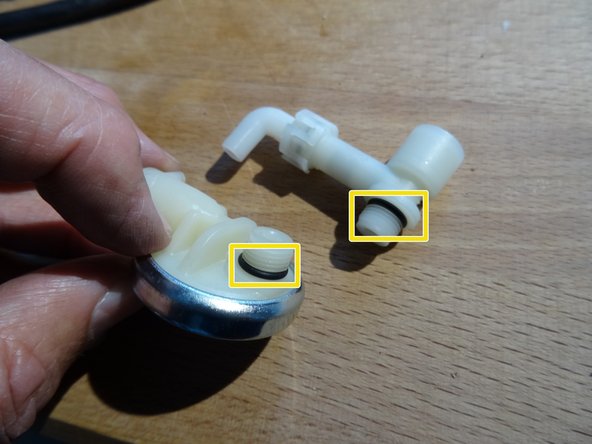
    • Make sure that there is a sealing ring above the thread on the valves, marked yellow in the photo.

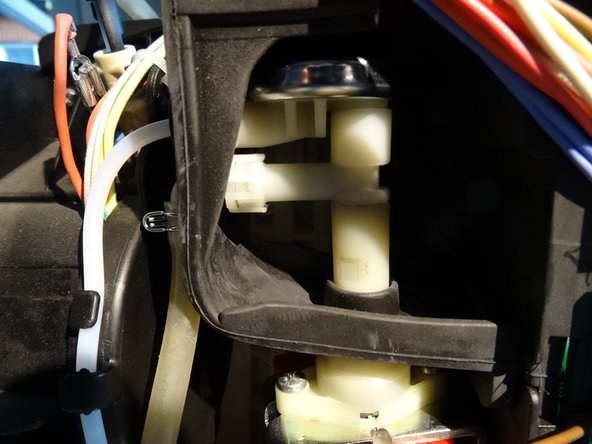
    • First screw the safety valve into the pump tube. Do not turn too hard.

    • then screw the pressure regulating valve into the safety valve.

    • Place the two outputs on top of each other.

    • Put the two hoses back on. Also pay attention here to the thinner tube on the sealing ring, if possible, a new one.

Conclusão

Repeat the steps in order to reassemble your device.

2 outras pessoas executaram este guia.

Um agradecimento especial a esses tradutores:

de en

100%

Estes tradutores estão nos ajudando a consertar o mundo! Quer contribuir?
Comece a traduzir ›

VauWeh

Membro desde: 10/19/15

203.382 Reputação

Autoria de 246 guias

Equipe

Repair is War on Entropy Membro de Repair is War on Entropy

Community

Membros da 25

Autoria de 1.121 guias

2 comentários

Sehr gute Anleitung.

Den Deckel abzunehmen fand ich nicht notwendig.

Sehr hilfreich die Ersatzteil Bezugsquellen.

Maschine ist jetzt um einiges leiser.

Danke

SCHLUMPF - Responder

Gern geschehen. Stimmt, bei dieser Reparatur muss der Deckel nicht unbedingt ab, liegt halt an der Logik dieser aufeinander aufbauenden Anleitungen.

VauWeh - Responder

Adicione um comentário

Exibir estatísticas:

Últimas 24 horas: 0

Últimos 7 dias: 13

Últimos 30 dias: 73

Duração total: 3,351