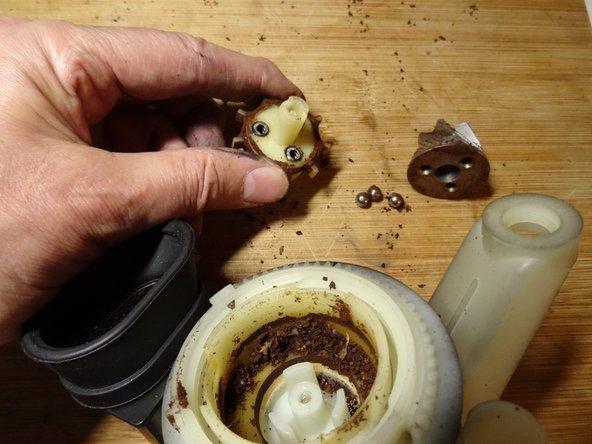
Ir para o conteúdo principal

DeLonghi Coffee Maker grindstones replacement

O que você precisa

  1. DeLonghi Coffee Maker grindstones replacement, Grindstones: passo 1, imagem 1 %32 DeLonghi Coffee Maker grindstones replacement, Grindstones: passo 1, imagem 2 %32 DeLonghi Coffee Maker grindstones replacement, Grindstones: passo 1, imagem 3 %32
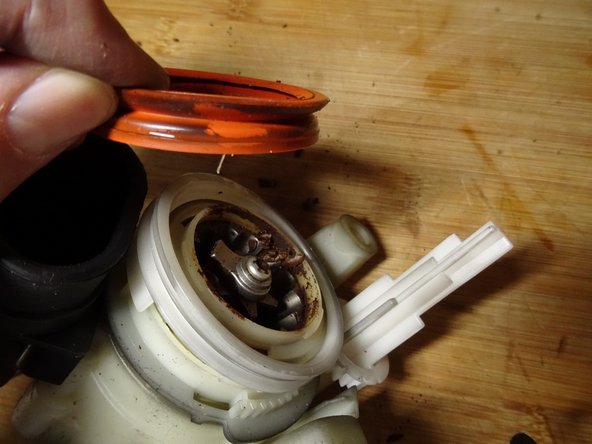
    • If the bean hopper is still attached, it must be removed.

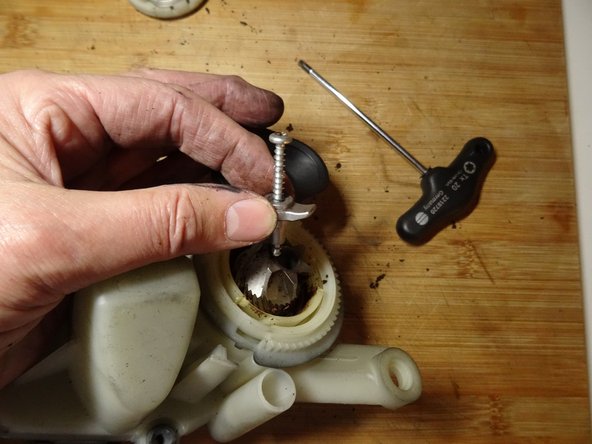
    • Use a pointed tool to remove the cap on the adjustment dial.

  2. DeLonghi Coffee Maker grindstones replacement: passo 2, imagem 1 %32 DeLonghi Coffee Maker grindstones replacement: passo 2, imagem 2 %32 DeLonghi Coffee Maker grindstones replacement: passo 2, imagem 3 %32
    • There is a Phillips screw underneath. Unscrew it.

    • Note the position and pull the dial upwards.

    • Pull the bean container upwards.

    • On some models, there are two more Phillips screws in the bean hopper.

  3. DeLonghi Coffee Maker grindstones replacement: passo 3, imagem 1 %32 DeLonghi Coffee Maker grindstones replacement: passo 3, imagem 2 %32 DeLonghi Coffee Maker grindstones replacement: passo 3, imagem 3 %32
    • Mark the settings of the wheels with a pencil.

    • Use a spatula to loosen the two detents on the sides.

    • Pull off the red silicone seal.

  4. DeLonghi Coffee Maker grindstones replacement: passo 4, imagem 1 %32 DeLonghi Coffee Maker grindstones replacement: passo 4, imagem 2 %32 DeLonghi Coffee Maker grindstones replacement: passo 4, imagem 3 %32
    • Lift off the white plastic ring.

    • Turn the white ring with the ring gear counterclockwise as far as it will go.

    • The grinding ring is free and you can lift it out upwards.

  5. DeLonghi Coffee Maker grindstones replacement: passo 5, imagem 1 %32
    • The grinding ring can be completely removed from the plastic holder. To do this, lift the three detents to the side and push the ring out.

    • The ring has three flattened sides. Unfortunately, such a ring is not commercially available anywhere. If it is still good, you may be able to use it in another mill.

  6. DeLonghi Coffee Maker grindstones replacement: passo 6, imagem 1 %32 DeLonghi Coffee Maker grindstones replacement: passo 6, imagem 2 %32
    • The grinding cone is fastened with a Torx T20 screw with left-hand thread.

    • Unscrew the screw clockwise, i.e. the wrong way round.

    • When assembling, make sure that the screw with its fastening part fits exactly into the intended groove.

  7. DeLonghi Coffee Maker grindstones replacement: passo 7, imagem 1 %32 DeLonghi Coffee Maker grindstones replacement: passo 7, imagem 2 %32
    • Carefully lift the grinding cone upwards.

    • This grinding cone is the same as on the Jura and can now be replaced.

    • There are three metal balls on springs under the grinding cone. They are stuck in three sleeves in the plastic driver. Make sure that none of these parts get lost.

    • Lift the driver up and out.

    • Now you can clean all parts thoroughly.

    • When reassembling, make sure that the metal balls fit into the corresponding recesses in the cone.

Conclusão

Work through the steps in reverse order to reassemble your device.

Uma outra pessoa concluiu este guia.

Um agradecimento especial a esses tradutores:

de en

100%

oldturkey03 está nos ajudando a consertar o mundo! Quer contribuir?
Comece a traduzir ›

VauWeh

Membro desde: 10/19/15

202.909 Reputação

Autoria de 246 guias

Equipe

Repair is War on Entropy Membro de Repair is War on Entropy

Community

Membros da 25

Autoria de 1.114 guias

0 comentários

Adicione um comentário

Exibir estatísticas:

Últimas 24 horas: 4

Últimos 7 dias: 10

Últimos 30 dias: 62

Duração total: 852