Ir para o conteúdo principal

DJI Phantom 4 Advanced Shell Replacement

Pré-requisito somente
Este guia destina-se apenas a ser usado como pré-requisito para outros guias. É incompleto por si só.

O que você precisa

  1. DJI Phantom 4 Advanced Shell Replacement, Propeller: passo 1, imagem 1 %32 DJI Phantom 4 Advanced Shell Replacement, Propeller: passo 1, imagem 2 %32
    • Use your finger tips to pinch the damaged propeller.

    • Twist the propeller counterclockwise and pull up to remove.

  2. DJI Phantom 4 Advanced Shell Replacement, Shell: passo 2, imagem 1 %32 DJI Phantom 4 Advanced Shell Replacement, Shell: passo 2, imagem 2 %32
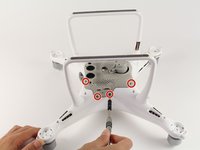
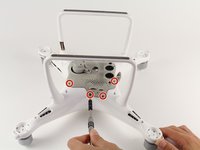
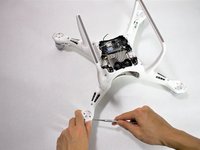
    • Remove the eight 7 mm hex screws by turning counterclockwise with a 2 mm hex bit.

  3. DJI Phantom 4 Advanced Shell Replacement: passo 3, imagem 1 %32
    • Pry the LED motor covers off with a metal spudger.

    • The prying location is marked by an indent that points outward from the arm.

  4. DJI Phantom 4 Advanced Shell Replacement: passo 4, imagem 1 %32
    • Pry the paper covering off the four corners with a metal spudger.

  5. DJI Phantom 4 Advanced Shell Replacement: passo 5, imagem 1 %32
    • Remove the twelve 8.7 mm hex screws with a 2 mm hex bit from the motor bases.

  6. DJI Phantom 4 Advanced Shell Replacement: passo 6, imagem 1 %32 DJI Phantom 4 Advanced Shell Replacement: passo 6, imagem 2 %32
    • Flip the drone on its back

    • Remove the eight 4.5 mm hex screws by turning them counterclockwise with a 1.5 mm hex bit.

    • Separate the mesh from the drone by pulling up gently and rocking left to right.

    • The cable connects from the camera to the drone. Pulling up could rip the connection. Tilt the mesh 90 degrees towards the cable.

  7. DJI Phantom 4 Advanced Shell Replacement: passo 7, imagem 1 %32
    • Remove two 1.2mm screws using the JIS #000 bit from the camera cable retaining bracket.

  8. DJI Phantom 4 Advanced Shell Replacement: passo 8, imagem 1 %32
    • Lift the camera connector at one end with your hand and remove the mesh.

  9. DJI Phantom 4 Advanced Shell Replacement: passo 9, imagem 1 %32 DJI Phantom 4 Advanced Shell Replacement: passo 9, imagem 2 %32 DJI Phantom 4 Advanced Shell Replacement: passo 9, imagem 3 %32
    • Remove the two 1.2 mm screws using a JIS #000 bit from the antenna retaining bracket.

    • Pull the four U.FL antennae up.

    • The U.FL antenna connectors are fragile.

    • Remove the two 4 mm screws using a JIS #000 bit.

  10. DJI Phantom 4 Advanced Shell Replacement: passo 10, imagem 1 %32 DJI Phantom 4 Advanced Shell Replacement: passo 10, imagem 2 %32
    • Pry apart the clamshell at the motor end.

    • Separate the clamshell.

    • Two wires connect from the lower frame to the upper frame at the front of the drone. Pulling the clamshell apart hard may damage the connectors and wires.

  11. DJI Phantom 4 Advanced Shell Replacement: passo 11, imagem 1 %32
    • Press the connector tabs with a spudger and pull on the wire simultaneously.

    • Remove the shell from the rest of the drone.

Conclusão

To reassemble your device, follow these instructions in reverse order.

Uma outra pessoa concluiu este guia.

David Hudson

Membro desde: 10/08/18

301 Reputação

Autoria de 2 guias

Equipe

Cal Poly, Team S15-G6, White Fall 2018 Membro de Cal Poly, Team S15-G6, White Fall 2018

CPSU-WHITE-F18S15G6

Membros da 4

Autoria de 6 guias

0 comentários

Adicione um comentário

Exibir estatísticas:

Últimas 24 horas: 0

Últimos 7 dias: 0

Últimos 30 dias: 0

Duração total: 51