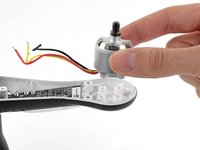
Ir para o conteúdo principal

DJI Phantom 2 Vision+ Motor Removal

O que você precisa

  1. DJI Phantom 2 Vision+ Motor Removal, Remove the battery: passo 1, imagem 1 %32 DJI Phantom 2 Vision+ Motor Removal, Remove the battery: passo 1, imagem 2 %32 DJI Phantom 2 Vision+ Motor Removal, Remove the battery: passo 1, imagem 3 %32
    • Pinch the top and bottom tabs of the battery case, pull the battery straight out to remove it.

    • The metal connectors form a stiff mechanical connection with the battery, you will need quite a bit of force to remove the battery. Hold the Phantom Vision+ with one hand and remove the battery with the other.

  2. DJI Phantom 2 Vision+ Motor Removal, Propellers: passo 2, imagem 1 %32
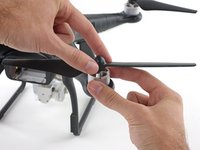
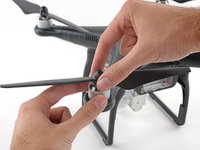
    • Determine if the propellor is clockwise or counter-clockwise rotating.

    • Each arm is labeled with a rotation icon that shows the direction of propellor rotation.

    • If this icon is missing or you can't read it, you can determine the direction of rotation by examining the propellor.

    • A clockwise rotating propellor pushes air down while rotating clockwise, and the opposite is true for a counter-clockwise rotating propellor, and the propellor blade slopes up in the direction of rotation.

  3. DJI Phantom 2 Vision+ Motor Removal, Removing clockwise rotating propellers: passo 3, imagem 1 %32 DJI Phantom 2 Vision+ Motor Removal, Removing clockwise rotating propellers: passo 3, imagem 2 %32 DJI Phantom 2 Vision+ Motor Removal, Removing clockwise rotating propellers: passo 3, imagem 3 %32
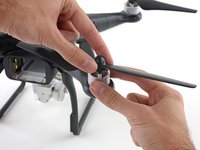
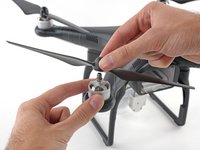
    • Loosen a clockwise rotating propeller by holding the motor with one hand and spinning the propellor clockwise.

    • Remove the propellor.

  4. DJI Phantom 2 Vision+ Motor Removal, Removing counter-clockwise rotating propellers: passo 4, imagem 1 %32 DJI Phantom 2 Vision+ Motor Removal, Removing counter-clockwise rotating propellers: passo 4, imagem 2 %32 DJI Phantom 2 Vision+ Motor Removal, Removing counter-clockwise rotating propellers: passo 4, imagem 3 %32
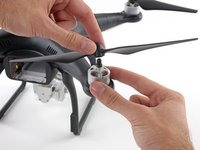
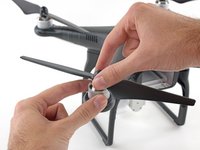
    • Loosen a counter-clockwise rotating propeller by holding the motor with one hand and spinning the propellor counter-clockwise.

    • Remove the propellor.

  5. DJI Phantom 2 Vision+ Motor Removal, Case Top Shell: passo 5, imagem 1 %32 DJI Phantom 2 Vision+ Motor Removal, Case Top Shell: passo 5, imagem 2 %32
    • Remove the following screws from the underside of the Phantom:

    • Twelve 2.0 mm hex bolts

    • Four Phillips #00 screws

  6. DJI Phantom 2 Vision+ Motor Removal: passo 6, imagem 1 %32 DJI Phantom 2 Vision+ Motor Removal: passo 6, imagem 2 %32
    • Gently lift up the top shell case.

    • Do not attempt to fully remove the top shell. The GPS cable is still attached to the mainboard, avoid lifting the case too high or you may damage this connection.

  7. DJI Phantom 2 Vision+ Motor Removal, Unplug GPS connector and remove case: passo 7, imagem 1 %32 DJI Phantom 2 Vision+ Motor Removal, Unplug GPS connector and remove case: passo 7, imagem 2 %32 DJI Phantom 2 Vision+ Motor Removal, Unplug GPS connector and remove case: passo 7, imagem 3 %32
    • The GPS cable molex connector is located on the backside of the mainboard, near the battery opening.

    • Pull the GPS connector straight up out of its socket.

    • Lift the top shell case up and remove it from the body of the Phantom.

  8. DJI Phantom 2 Vision+ Motor Removal, Desolder motor wires: passo 8, imagem 1 %32 DJI Phantom 2 Vision+ Motor Removal, Desolder motor wires: passo 8, imagem 2 %32
    • Desolder all three motor wires.

    • When replacing a motor, be sure to solder the new motor in following the same wire color order as when you removed it.

    • The motor spin direction is dependent on the order of the wires, and may not match this image exactly. If you forgot the order, check the arm directly opposite for reference.

  9. DJI Phantom 2 Vision+ Motor Removal: passo 9, imagem 1 %32
    • Remove the four 2mm hex motor bolts.

  10. DJI Phantom 2 Vision+ Motor Removal: passo 10, imagem 1 %32 DJI Phantom 2 Vision+ Motor Removal: passo 10, imagem 2 %32
    • Remove the motor from the motor mount.

Conclusão

To reassemble your device, follow these instructions in reverse order.

4 outras pessoas executaram este guia.

David Hoyt

Membro desde: 04/09/10

4.023 Reputação

Autoria de 43 guias

Equipe

Cal Poly, Team 25-89, Amido Spring 2010 Membro de Cal Poly, Team 25-89, Amido Spring 2010

CPSU-AMIDO-S10S25G89

Membros da 4

Autoria de 63 guias

0 comentários

Adicione um comentário

Exibir estatísticas:

Últimas 24 horas: 0

Últimos 7 dias: 0

Últimos 30 dias: 7

Duração total: 5,628