Ir para o conteúdo principal

Compaq Presario CQ58 Cooling / FAN system cleaning

O que você precisa

Vídeo de Apresentação

  1. Compaq Presario CQ58 Cooling / FAN system cleaning, Cooling / FAN system cleaning: passo 1, imagem 1 %32 Compaq Presario CQ58 Cooling / FAN system cleaning, Cooling / FAN system cleaning: passo 1, imagem 2 %32 Compaq Presario CQ58 Cooling / FAN system cleaning, Cooling / FAN system cleaning: passo 1, imagem 3 %32
    • Switch-off the laptop and remove the battery.

    • Remove the memory cover.

  2. Compaq Presario CQ58 Cooling / FAN system cleaning: passo 2, imagem 1 %32 Compaq Presario CQ58 Cooling / FAN system cleaning: passo 2, imagem 2 %32 Compaq Presario CQ58 Cooling / FAN system cleaning: passo 2, imagem 3 %32
    • Remove the HDD cover.

    • Unpin the HDD.

  3. Compaq Presario CQ58 Cooling / FAN system cleaning: passo 3, imagem 1 %32 Compaq Presario CQ58 Cooling / FAN system cleaning: passo 3, imagem 2 %32 Compaq Presario CQ58 Cooling / FAN system cleaning: passo 3, imagem 3 %32
    • Near to the WiFi card you can see one screw hole with a keyboard symbol. This screw holds the Keyboard.

    • To remove the Keyboard, you must open 5X locking clips.

  4. Compaq Presario CQ58 Cooling / FAN system cleaning: passo 4, imagem 1 %32 Compaq Presario CQ58 Cooling / FAN system cleaning: passo 4, imagem 2 %32 Compaq Presario CQ58 Cooling / FAN system cleaning: passo 4, imagem 3 %32
    • Under the Keyboard there are:

    • 4x M2.5x5.0 screws

    • Mouse flex cable connector

    • Power On button flex cable connector.

    • Unscrew the screws on the bottom side of the laptop:

    • 13x M2.5x5.0

    • 3x M2.5x3.0

  5. Compaq Presario CQ58 Cooling / FAN system cleaning: passo 5, imagem 1 %32 Compaq Presario CQ58 Cooling / FAN system cleaning: passo 5, imagem 2 %32 Compaq Presario CQ58 Cooling / FAN system cleaning: passo 5, imagem 3 %32
    • Use a plastic tool to separate and remove the upper case.

    • Unscrew 5x screws and disconnect:

    • LCD Display cable

    • Additional USB board cable

    • Power jack cable

    • Loudspeaker cable

    • SATA HDD cable

  6. Compaq Presario CQ58 Cooling / FAN system cleaning: passo 6, imagem 1 %32 Compaq Presario CQ58 Cooling / FAN system cleaning: passo 6, imagem 2 %32 Compaq Presario CQ58 Cooling / FAN system cleaning: passo 6, imagem 3 %32
    • Move a little the LCD display hinge.

    • Remove the board by starting from the right side.

  7. Compaq Presario CQ58 Cooling / FAN system cleaning: passo 7, imagem 1 %32 Compaq Presario CQ58 Cooling / FAN system cleaning: passo 7, imagem 2 %32 Compaq Presario CQ58 Cooling / FAN system cleaning: passo 7, imagem 3 %32
    • Remove the cooling system.

  8. Compaq Presario CQ58 Cooling / FAN system cleaning: passo 8, imagem 1 %32 Compaq Presario CQ58 Cooling / FAN system cleaning: passo 8, imagem 2 %32
    • Open the fan and clean the dust from inside with a soft brush.

  9. Compaq Presario CQ58 Cooling / FAN system cleaning: passo 9, imagem 1 %32 Compaq Presario CQ58 Cooling / FAN system cleaning: passo 9, imagem 2 %32 Compaq Presario CQ58 Cooling / FAN system cleaning: passo 9, imagem 3 %32
    • Clean the old thermal compound (from the CPU and from the heat-sink system).

    • Put a new thermal compound and start with reassembling.

  10. Compaq Presario CQ58 Cooling / FAN system cleaning: passo 10, imagem 1 %32 Compaq Presario CQ58 Cooling / FAN system cleaning: passo 10, imagem 2 %32 Compaq Presario CQ58 Cooling / FAN system cleaning: passo 10, imagem 3 %32
    • When you start the system, check that fan is working.

    • Did you do it successfully?

Conclusão

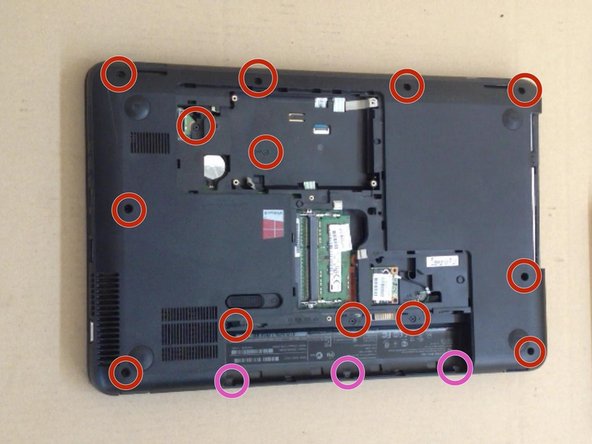
To reassemble your device, follow these instructions in reverse order.

9 outras pessoas executaram este guia.

ZFix

Membro desde: 12/09/13

191.368 Reputação

Autoria de 330 guias

Equipe

Master Techs Membro de Master Techs

Community

Membros da 321

Autoria de 1.468 guias

7 comentários

A brilliant demonstration really clear and well photographed, only one problem how the !&&* do you get the screws undone mine seem fixed solid

please let me into the secret if there is one.

thanks for the demo anyway.

JF.

alma francomb - Responder

Thanks for this!

My Son and I have just successfully removed, cleaned and replaced the fan in his laptop by following the instructions above.

Great work.

David Cooper - Responder

I think i did something wrong? I completed all the steps but my fan (which is brand new) keeps making this scary loud wizzy noise instead of a hum and did i not tightem the screws enough or they to tight?? Please help!

Layla - Responder

Please ensure the fan metal case is not bent and ensure the fan is properly mounted. If this doesn’t solve your problem, your new fan is defective.

Brendan -

Adicione um comentário

Exibir estatísticas:

Últimas 24 horas: 4

Últimos 7 dias: 16

Últimos 30 dias: 63

Duração total: 24,757