Ir para o conteúdo principal
Compaq Mini 110 Keyboard Replacement

Compaq Mini 110 Keyboard Replacement

alea

alea e 10 outros colaboradores

Última atualização em June 10, 2022

Nenhuma estimativa
Moderado
Faltando Passos
Melhor Introdução
Faltando detalhes

Introdução

Ir para o passo 1

Sticky keys? Simply just want to get rid of your keyboard? Here's how.

O que você precisa

Ferramentas

  • Spudger
    Spudger
  • Phillips #0 Screwdriver
    Phillips #0 Screwdriver

Exibir mais…

  1. Compaq Mini 110 Keyboard Replacement, Battery: passo 1, imagem 1 %32 Compaq Mini 110 Keyboard Replacement, Battery: passo 1, imagem 2 %32
    • Locate the battery and the battery tabs on the bottom of the Compaq Mini.

  2. Compaq Mini 110 Keyboard Replacement: passo 2, imagem 1 %32 Compaq Mini 110 Keyboard Replacement: passo 2, imagem 2 %32 Compaq Mini 110 Keyboard Replacement: passo 2, imagem 3 %32
    • Push both tabs inward simultaneously and slide the battery out.

  3. Compaq Mini 110 Keyboard Replacement, RAM: passo 3, imagem 1 %32 Compaq Mini 110 Keyboard Replacement, RAM: passo 3, imagem 2 %32
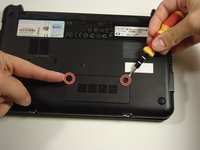
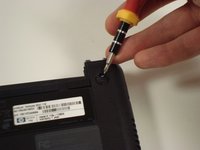
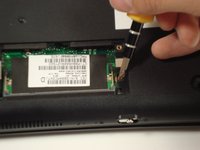
    • Use a Philips #0 screwdriver to unscrew the two screws covering the memory compartment on the bottom of the laptop and remove the cover.

  4. Compaq Mini 110 Keyboard Replacement: passo 4, imagem 1 %32
    • Push out the side tabs simultaneously and pull out the old RAM module.

    • When inserting a new RAM stick, be sure to evenly insert the gold pins in the same orientation that the old module was removed. While sliding the module in, press the side tabs in place.

  5. Compaq Mini 110 Keyboard Replacement, Keyboard: passo 5, imagem 1 %32 Compaq Mini 110 Keyboard Replacement, Keyboard: passo 5, imagem 2 %32
    • Remove the rubber pads located on the corners of your Compaq Mini.

    • There may be junk underneath it. This is residue left from the glue that held on the rubber pad. Just scrape it away to find the screw.

  6. Compaq Mini 110 Keyboard Replacement: passo 6, imagem 1 %32 Compaq Mini 110 Keyboard Replacement: passo 6, imagem 2 %32
    • Unscrew all the corner screws. There are four total, one under each rubber pad.

  7. Compaq Mini 110 Keyboard Replacement: passo 7, imagem 1 %32 Compaq Mini 110 Keyboard Replacement: passo 7, imagem 2 %32
    • Unscrew the screw for the bottom case located in the RAM compartment.

  8. Compaq Mini 110 Keyboard Replacement: passo 8, imagem 1 %32 Compaq Mini 110 Keyboard Replacement: passo 8, imagem 2 %32
    • Remove the three screws in the silver tabs at the back of the keyboard.

    • These are located at the back of the base under the screen.

    • Lift the keyboard away from the laptop.

Conclusão

To reassemble your device, follow these instructions in reverse order.

4 outras pessoas executaram este guia.

alea

Membro desde: 10/06/10

1.417 Reputação

Autoria de 14 guias

Equipe

Cal Poly, Team 22-2, Maness Fall 2010 Membro de Cal Poly, Team 22-2, Maness Fall 2010

CPSU-MANESS-F10S22G2

6 Membros

Autoria de 20 guias

3Comentários do guia

hi, steps 5 and 6 are not needed. not sure about removing RAM either. If I look on my removed keyboard, all I see are three places for screws - those located nearby battery socket.

Petr Gebelt - Responder

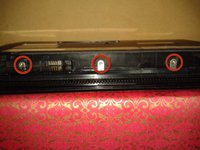
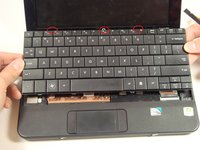
I think steps 3,4,5,6,7 are not needed! The essential problem in removing the keyboard is not shown: how to lift the keyboard! Use the flat side or back of a screwdriver to push the metal strips shown in step 8 up (in the direction of the keyboard) to lift the keyboard. Put your fingers under the edge of the keyboard and pull gently but firmly. There is some resistance of the holding cover.

See also: https://www.youtube.com/watch?v=nELBz1VB...

Hans Donck - Responder

Thank you so much for the link!

Alex -

Comentar

Visualizações:

Últimas 24 horas: 0

Últimos 7 dias: 2

Últimos 30 dias: 12

Ao todo: 16,824