Introdução
Advance warning: a microwave oven uses high voltage. Disassembling it, if you are not knowledgeable, can lead to life-threatening situations, even quite some time after the plug has been unplugged.
This microwave oven was presented to me for repair. After years of faithful service, the unit had completely failed. My brother-in-law discovered that the main fuse in the unit had blown and replaced it, but the new fuse had a particularly short life.
A microwave tube needs high voltage to function. Some microwaves generate this high voltage (about 8000V) by means of a large transformer. This microwave, however, does so in a different way, namely by means of a so-called "inverter," a circuit board equipped with a relatively small transformer, and several switching semiconductors. My brother-in-law discovered that the fuse no longer blew when he disconnected the inverter board.
O que você precisa
-
-
Disassemble the microwave until you get open access to its back.
-
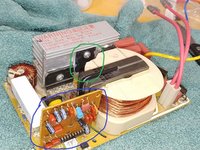
The picture shows the back of the microwave, with the inverter circled in red...
-
...and the microwave tube circled in green.
-
-
-
Unscrew the inverter board (the one with a heat sink) in order to access the IGBTs.
-
There are two IGBTs (Insulated Gate Bipolar Transistor) on this board that are likely to fail. These electronic components switch high voltages, and large currents, at a rapid rate, so they are subject to wear and tear. The IGBTs are bolted to a hefty heat sink.
-
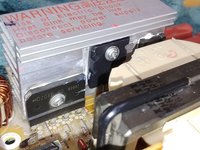
This picture shows the inverter board with heat sink.
-
There are 3 components attached to the heatsink: a bridge cell on the left, an IGBT GT60N321 in the middle and another type of IGBT (GT30J322) on the right (not visible in the photo).
-
-
-
Ferramenta utilizada neste passo:Digital Multimeter$19.99
-
Measuring with a multimeter in the 'diode' mode revealed that the left IGBT (the GT60N321) had indeed yielded its spirit: there was little resistance between collector and emitter.
-
To be sure that this was not a side effect of the surrounding electronics, I desoldered the IGBT pins from the PCB using a desoldering pump, and then measured again. The IGBT was indeed found to be defective.
-
-
-
Now the defective IGBT had to be removed, but the transformer on the PCB blocked handling a screwdriver. The transformer was soldered at several points, it seemed rather laborious to disassemble it.
-
So I went for the more convenient solution: I nibbled off some of the plastic of the transformer with pliers, after which I could just reach the screw of the IGBT with a small flathead screwdriver.
-
In the green circle the defective component, and the partially nibbled away plastic.
-
In the blue "circle" the microcontroller board, which controls the other electronics on the board.
-
The second picture shows a close-up of the result of this questionable practice.
-
-
-
With this kind of repair it is recommended to replace all wear-sensitive electronic components while you are at it. Think of bridge cell, both IGBTs, and the two high voltage diodes.
-
Components are available on AliExpress at extremely reasonable prices. However. There was some urgency for this repair, so I ordered only the IGBT from a Dutch webshop (MartoParts). I was pleasantly surprised by the low shipping costs and fast delivery time.
-
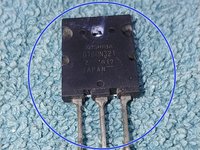
The picture shows the defective IGBT, no damage was visible to the naked eye.
-
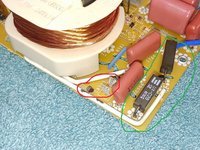
The second picture shows the two high voltage diodes, circled in green,
-
and some waterproof marker markings, made by me, circled in red.
-
-
Ferramenta utilizada neste passo:iFixit Thermal Paste$21.99
-
I received the IGBT, applied cooling paste to the heatsink, carefully screwed the IGBT in place and soldered the pins to the PCB.
-
Then, just to be sure, since there seemed to be some sort of film over the solder side of the PCB, I applied clear nail polish over the solder, to prevent arcing (moisture, high voltages).
-


Now, reassemble your microwave, and you'll find it fixed! - Worked for me.
Service manual: https://www.circuitsonline.net/forum/fil...
Discussion: https://www.circuitsonline.net/forum/vie...
datasheet GT60N321: https://toshiba.semicon-storage.com/info...
datasheet GT30J322: https://datasheetspdf.com/pdf-file/86037...
