Ir para o conteúdo principal

Casio CZ-1000 Display Screen Replacement

O que você precisa

  1. Casio CZ-1000 Display Screen Replacement, Backplate: passo 1, imagem 1 %32 Casio CZ-1000 Display Screen Replacement, Backplate: passo 1, imagem 2 %32
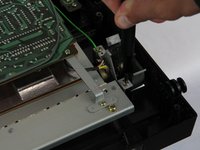
    • Use a Phillips #1 screwdriver to remove the eleven 7.5 mm screws securing the back plate.

  2. Casio CZ-1000 Display Screen Replacement: passo 2, imagem 1 %32 Casio CZ-1000 Display Screen Replacement: passo 2, imagem 2 %32 Casio CZ-1000 Display Screen Replacement: passo 2, imagem 3 %32
    • Using a Phillips #1 screwdriver, remove all 14 5.5 mm screws from the two motherboards.

    • These screws secure the motherboards to the keyboard assembly and the dial on the right side.

  3. Casio CZ-1000 Display Screen Replacement: passo 3, imagem 1 %32 Casio CZ-1000 Display Screen Replacement: passo 3, imagem 2 %32 Casio CZ-1000 Display Screen Replacement: passo 3, imagem 3 %32
    • Carefully cut the zip tie located in the right-hand corner using a pair of scissors or wire cutters.

    • Be sure to avoid cutting any nearby wires or components.

    • Gently slide all the plugs out of their sockets.

    • This will prevent them from catching on anything or damaging the connectors as you lift.

  4. Casio CZ-1000 Display Screen Replacement, Display Screen: passo 4, imagem 1 %32 Casio CZ-1000 Display Screen Replacement, Display Screen: passo 4, imagem 2 %32
    • Pull out the orange 24 pin connector.

    • Pull on the orange plastic piece and not the wires. Pulling on the wires can potentially damage the device.

  5. Casio CZ-1000 Display Screen Replacement: passo 5, imagem 1 %32 Casio CZ-1000 Display Screen Replacement: passo 5, imagem 2 %32
    • Remove the four 7.5 mm screws that are holding down the metal sheets using a Phillips #1 screwdriver.

    • Set the sheet to the side for now.

  6. Casio CZ-1000 Display Screen Replacement: passo 6, imagem 1 %32 Casio CZ-1000 Display Screen Replacement: passo 6, imagem 2 %32 Casio CZ-1000 Display Screen Replacement: passo 6, imagem 3 %32
    • Remove the four 5.5 mm screws from the corners of the display screen using a Phillips #1 screwdriver.

    • Lift the side of the display screen that is closer to you and then pull out the screen.

Conclusão

To reassemble your device, follow these instructions in reverse order.

Ayman Benbrahim

Membro desde: 10/24/24

97 Reputação

Autoria de 1 guia

Equipe

Cuesta, Team 60-3, Krynen Fall 2024 Membro de Cuesta, Team 60-3, Krynen Fall 2024

CUESTA-KRYNEN-F24S60G3

Membros da 4

Autoria de 5 guias

0 comentários

Adicione um comentário

Exibir estatísticas:

Últimas 24 horas: 0

Últimos 7 dias: 0

Últimos 30 dias: 2

Duração total: 33