Ir para o conteúdo principal

Carrera Mario Copter Motor Replacement

O que você precisa

  1. Carrera Mario Copter Motor Replacement, Battery: passo 1, imagem 1 %32
    • Flip the quadrocopter over so that the underside of the device is facing up.

    • Unplug the battery cable from the socket on the quadrocopter.

  2. Carrera Mario Copter Motor Replacement: passo 2, imagem 1 %32
    • Push the battery upward with your thumbs to loosen it from the tight slot until your thumbs can not reach the bottom of the battery anymore.

  3. Carrera Mario Copter Motor Replacement: passo 3, imagem 1 %32
    • Pull the battery away from the slot to remove it.

  4. Carrera Mario Copter Motor Replacement, Rotor Blade: passo 4, imagem 1 %32
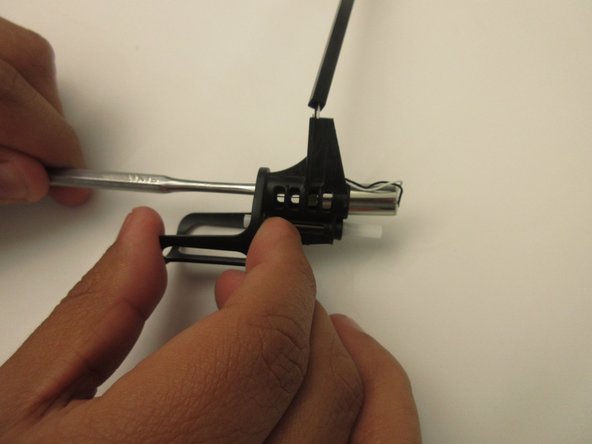
    • Using the JIS #00 screwdriver, hold the rotor blade still and unscrew the 4.762mm screw in the center of the blade.

  5. Carrera Mario Copter Motor Replacement: passo 5, imagem 1 %32
    • Lift the screw out and set it aside.

    • Lift the rotor blade out.

    • Be sure to place the rotor blades properly for stable flight. With the quadrocopter facing you, the front rotor blades should be red with blade A on the right and B on the left. The rear rotor blades should be blue with blade B on the right and A on the left.

  6. Carrera Mario Copter Motor Replacement, Motor: passo 6, imagem 1 %32
    • With the PH1 screwdriver, unscrew the four 7.1mm screws located underneath the quadrocopter.

    • Pull the base out and set the foam piece aside

  7. Carrera Mario Copter Motor Replacement: passo 7, imagem 1 %32
    • From the precision tweezers set, use the round-end tweezers to pull and wiggle the white-head wires from the motherboard.

    • Be sure to pull from the connector. Otherwise you run the risk of slicing through the wires.

  8. Carrera Mario Copter Motor Replacement: passo 8, imagem 1 %32 Carrera Mario Copter Motor Replacement: passo 8, imagem 2 %32
    • Using the PH0 screwdriver, unscrew the 3.2 mm screw on the base.

    • While all four locations are shown, you will only have to remove the screw/s corresponding to the motor/s you are replacing.

    • Pull the rotor leg out from the base

  9. Carrera Mario Copter Motor Replacement: passo 9, imagem 1 %32 Carrera Mario Copter Motor Replacement: passo 9, imagem 2 %32
    • Using the PH0 screwdriver, unscrew the 4 mm screw where the leg meets the motor case/ rotor stand.

    • Pull the leg apart from the motor case/ rotor stand

  10. Carrera Mario Copter Motor Replacement: passo 10, imagem 1 %32 Carrera Mario Copter Motor Replacement: passo 10, imagem 2 %32
    • Using the metal spudger of your choice, remove the clip at the top of the motor.

    • Use the thinner side of the spudger to push the motor through and out of the case.

  11. Carrera Mario Copter Motor Replacement: passo 11, imagem 1 %32
    • Cut the connection head off and pull the wiring out of the leg.

Conclusão

To reassemble your device, follow these instructions in reverse order.

Edgar Lopez-Allende

Membro desde: 10/20/17

207 Reputação

Autoria de 2 guias

Equipe

UW Tacoma, Team S1-G6, Rose Fall 2017 Membro de UW Tacoma, Team S1-G6, Rose Fall 2017

UWT-ROSE-F17S1G6

Membros da 4

Autoria de 10 guias

0 comentários

Adicione um comentário

Exibir estatísticas:

Últimas 24 horas: 0

Últimos 7 dias: 1

Últimos 30 dias: 7

Duração total: 427